AMP Module Installation for OpenCart 3.0
INSTRUCTION AMP MODULE FOR OPENCART 3.0
Download and install
Download the plugin archive from the Shop Pinta store and save it on your computer.
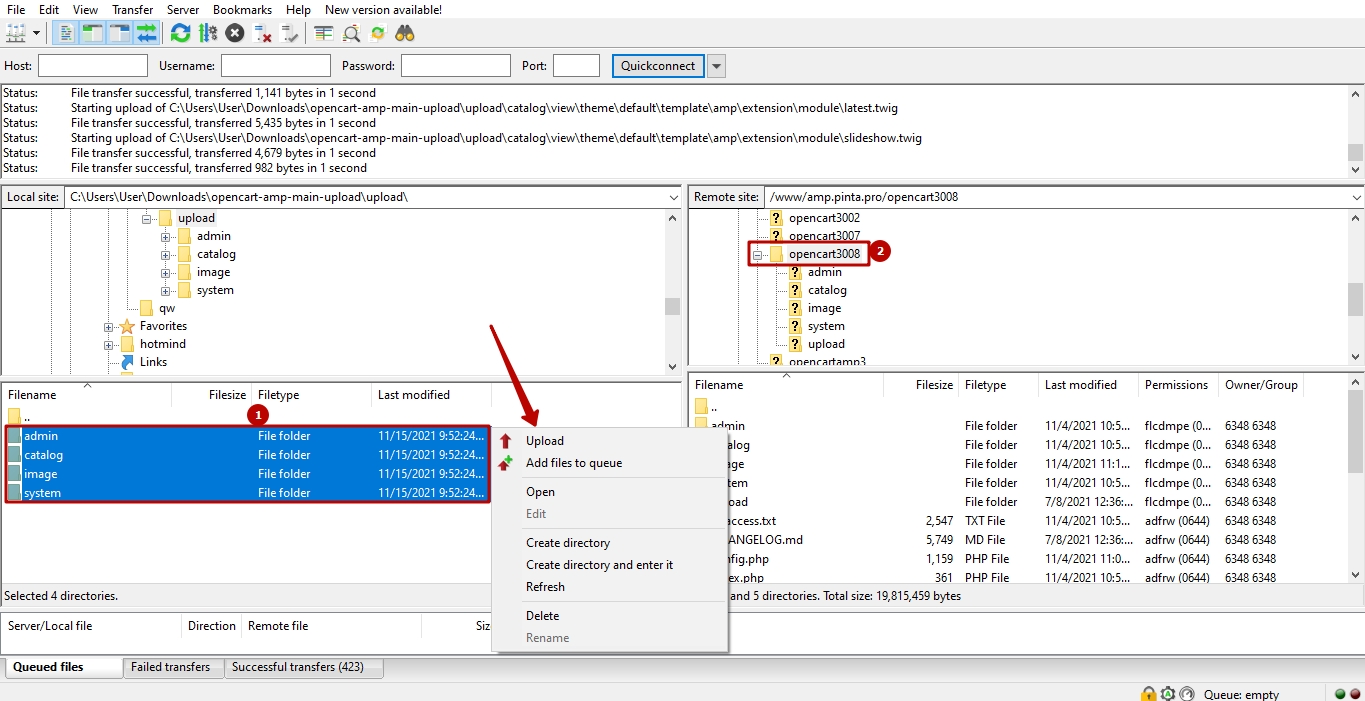
Connect via FTP to your website, and copy the contents of the upload folder (1) to the root of the website folder (2).
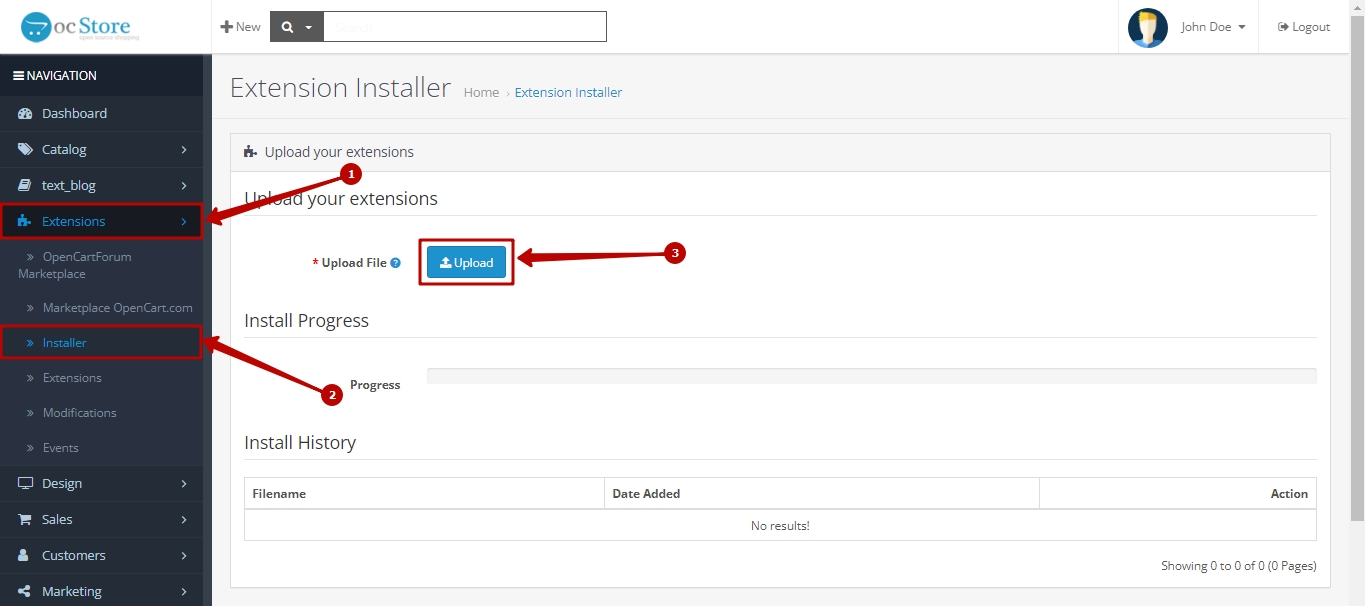
In the admin panel of your website, select Extensions (1) > Installer (2). Next, click the Upload button (3).
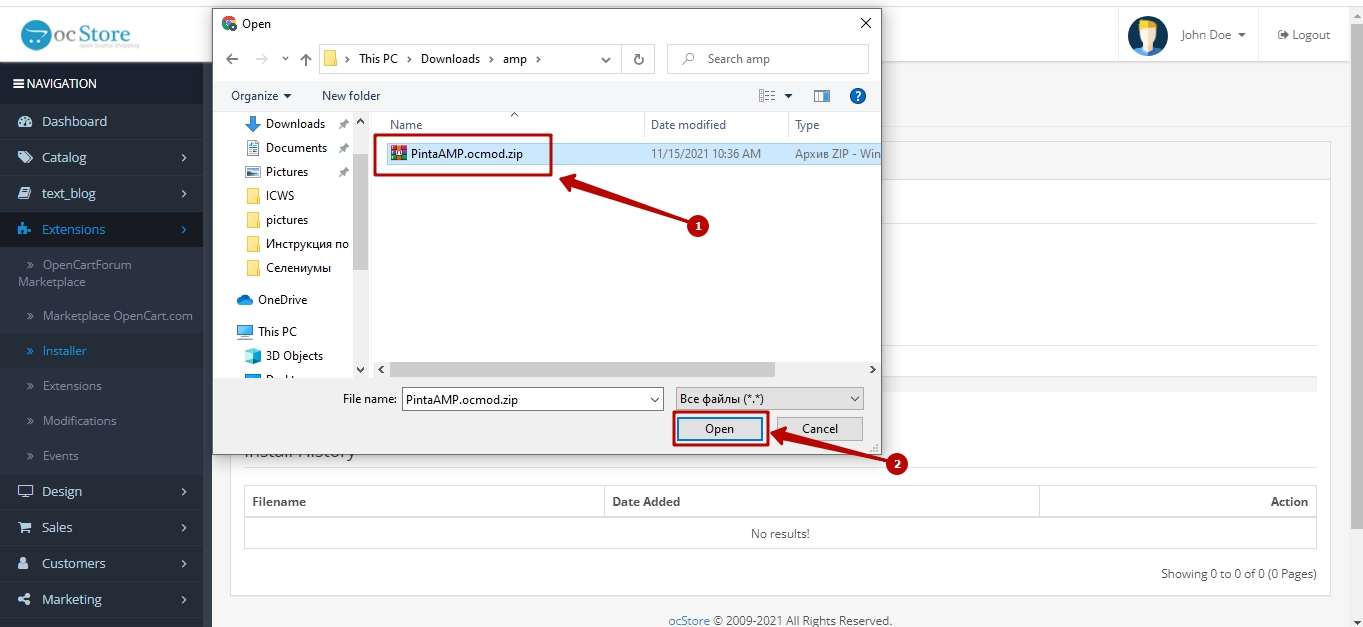
In the opened window, select the plugin archive (1) and click the Open button (2).
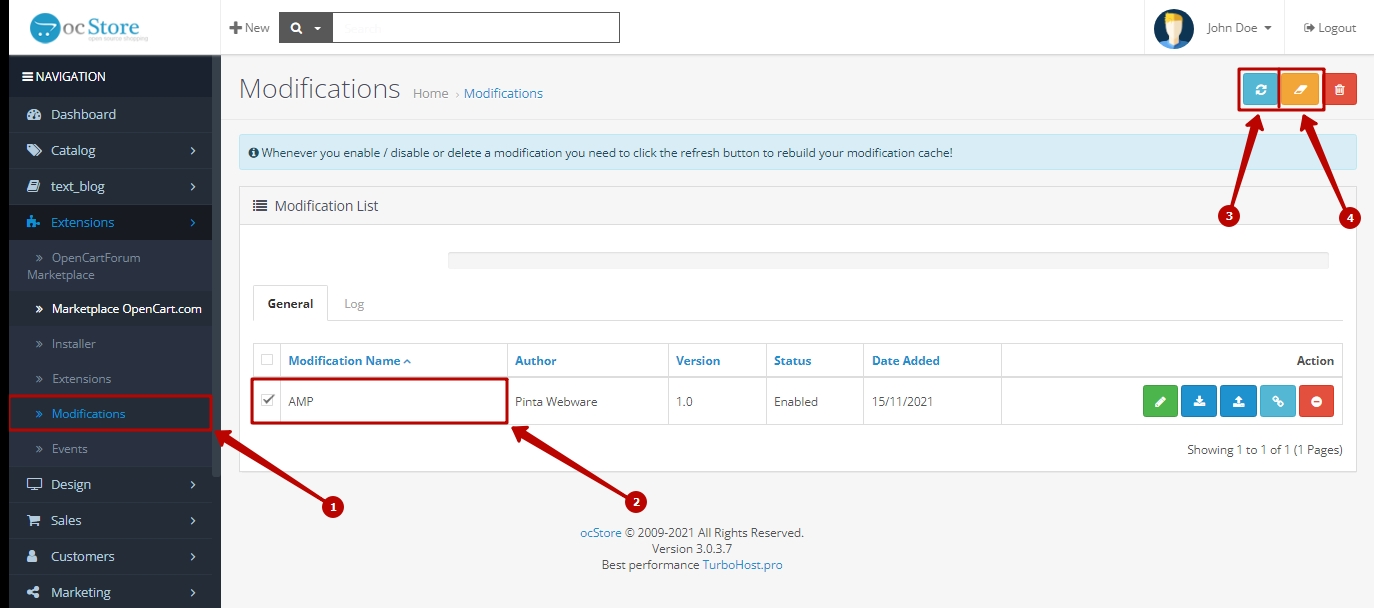
Clear the cache (recommended). Go to the Modifications subcategory (1), select the plugin checkbox (2), click the Clear (3) and Refresh (4) buttons.
Go to the Extensions subcategory (1) and in the Extension List select Modules (2).
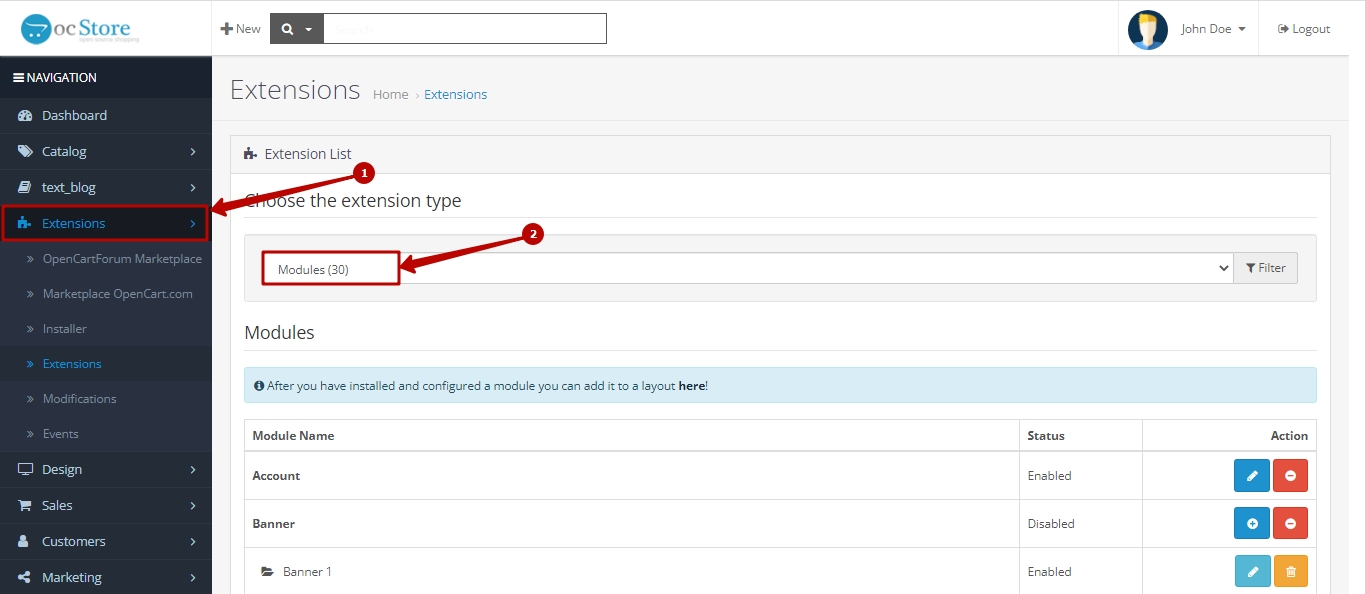
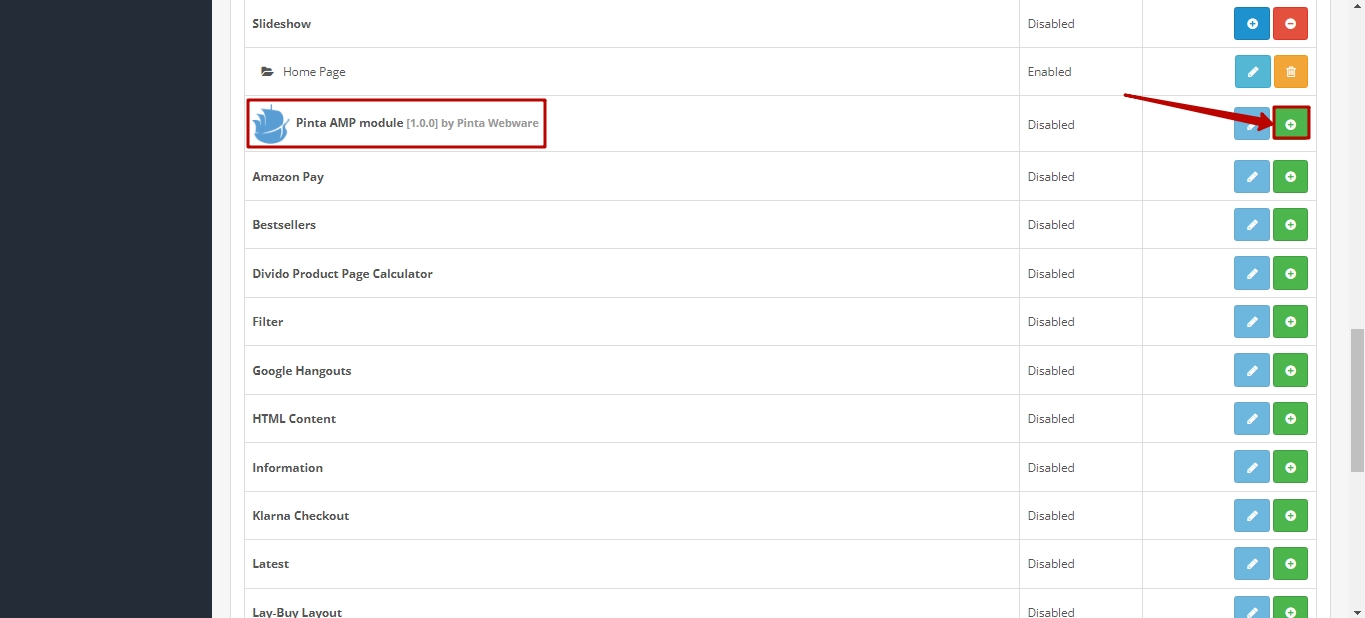
Find the Pinta AMP module and click the Install button.
To configure the plugin, click the Edit button.

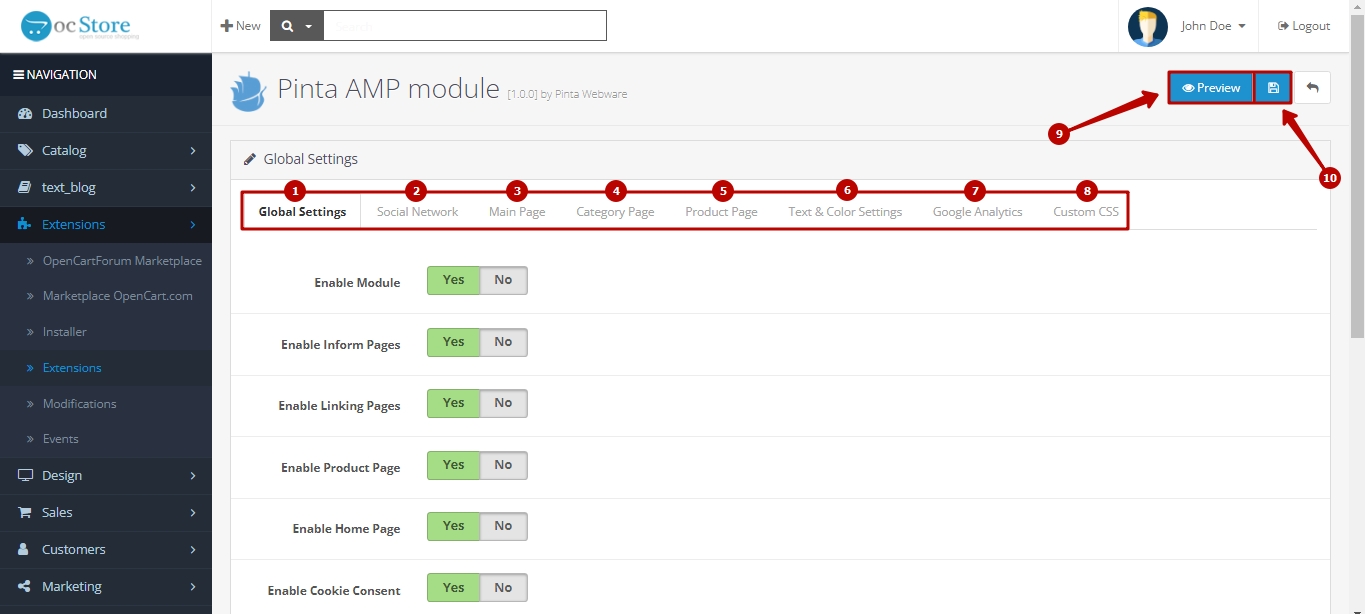
Plugin page
The plugin page consists of:
The Global Settings tab.
The Social Network tab.
The Main Page tab.
The Category Page tab.
The Product Page tab.
The Text & Color Settings tab.
The Google Analytics tab.
The Custom CSS tab.
The Preview button - to preview the generated amp-pages of your website.
The Save button - to save plugin settings.
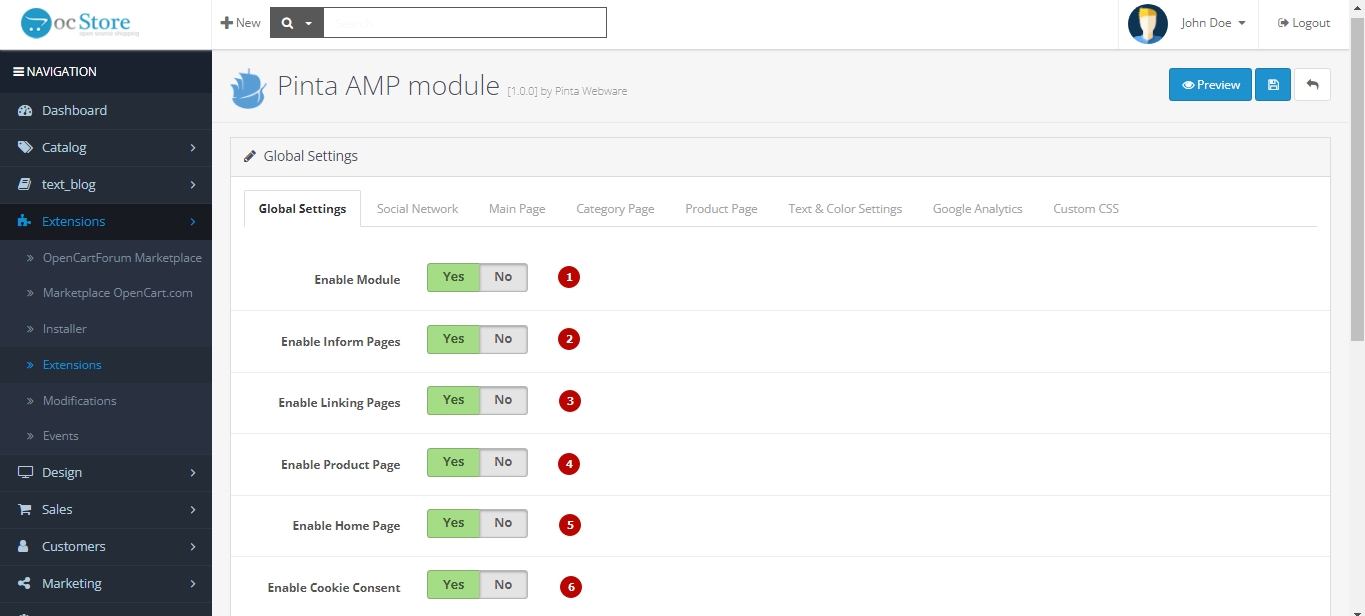
The Global Settings tab contains:
The Enable Module button - to enable / disable the applying of amp-technology to your website pages (position Yes / No);
The Enable Inform Pages button - to enable / disable the displaying of amp-version of information pages (position Yes / No);
The Enable Linking Pages button - to enable / disable the displaying of amp-version of linking pages such as Search, Product Category (position Yes / No);
The Enable Product Page button - to enable / disable the displaying of amp-version of product pages (position Yes / No);
The Enable Home Page button - to enable / disable the displaying of amp-version of the Home Page (position Yes / No);
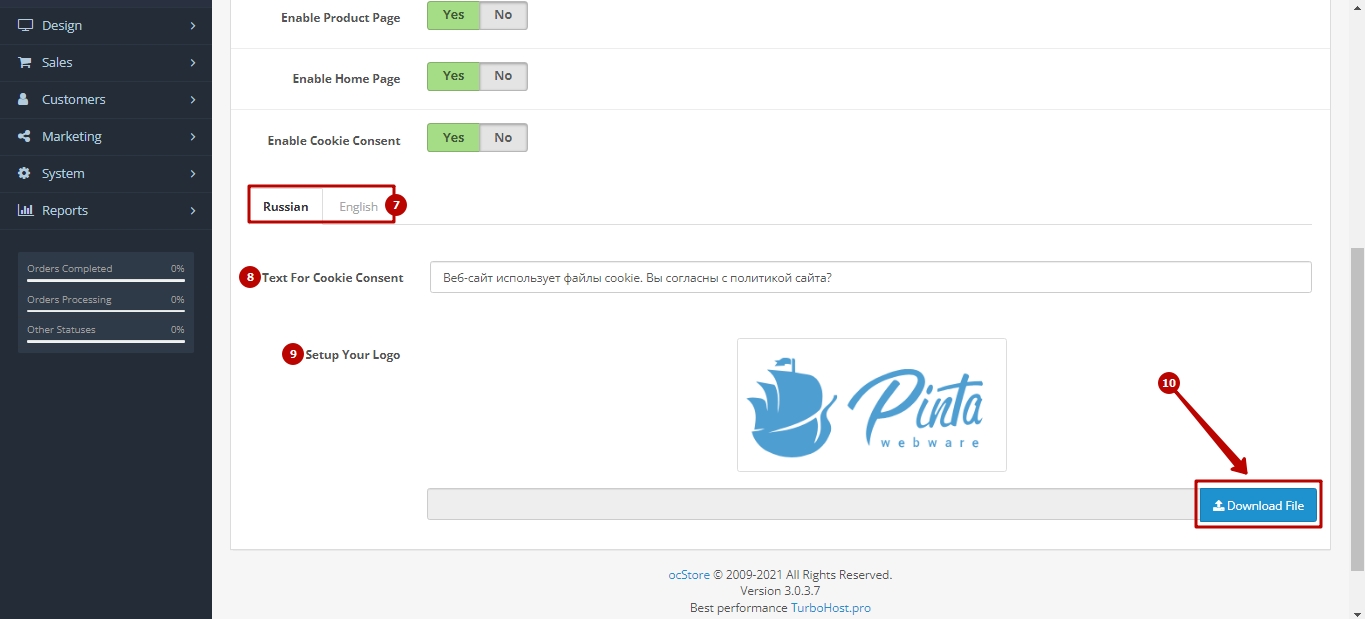
The Enable Cookie Consent button - to enable / disable the displaying of the amp-version of the "Cookie Consent" panel (position Yes / No);
Selection tabs of the text language for the "Cookie Consent" panel, depending on the language used on your website;
The Text For Cookie Consent field - to enter the text of the "Cookie Consent" panel;
The Setup Your Logo block allows adds the image of the website logo;
The Download File button - to download the logo image from your computer.
After selecting the settings, click the Save button.
The Social Network tab contains:
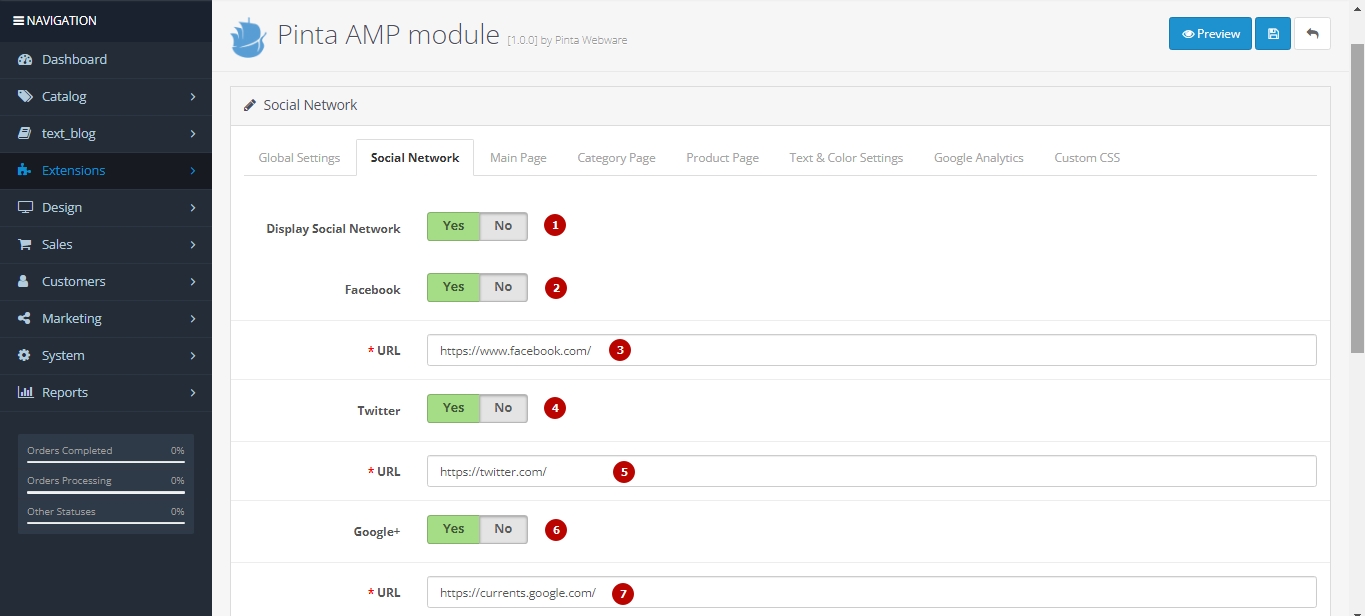
The Display Social Network button - to enable / disable the display of your social networks and contacts in the website menu (position Yes / No);
The Facebook button - to enable / disable the displaying of the redirect button on Facebook (position Yes / No);
The URL field - to enter the Facebook page URL;
The Twitter button - to enable / disable the displaying of the redirect button on Twitter (position Yes / No);
The URL field - to enter the Twitter page URL;
The Google+ button - to enable / disable the displaying of the redirect button on Google+ (position Yes / No);
The URL field - to enter the Google+ page URL;
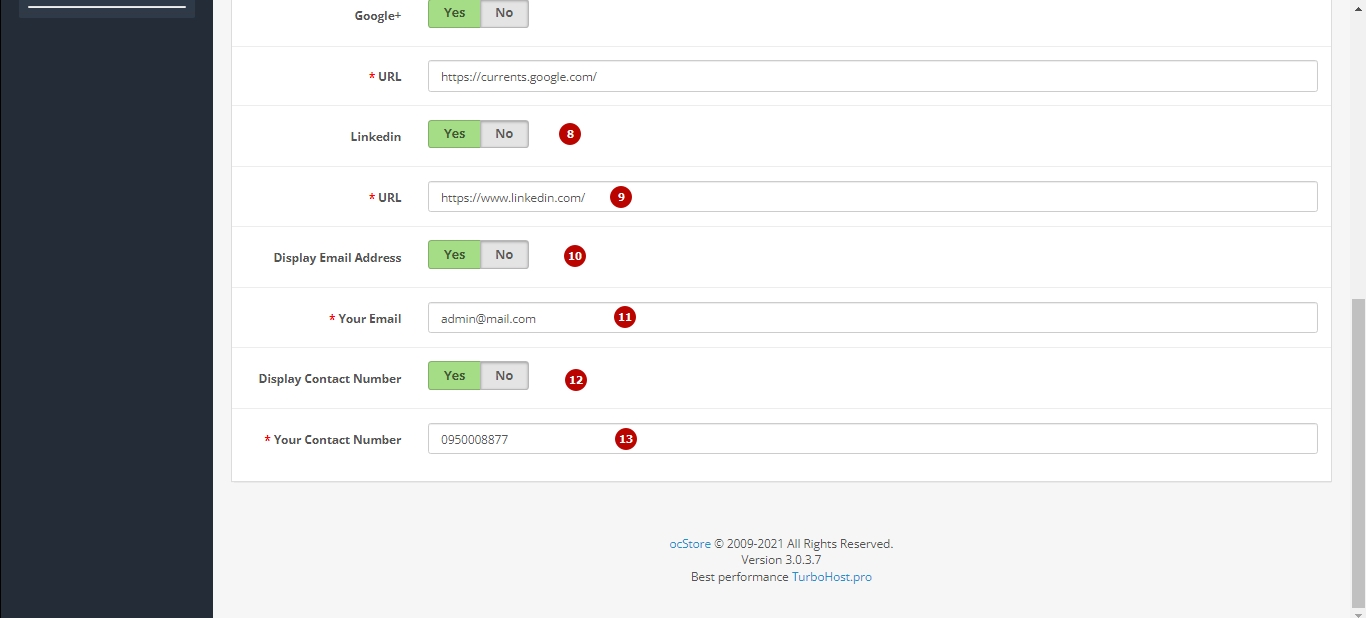
The Linkedin button - to enable / disable the displaying of the redirect button on Linkedin (position Yes / No);
The URL field - to enter the Linkedin page URL;
The Display Email Address button - to enable / disable the displaying of your e-mail (position Yes / No);
The Your Email field - to enter your e-mail;
The Display Contact Number button - to enable / disable the displaying of your phone number (position Yes / No);
The Your Contact Number field - to add your phone number.
After selecting the settings, click the Save button.
The Main Page tab allows you to edit the elements for the amp-version of the main page and contains:
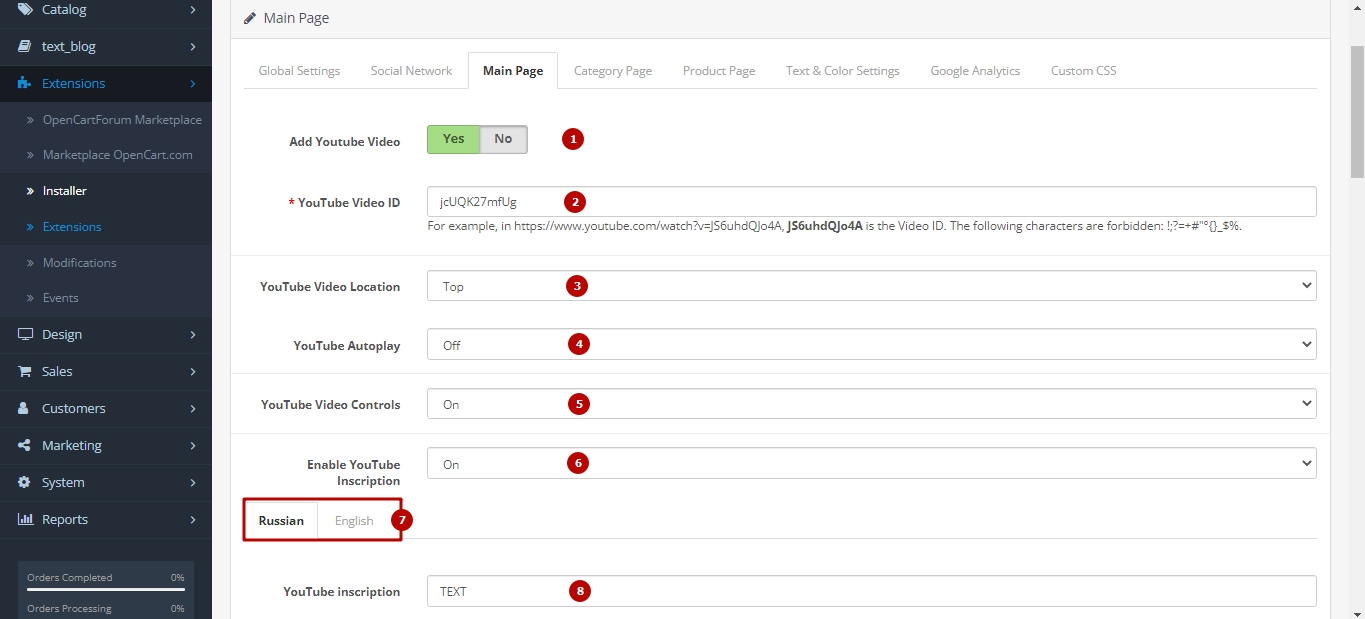
The Add Youtube Video button - to enable / disable the displaying of the Youtube video block (position Yes / No);
The YouTube Video ID field - to add the Youtube Video ID;
The YouTube Video Location field - to select where the Youtube video block is displayed (position Top / Bottom);
The YouTube Autoplay field - to enable / disable automatic video playback (position On / Off);
The YouTube Video Controls field - to enable / disable user video control (position On / Off);
The Enable YouTube Inscription field - to enable / disable the displaying of the text in the Youtube video block (position On / Off);
Selection tabs of the text language for the Youtube video block, depending on the language used on your website;
The YouTube inscription field - to enter text for the Youtube video block;
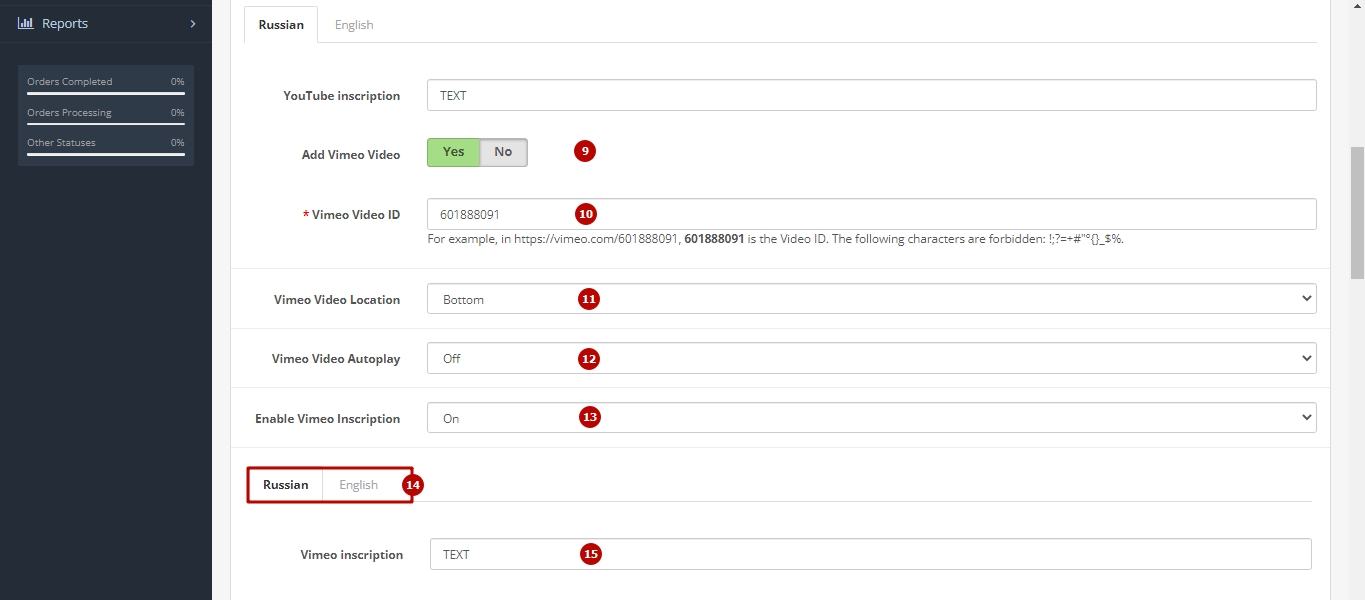
The Add Vimeo Video button - to enable / disable the displaying of the Vimeo video block (position Yes / No);
The Vimeo Video ID field - to add the Vimeo Video ID;
The Vimeo Video Location field - to select where the Vimeo video block is displayed (position Top / Bottom)
The Vimeo Video Autoplay field - to enable / disable automatic video playback (position On / Off);
The Enable Vimeo Inscription field - to enable / disable the displaying of the text in the Vimeo video block (position On / Off);
Selection tabs of the text language for the Vimeo video block, depending on the language used on your website;
The Vimeo inscription field - to enter text for the Vimeo video block;
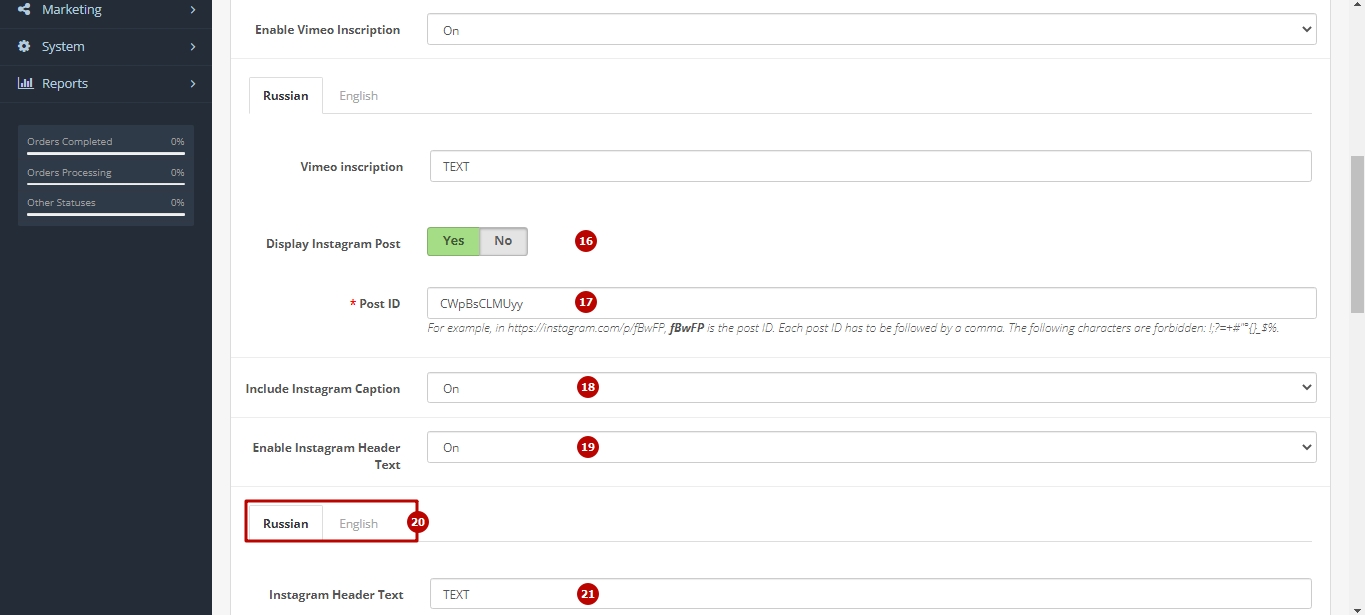
The Display Instagram Post button - to enable / disable the displaying of the Instagram post block (position Yes / No);
The Post ID field - to add the Instagram post ID;
The Include Instagram Caption field - to enable / disable the displaying of the Instagram post in real size (position On / Off);
The Enable Instagram Header Text field - to enable / disable the displaying of the text in the Instagram post block (position On / Off);
Selection tabs of the text language for the Instagram post block, depending on the language used on your website;
The Instagram Header Text field - to enter text for the Instagram post block;
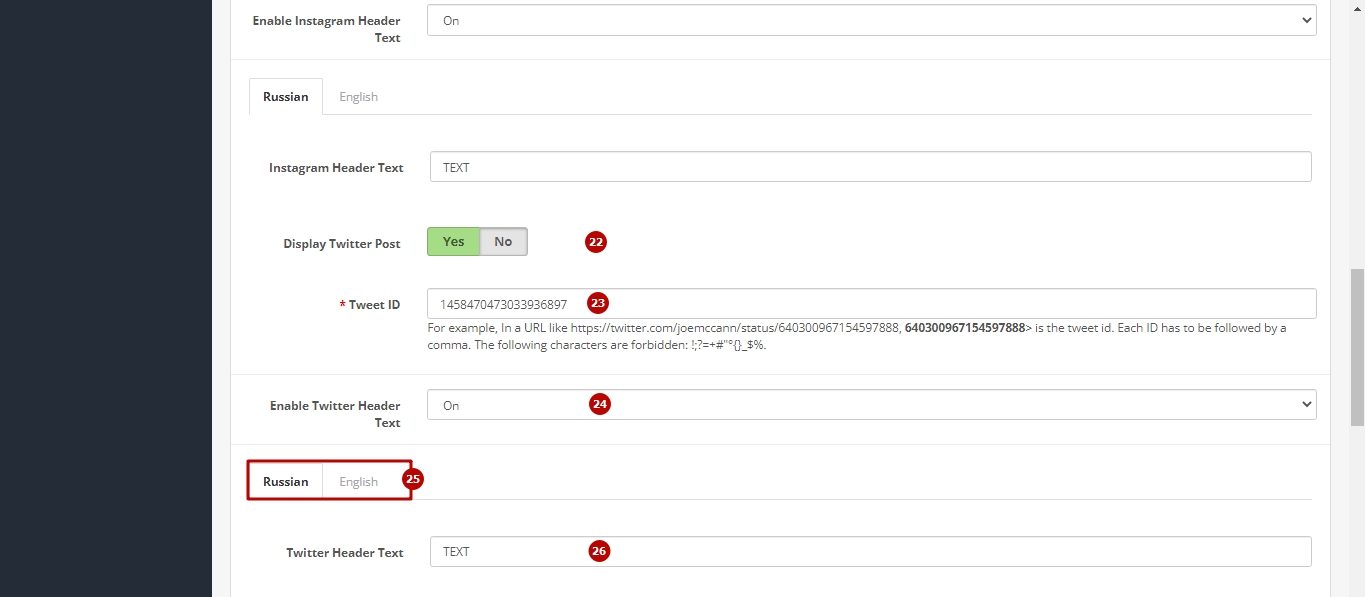
The Display Twitter Post button - to enable / disable the displaying of the Twitter post block (position Yes / No);
The Tweet ID field - to add the Twitter post ID;
The Enable Twitter Header Text field - to enable / disable the displaying of the text in the Twitter post block (position On / Off);
Selection tabs of the text language for the Twitter post block, depending on the language used on your website;
The Twitter Header Text field - to enter text for the Twitter post block;
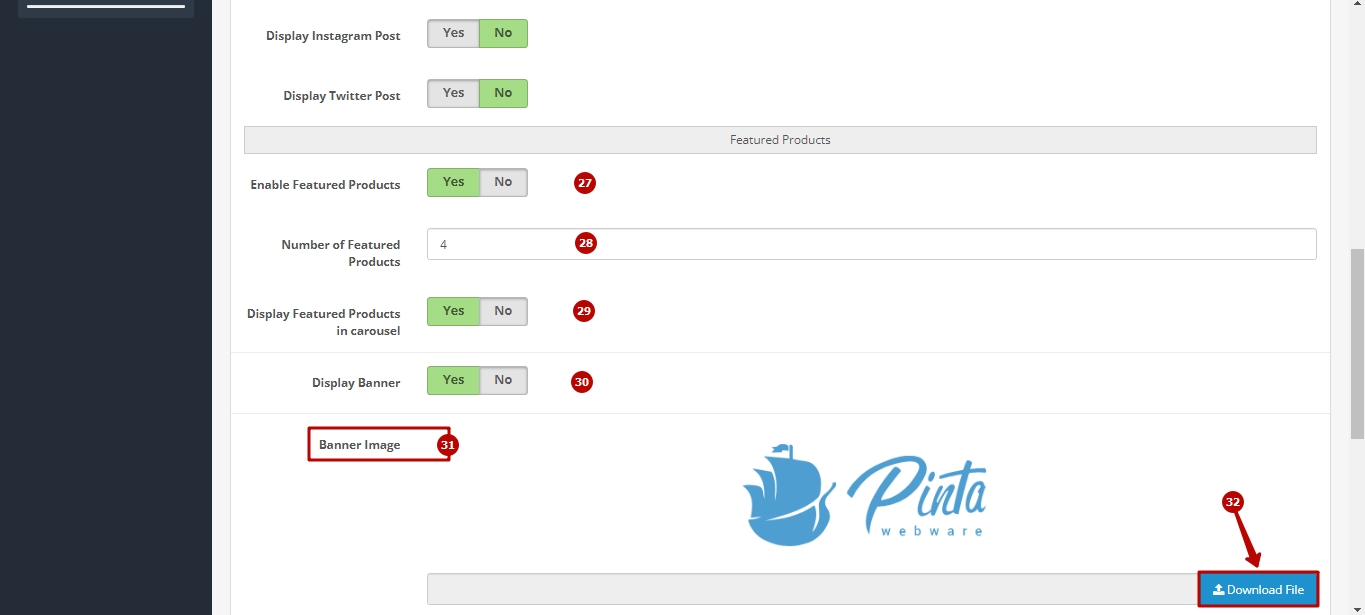
The Enable Featured Products button - to enable / disable the displaying of the featured products block (position Yes / No);
The Number of Featured Products field - to select the number of displayed products in the featured products block;
The Display Featured Products in carousel button - to enable / disable the displaying of the featured products block as a carousel (position Yes / No);
The Display Banner button - to enable / disable the displaying of the banner block (position Yes / No);
The Banner Image block allows you to add the banner image;
The Download File button - to download the banner image from your computer;
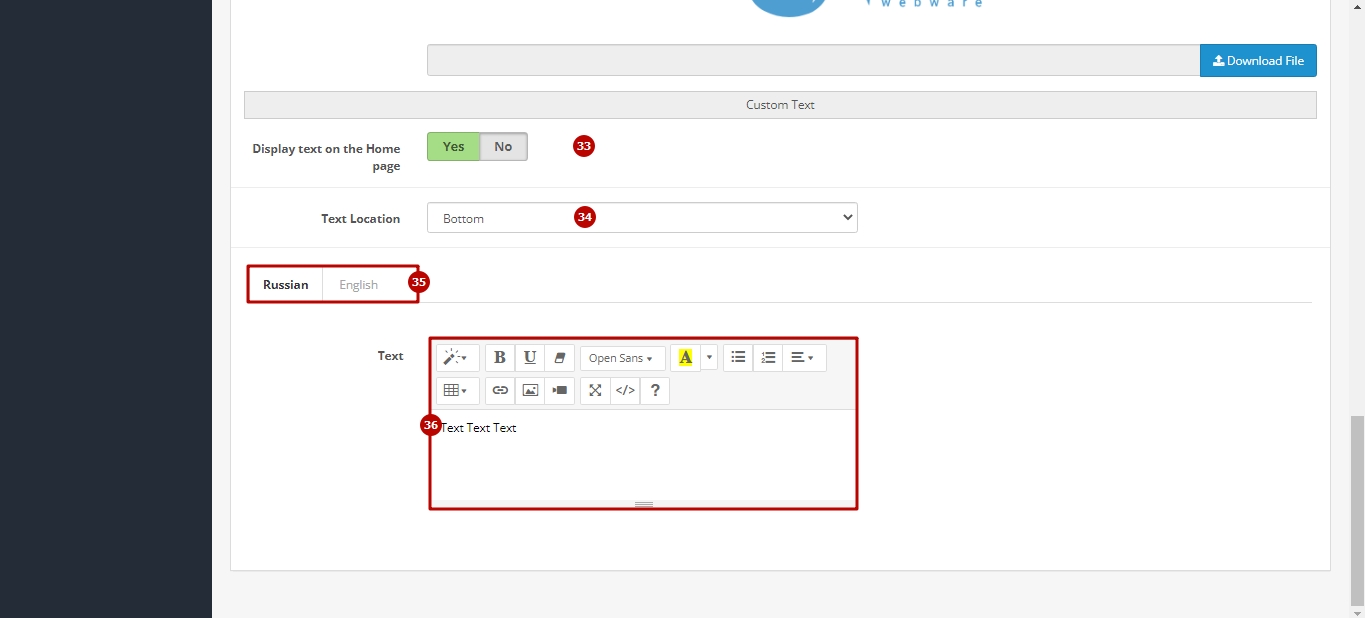
The Display text on the Home page button - to enable / disable the displaying of the description block on the home page (position Yes / No);
The Text Location field - to select where the description block is displayed on the home page (position Top / Bottom);
Selection tabs of the text language displayed on the home page, depending on the language used on your website;
The Text field - to enter the text displayed on the home page.
After selecting the settings, click the Save button.
The Category Page tab allows you to edit the elements for the amp-version of the category page and contains:
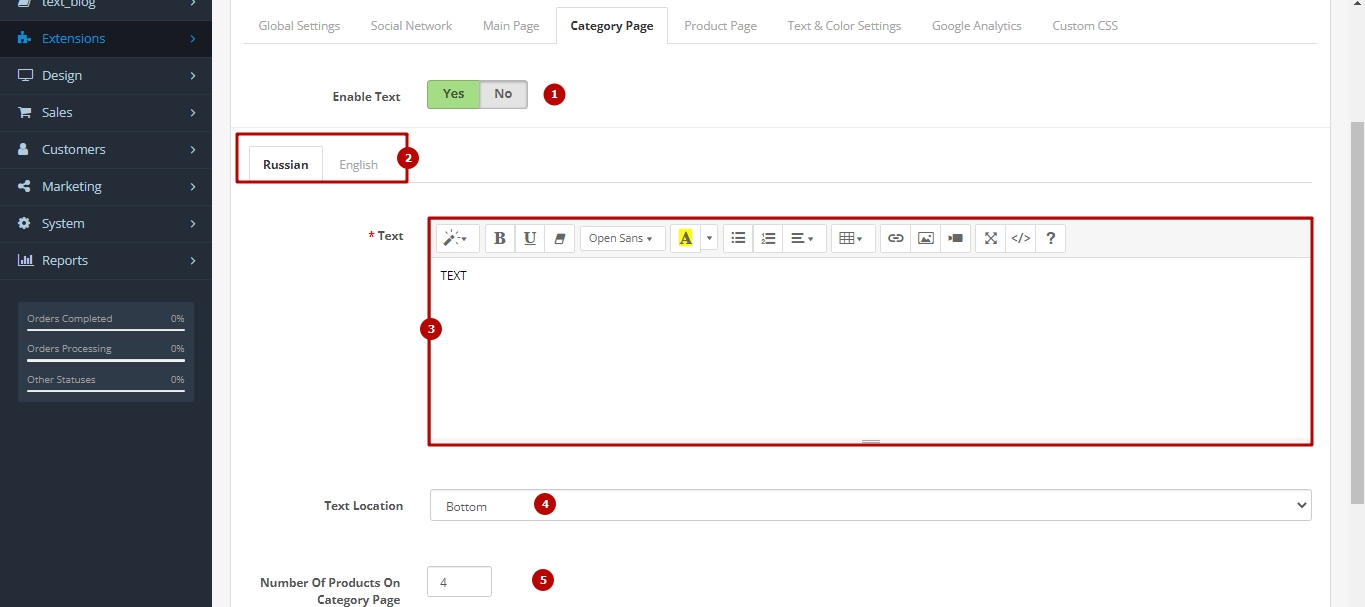
The Enable Text button - to enable / disable the displaying of the description block on the category page (position Yes / No);
Selection tabs of the text language displayed on the category page, depending on the language used on your website;
The Text field - to enter the text displayed on the category page;
The Text Location field - to select where the description block is displayed on the category page (position Top / Bottom);
The Number Of Products On Category Page field - to select the number of displayed products on the category page.
After selecting the settings, click the Save button.
The Product Page tab allows you to edit the elements for the amp-version of the product page and contains:
The Enable Text button - to enable / disable the displaying of the description block on the product page (position Yes / No);
Selection tabs of the text language displayed on the product page, depending on the language used on your website;
The Text field - to enter the text displayed on the product page;
The Text Location field - to select where the description block is displayed on the product page (position Top / Bottom);
The Display Related Products button - to enable / disable the displaying of the related products block on the product page (position Yes / No);
The Product Description button - to enable / disable the displaying of the product description (position Yes / No).
After selecting the settings, click the Save button.

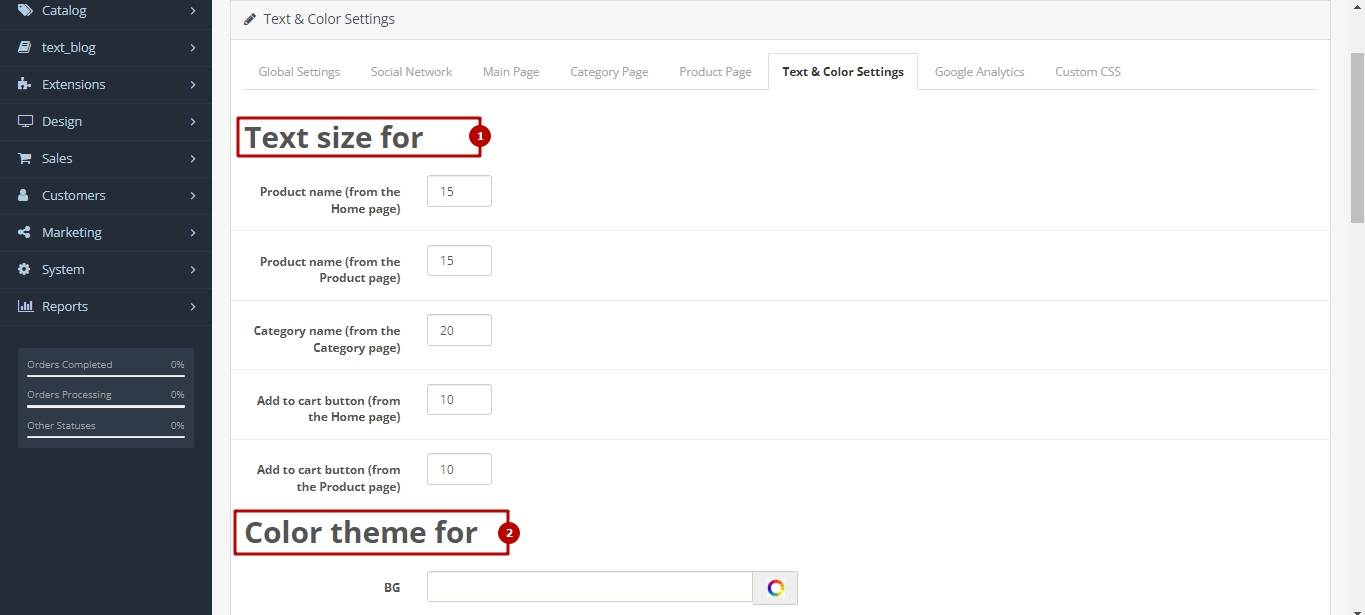
The Text & Color Settings tab allows you to edit the design for the amp-version of your website pages and contains:
The Text size for block - to change the font size of the main text;
The Color theme for block - to select the element colors of various pages.
After selecting the settings, click the Save button.
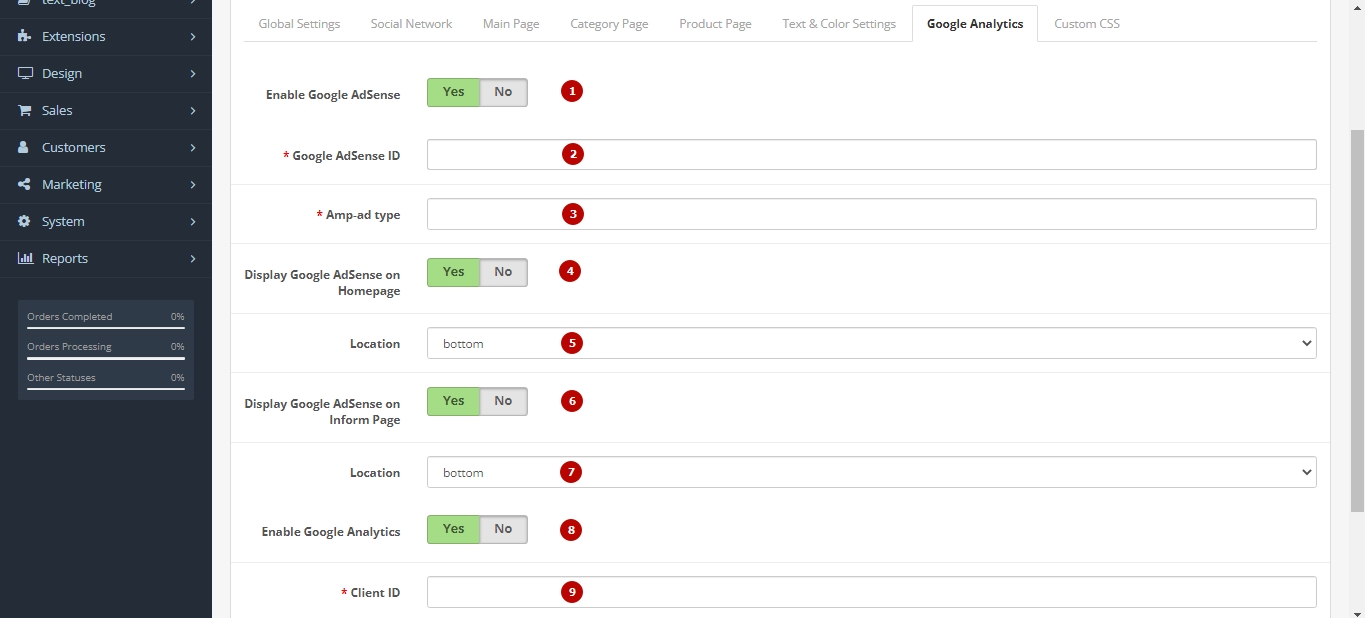
The Google Analytics tab allows you to use Google services and contains:
The Enable Google AdSense button - to enable / disable the displaying of the advertising block (position Yes / No);
The Google AdSense ID field - to enter your Google Adsense ID;
The Amp-ad type field - to select the type of the advertising block template;
The Display Google Adsense on Homepage button - to enable / disable the displaying of the advertising block on the home page (position Yes / No);
The Location button - to select where the advertising block is displayed on the home page (position top / bottom);
The Display Google AdSense on Inform Page button - to enable / disable the displaying of the advertising block on the information page (position Yes / No);
The Location button - to select where the advertising block is displayed on the information page (position top / bottom);
The Enable Google Analytics button - to enable / disable the applying of Google Analytics (position Yes / No);
The Client ID field - to enter your Google Analytics ID.
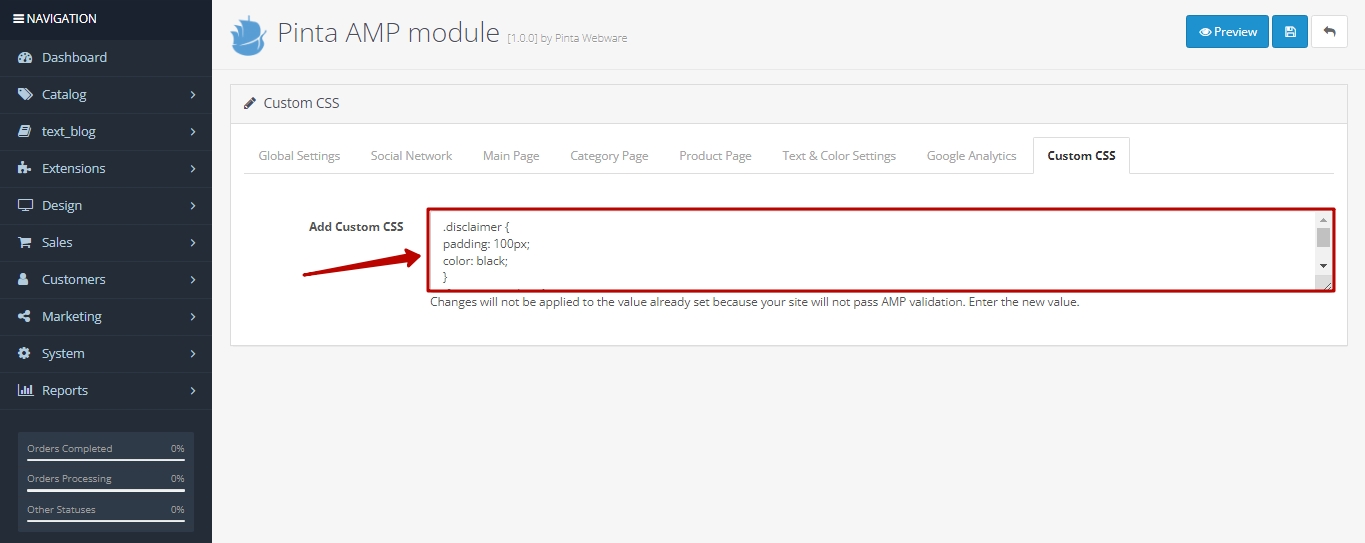
The Custom CSS tab allows you to add additional CSS styles for the amp-version of your website pages in the Add Custom CSS field.
After selecting the settings, click the Save button.
An example of displaying the amp-version of the website pages:
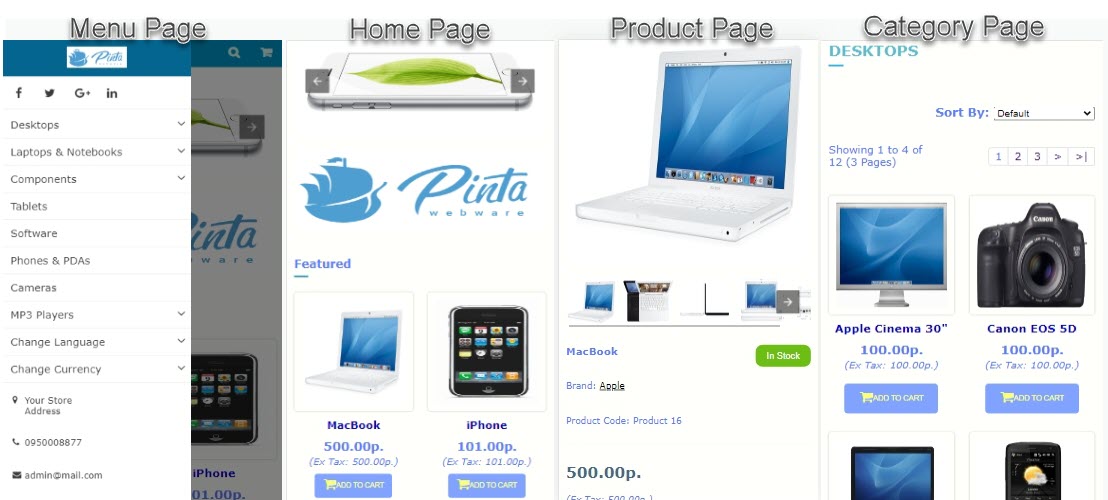
Use an AMP validator to check your website pages for AMP requirements. With it, you can automatically check the amp-version of all pages that you visit.
VIDEO INSTRUCTION