AMP Module Installation for PrestaShop 1.7
Download and install
Download the plugin archive from the Shop Pinta store and save it on your computer.
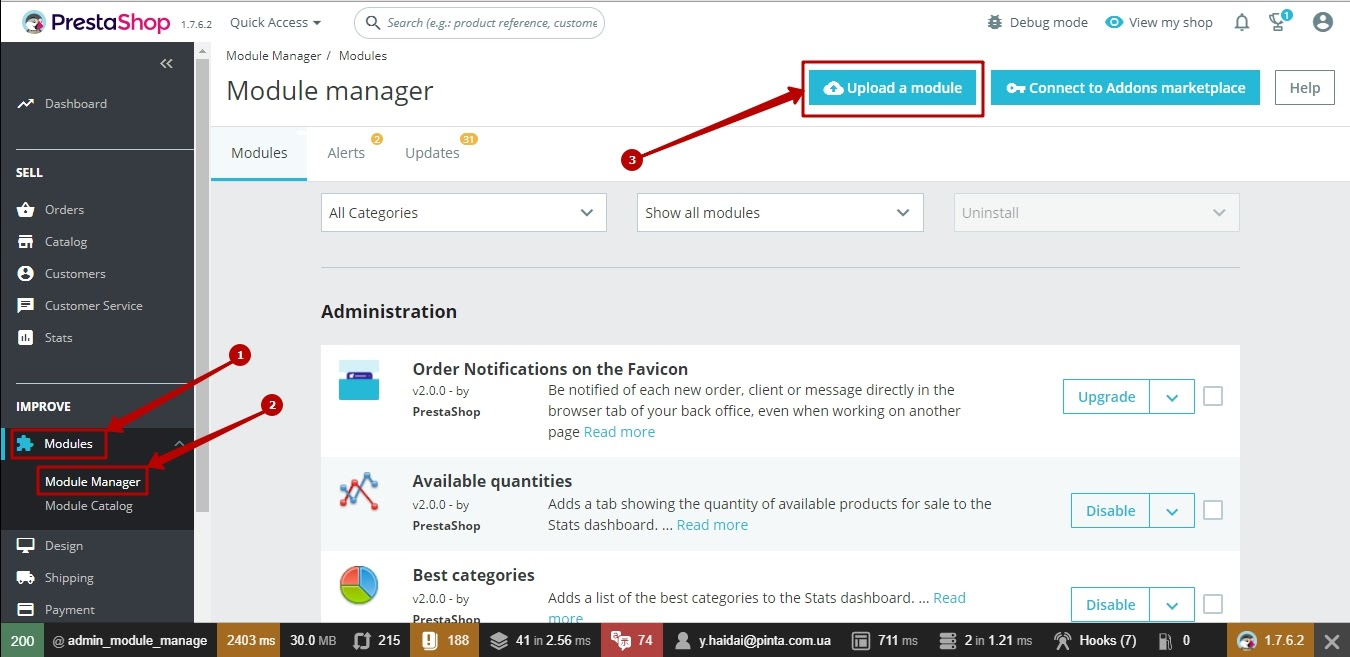
In the admin panel of your website, select Modules (1) > Module Manager (2).
Сlick the Upload a module button (3).
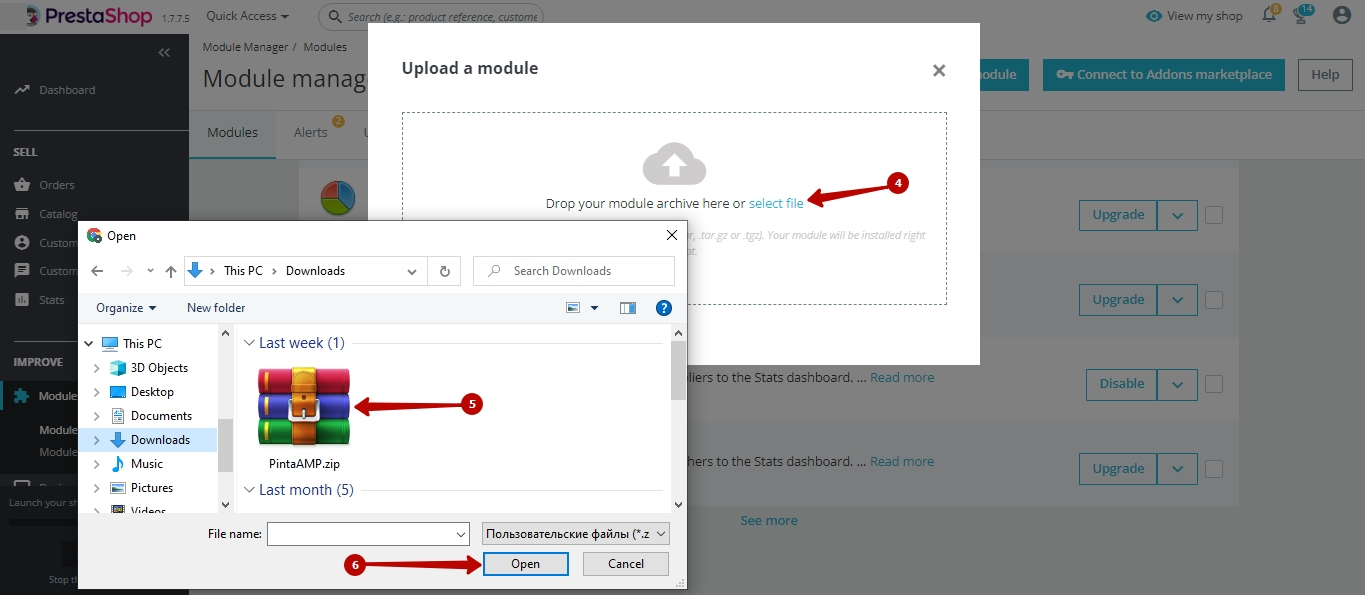
In the opened window, click on select file (4).
Next, select the plugin archive (5) and click the Open button (6).
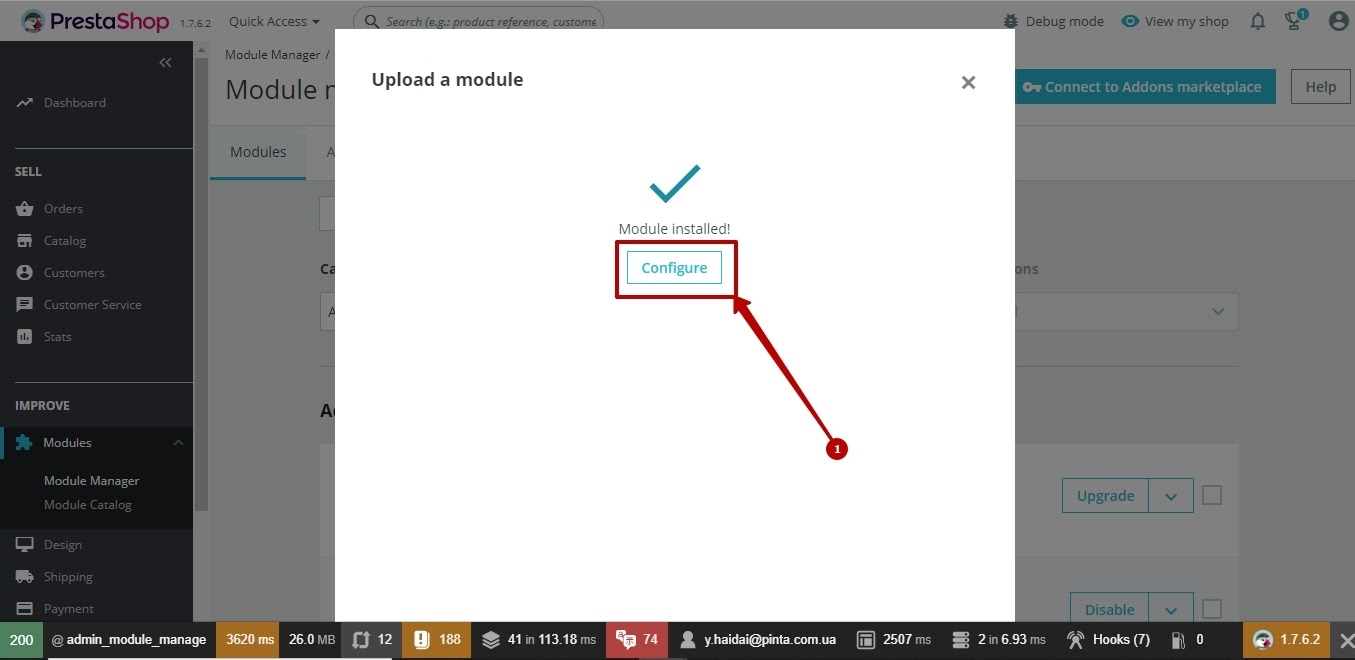
Wait for a message about "Module installed!".
To configure the plugin, click the Configure button.
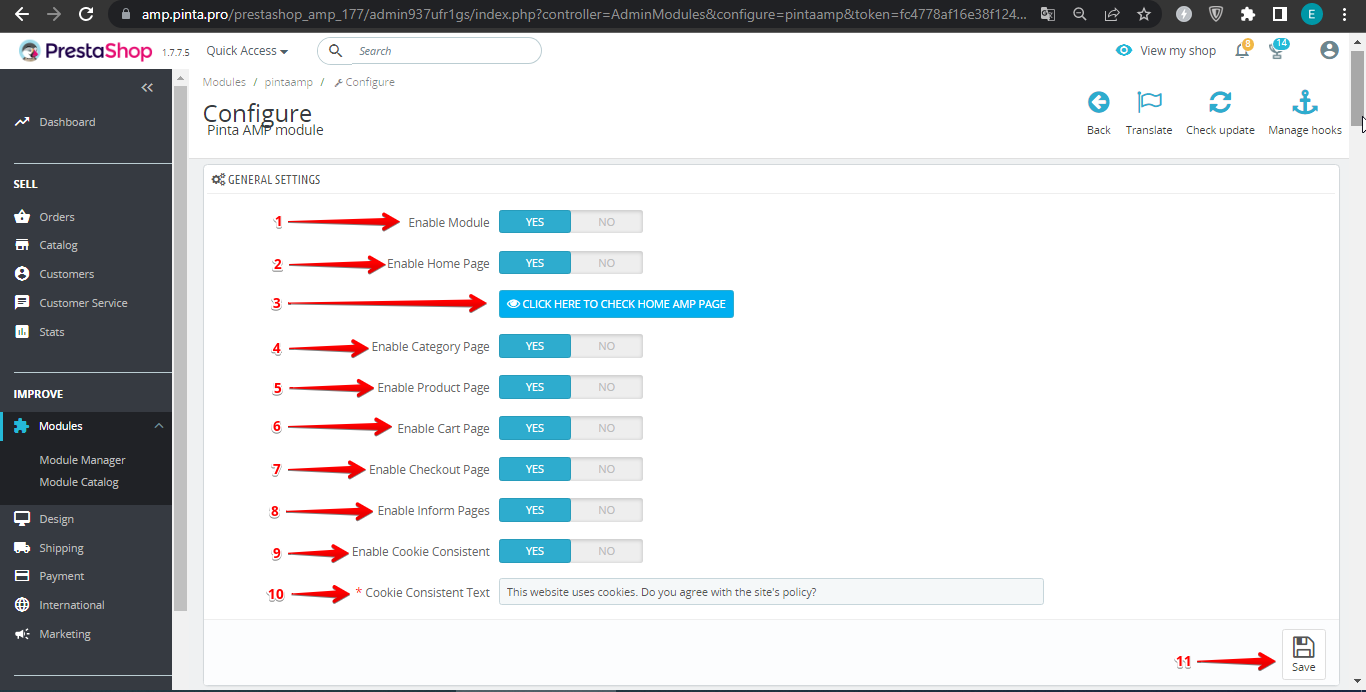
Plugin page
The GENERAL SETTINGS block consists of:
The Enable Module button (1) - to enable / disable the plugin (position YES / NO).
The Enable Home Page button (2) - to enable / disable the displaying of amp-version of the Home Page (position YES / NO).
The CLICK HERE TO CHECK HOME AMP PAGE button (3) - to preview the generated amp-pages of your website.
The Enable Category Page button (4) - to enable / disable the displaying of amp-version of category pages (position YES / NO).
The Enable Product Page button (5) - to enable / disable the displaying of amp-version of product pages (position YES / NO).
The Enable Cart Page button (6) - to enable / disable the displaying of amp-version of the cart page (position YES / NO).
The Enable Checkout Page button (7) - to enable / disable the displaying of amp-version of the checkout page (position YES / NO).
The Enable Inform Pages button (8) - to enable / disable the displaying of amp-version of information pages (position YES / NO).
The Enable Cookie Consistent button (9) - to enable / disable the displaying of the amp-version of the "Cookie Consent" panel (position YES / NO).
The Cookie Consistent Text field (10) - to enter the text of the "Cookie Consent" panel.
The Save button (11) - to save the selected settings.
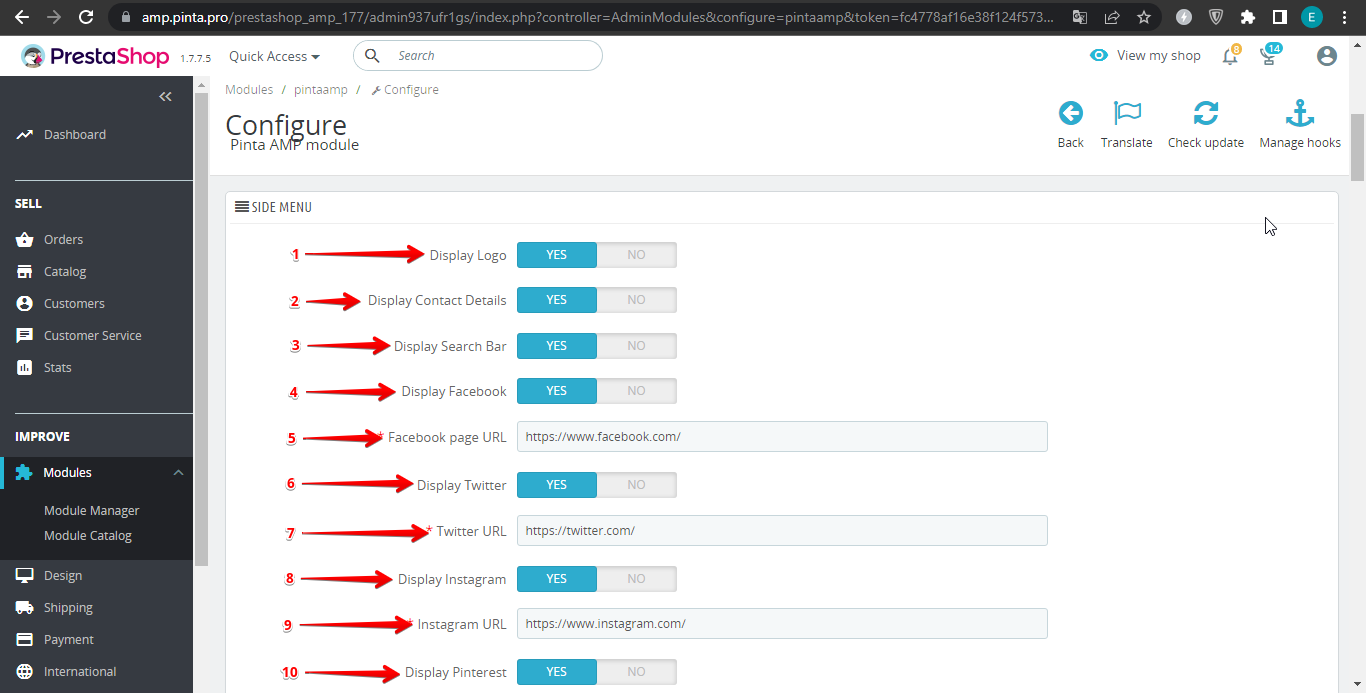
The SIDE MENU block consists of:
The Display Logo button (1) - to enable / disable the logo displaying on the website menu (position YES / NO).
The Display Contact Details button (2) - to enable / disable the displaying of contact details on the website menu (position YES / NO).
The Display Search Bar button (3) - to enable / disable the displaying of the search bar (position YES / NO).
The Display Facebook button (4) - to enable / disable the displaying of the redirect button on Facebook (position YES / NO).
The Facebook page URL field (5) - to enter the Facebook page URL.
The Display Twitter button (6) - to enable / disable the displaying of the redirect button on Twitter (position YES / NO).
The Twitter URL field (7) - to enter the Twitter page URL.
The Display Instagram button (8) - to enable / disable the displaying of the redirect button on Instagram (position YES / NO).
The Instagram URL field (9) - to enter the Instagram page URL.
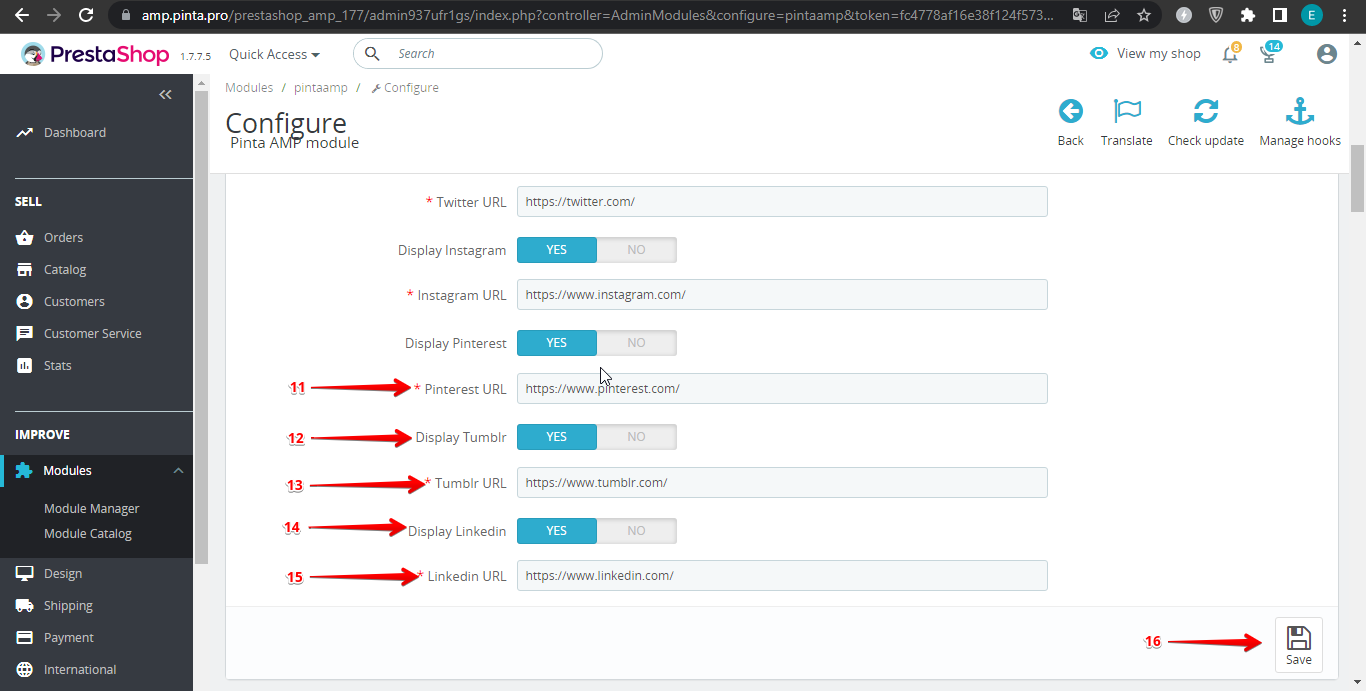
The Display Pinterest button (10) - to enable / disable the displaying of the redirect button on Pinterest (position YES / NO).
The Pinterest URL field (11) - to enter the Pinterest page URL.
The Display Tumblr button (12) - to enable / disable the displaying of the redirect button on the Tumblr (position YES / NO).
The Tumblr URL field (13) - to enter the Tumblr page URL.
The Display Linkedin button (14) - to enable / disable the displaying of the redirect button on the LinkedIn (position YES / NO).
The Linkedin URL field (15) - to enter the LinkedIn page URL.
The Save button (16) - to save the selected settings.
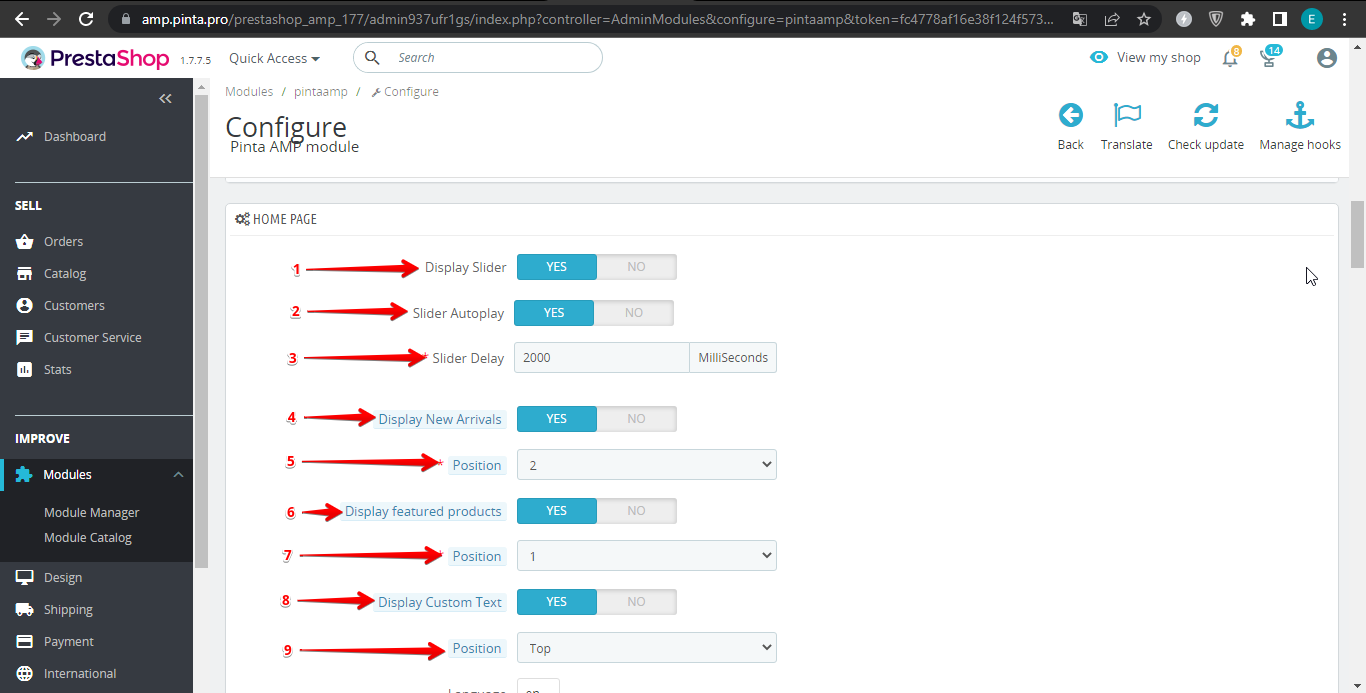
The HOME PAGE block consists of:
The Display Slider button (1) - to enable / disable the slider displaying on the home page (position YES / NO).
The Slider Autoplay button (2) - to enable / disable the slider autoplay function (position YES / NO).
The Slider Delay field (3) - to enter the slider delay time (in milliseconds).
The Display New Arrivals button (4) - to enable / disable the displaying of the new arrivals block on the home page (position YES / NO).
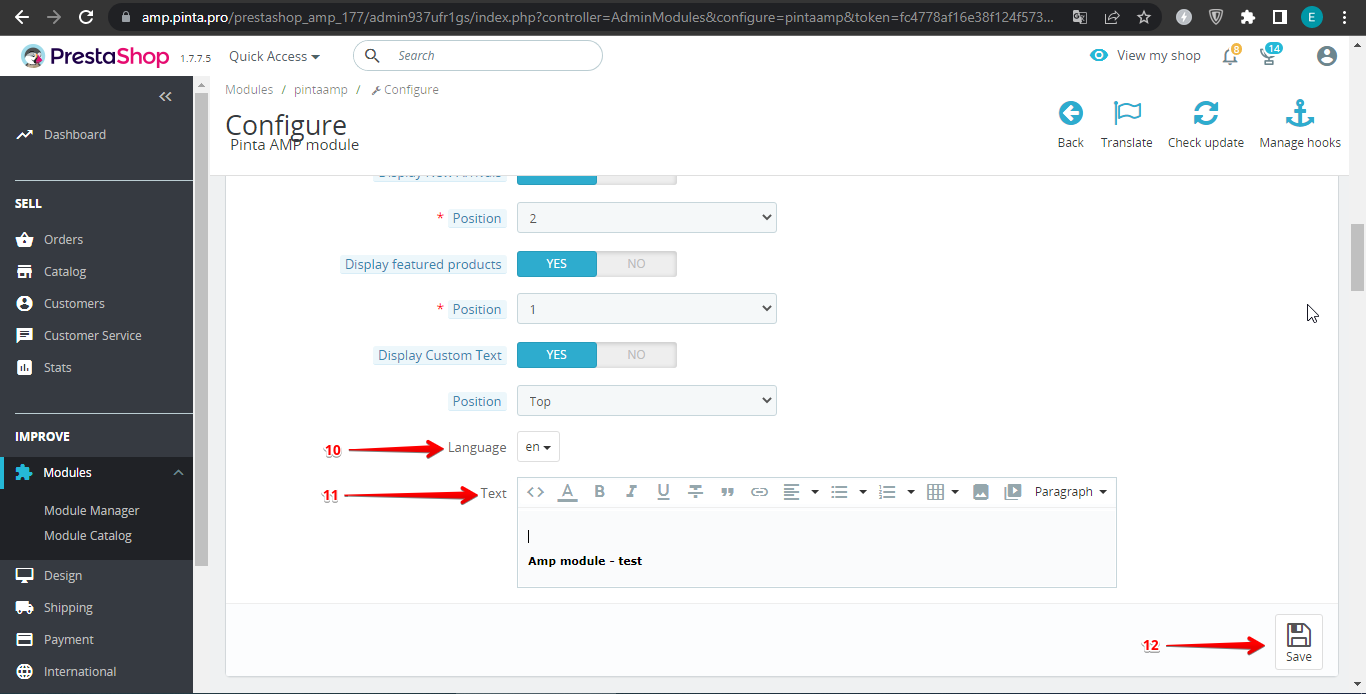
The Position field (5) - to select the location of the new arrivals block (position 1 / 2).
The Display featured products button (6) - to enable / disable the displaying of the featured products block on the home page (position YES / NO).
The Position field (7) - to select the location of the featured products block (position 1 / 2).
The Display Custom Text button (8) - to enable / disable the displaying of the description block on the home page (position YES / NO).
The Position field (9) - to select the location of the description block (position Top / Bottom).
The Language button (10) - to select the text language displayed on the home page, depending on the language used on your website.
The Text field (11) - to enter the text displayed on the home page.
The Save button (12) - to save the selected settings.
The VIDEO SETTINGS block consists of:
The Display YouTube Video button (1) - to enable / disable the displaying of the YouTube Video block on the home page (position YES / NO).
The YouTube Video ID field (2) - to add the YouTube Video ID.
The Autoplay button (3) - to enable / disable YouTube Video autoplay function (position YES / NO).
The Header Text button (4) - to enable / disable the header displaying of the YouTube Video block (position YES / NO).
The Text field (5) - to enter the header text of the Youtube video block.
The Position field (6) - to select the location of the YouTube Video block (position Top / Bottom).
The Display Dailymotion Video button (7) - to enable / disable the displaying of the Dailymotion Video block on the home page (position YES / NO).
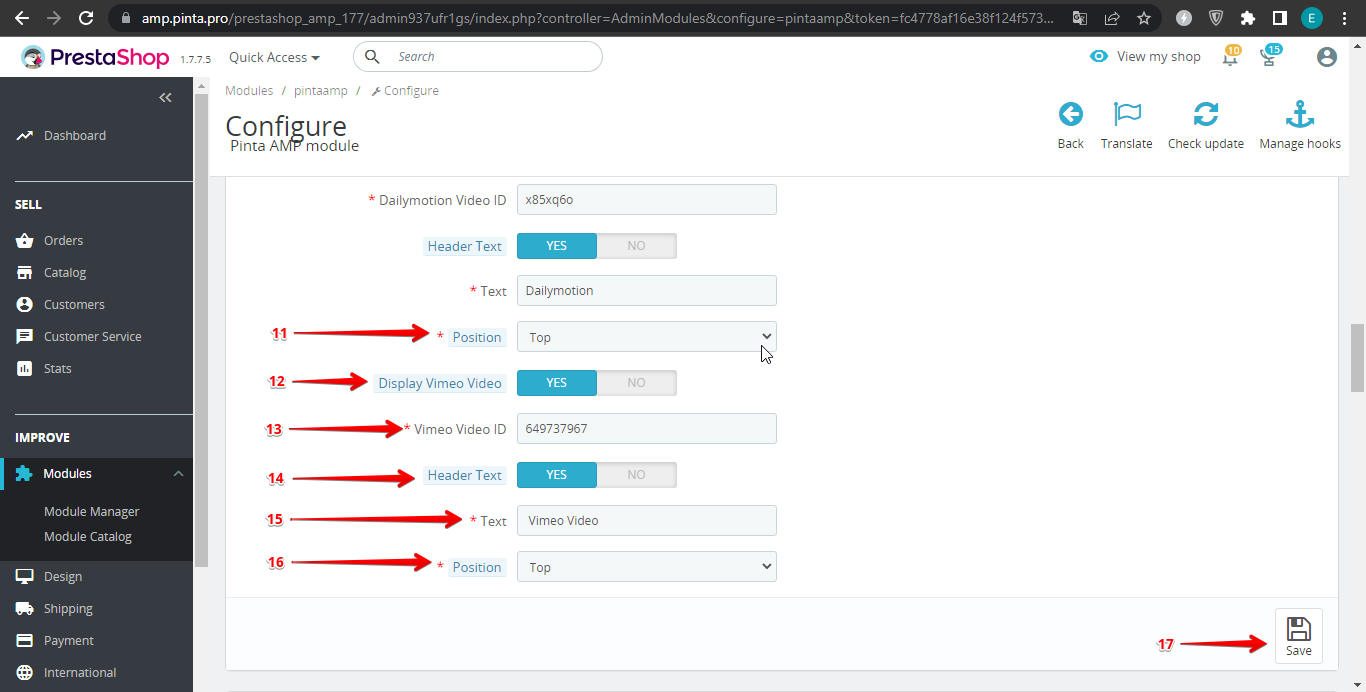
The Dailymotion Video ID field (8) - to add the Dailymotion Video ID.
The Header Text button (9) - to enable / disable the header displaying of the Dailymotion Video block (position YES / NO).
The Text field (10) - to enter the header text of the Dailymotion Video block.
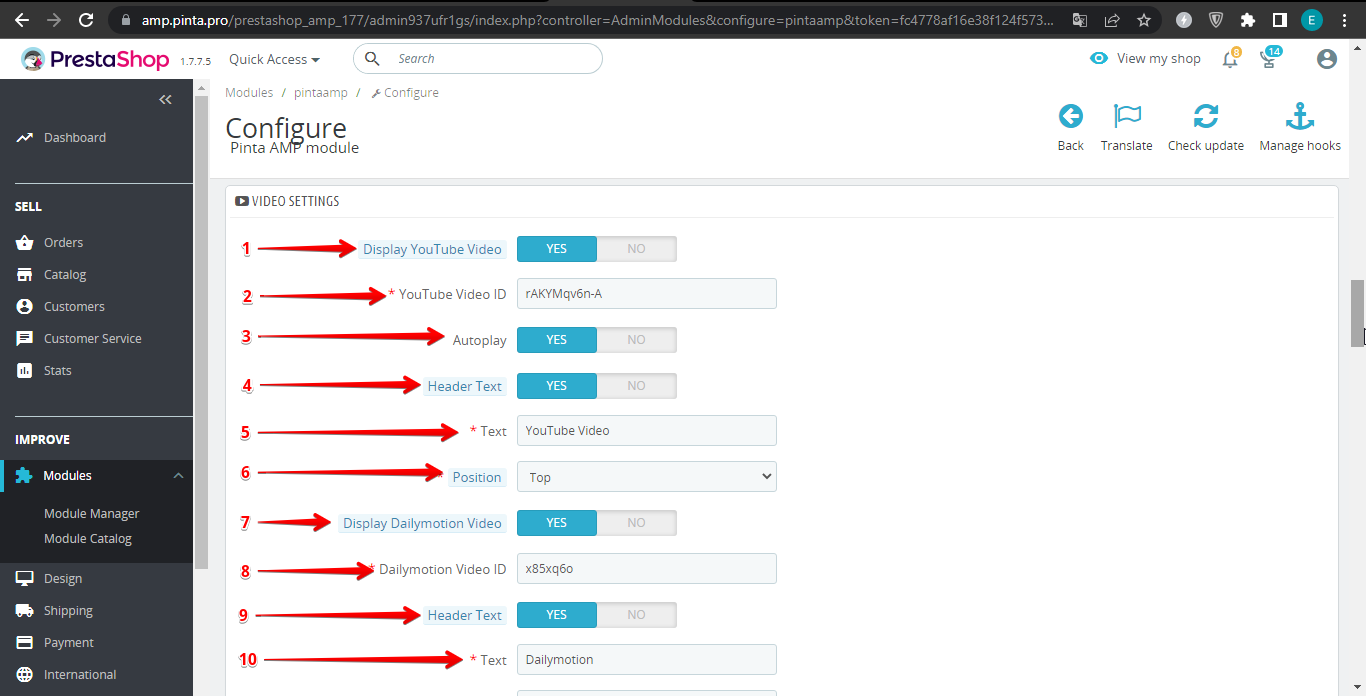
The Position field (11) - to select the location of the Dailymotion Video block (position Top / Bottom).
The Display Vimeo Video button (12) - to enable / disable the displaying of the Vimeo Video block on the home page (position YES / NO).
The Vimeo Video ID field (13) - to add the Vimeo Video ID.
The Header Text button (14) - to enable / disable the header displaying of the Vimeo Video block (position YES / NO).
The Text field (15) - to enter the header text of the Vimeo Video block.
The Position field (16) - to select the location of the Vimeo Video block (position Top / Bottom).
The Save button (17) - to save the selected settings.
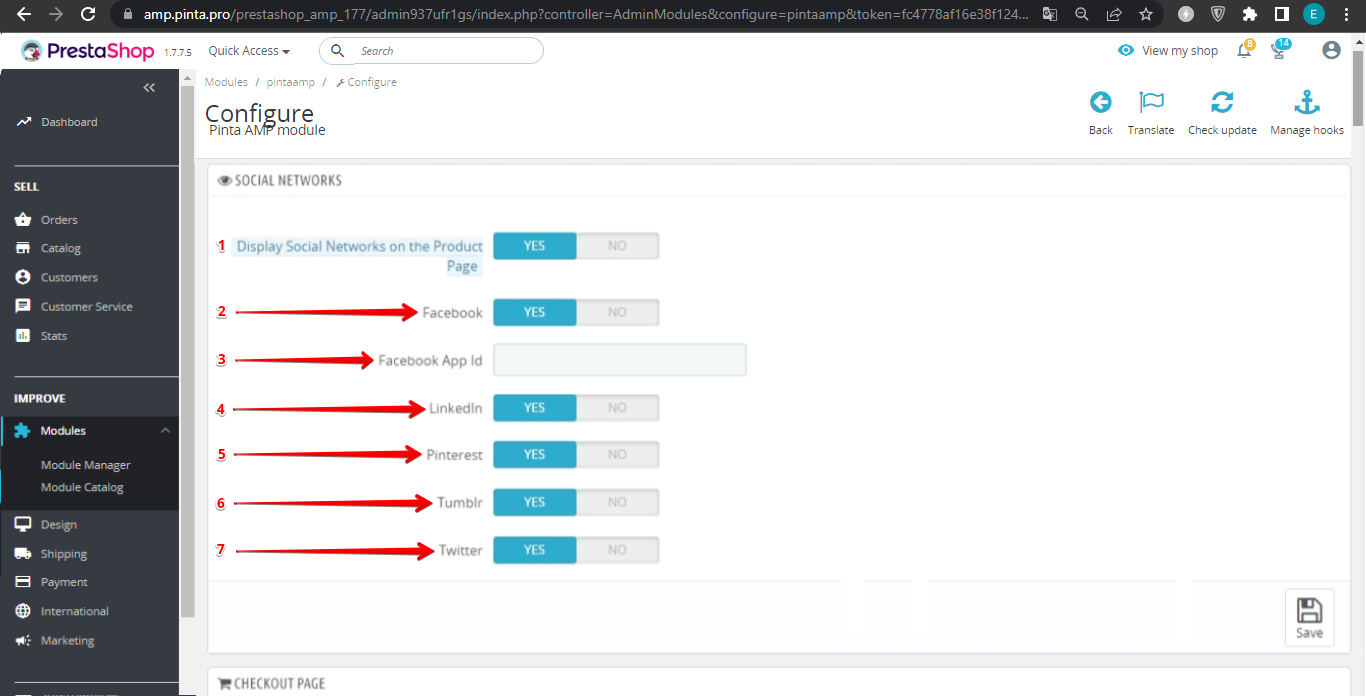
The SOCIAL NETWORKS block consists of:
The Display Social Networks on the Product Page button (1) - to enable / disable the displaying of social networks on the product page (position YES / NO).
The Facebook button (2) - to enable / disable the displaying of Facebook (position YES / NO).
The Facebook App Id field (3) - to enter the Facebook ID.
The LinkedIn button (4) - to enable / disable the displaying of LinkedIn (position YES / NO).
The Pinterest button (5) - to enable / disable the displaying of Pinterest (position YES / NO).
The Tumblr button (6) - to enable / disable the displaying of Tumblr (position YES / NO).
The Twitter button (7) - to enable / disable the displaying of Twitter (position YES / NO).
The Save button - to save the selected settings.
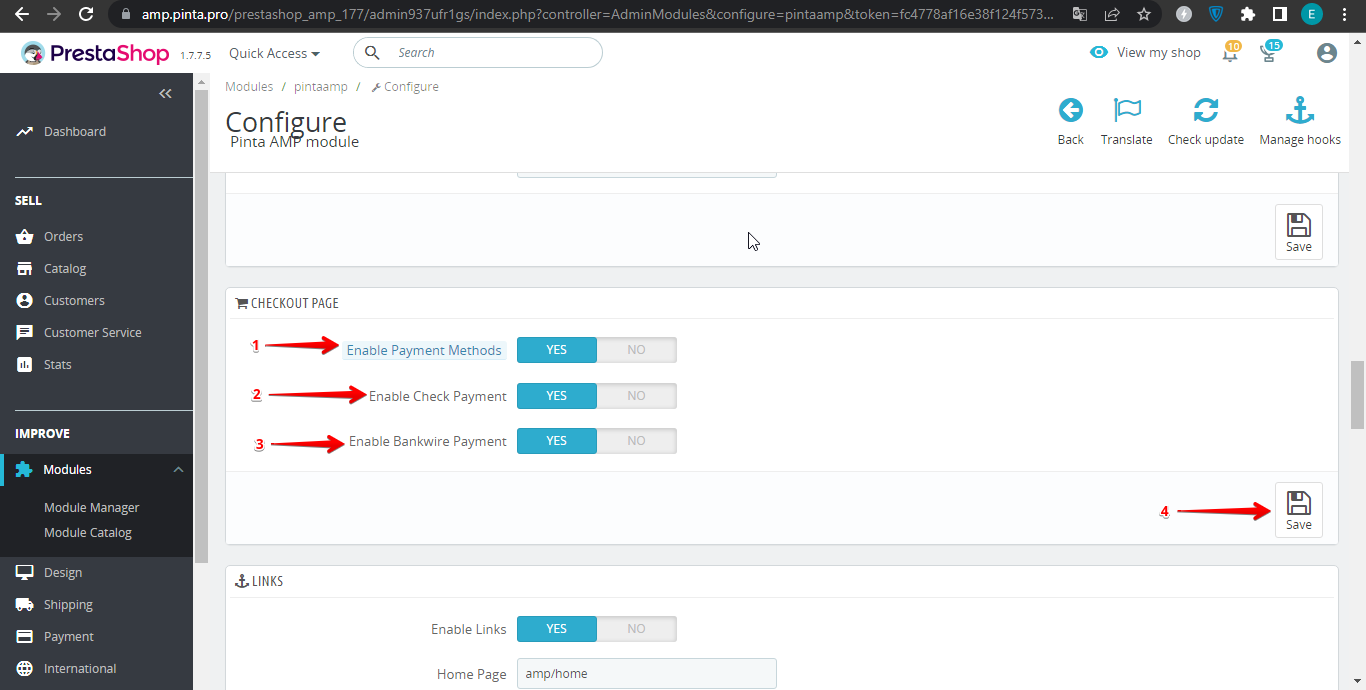
The CHECKOUT PAGE block consists of:
The Enable Payment Methods button (1) - to enable / disable the displaying of payment methods on the checkout page (position YES / NO).
The Enable Check Payment button (2) - to enable / disable the displaying of the payment method on the checkout page with the “Bank transfer from PrestaShop” module (position YES / NO).
The Enable Bankwire Payment button (3) - to enable / disable the displaying of the payment method on the checkout page with the “Payments by check from PrestaShop” module (position YES / NO).
The Save button (4) - to save the selected settings.
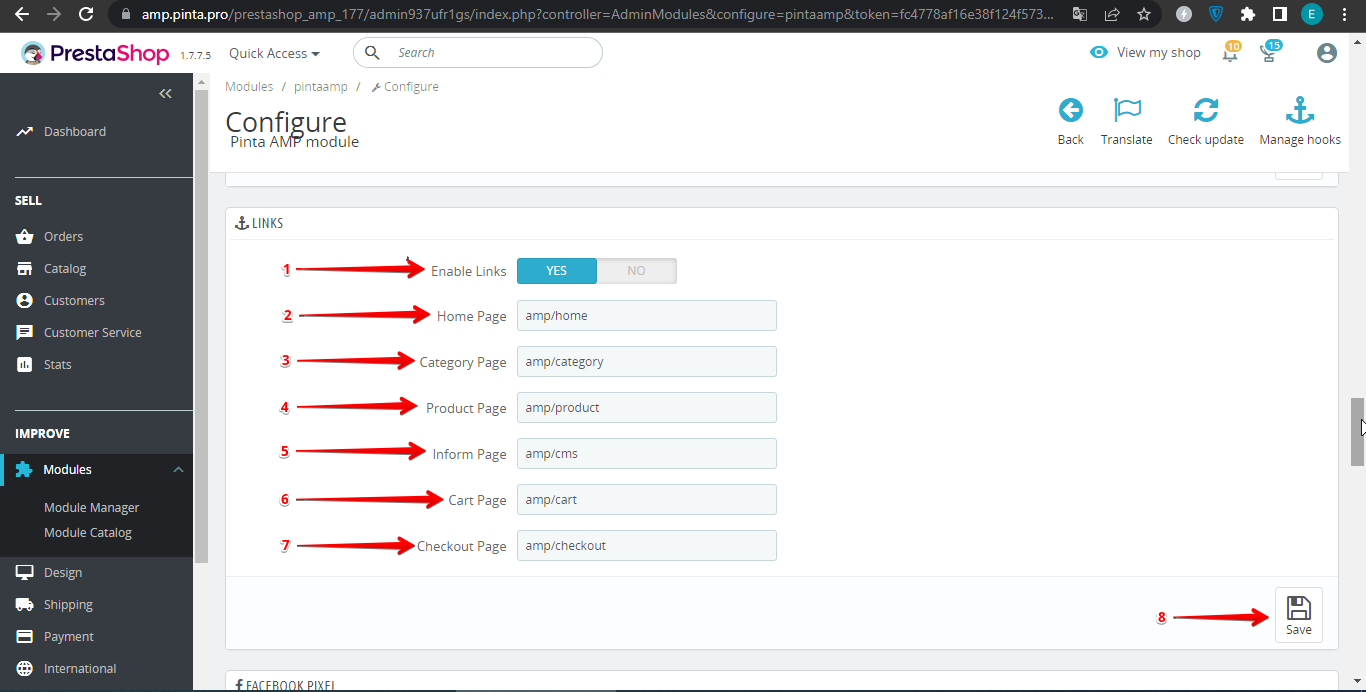
The LINKS block consists of:
The Enable Links button (1) - to enable / disable the changing links for the website main pages (position YES / NO).
The Home Page field (2) - to change the appearance of the home page link.
The Category Page field (3) - to change the appearance of the category page link.
The Product Page field (4) - to change the appearance of the product page link.
The Inform Page field (5) - to change the appearance of the link for information pages.
The Cart Page field (6) - to change the appearance of the cart page link.
The Checkout Page field (7) - to change the appearance of the checkout page link.
The Save button (8) - to save the selected settings.
The FACEBOOK PIXEL block consists of:
The Display Facebook Pixel button (1) - to enable / disable the use of Facebook Pixel (position YES / NO).
The Facebook Pixel Id field (2) - to add the Facebook Pixel ID.
The Save button (3) - to save the selected settings.
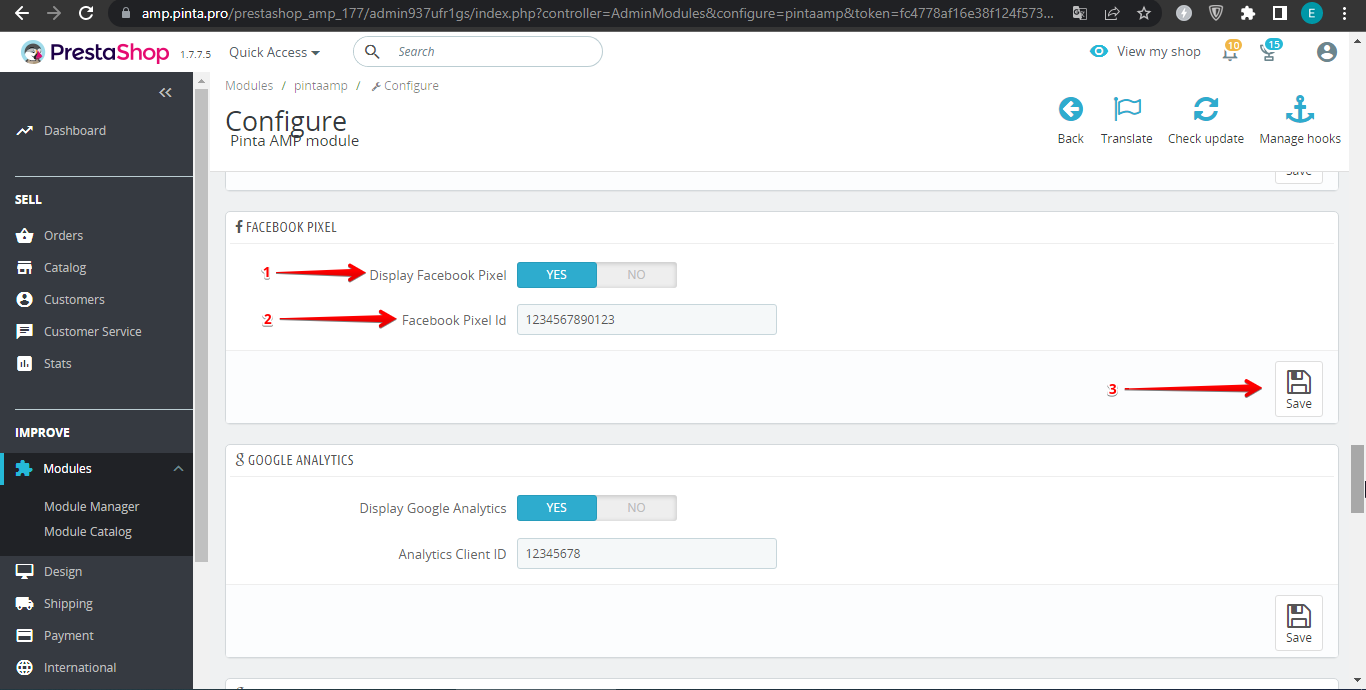
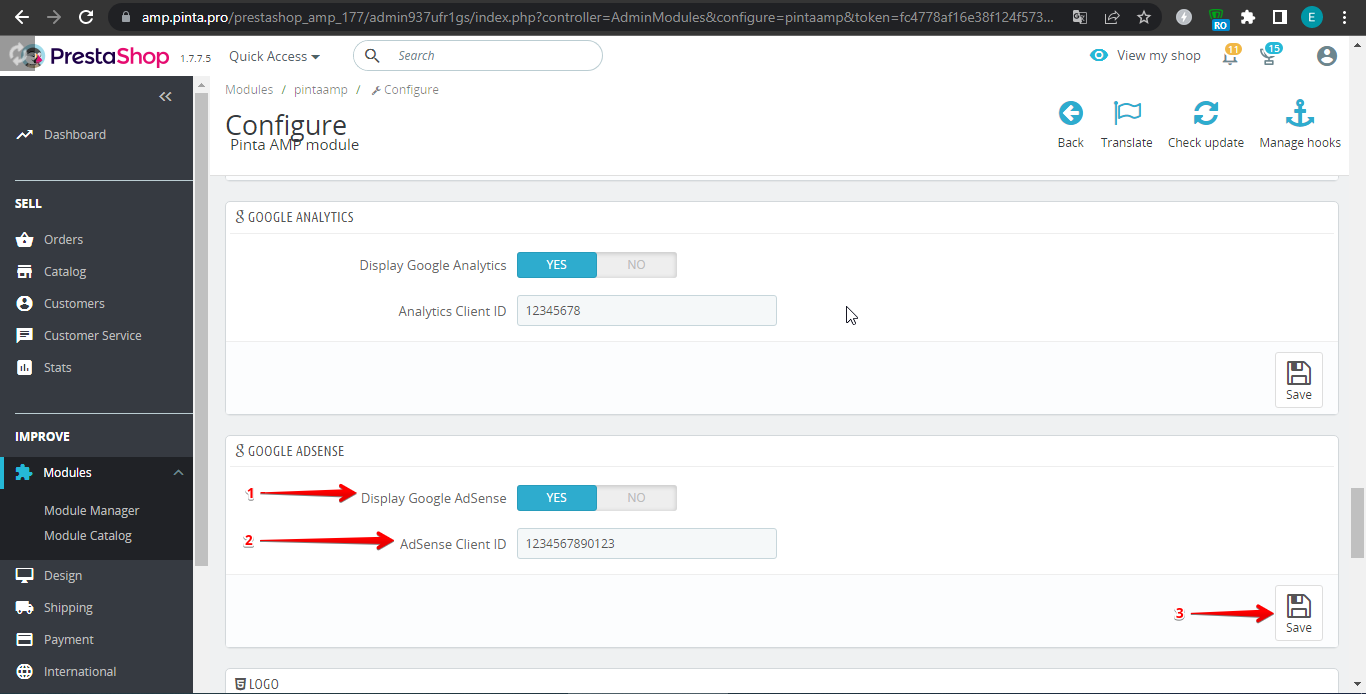
The GOOGLE ANALYTICS block consists of:
The Display Google Analytics button (1) - to enable / disable the use of Google Analytics (position YES / NO).
The Analytics Client ID field (2) - to add the Google Analytics ID.
The Save button (3) - to save the selected settings.
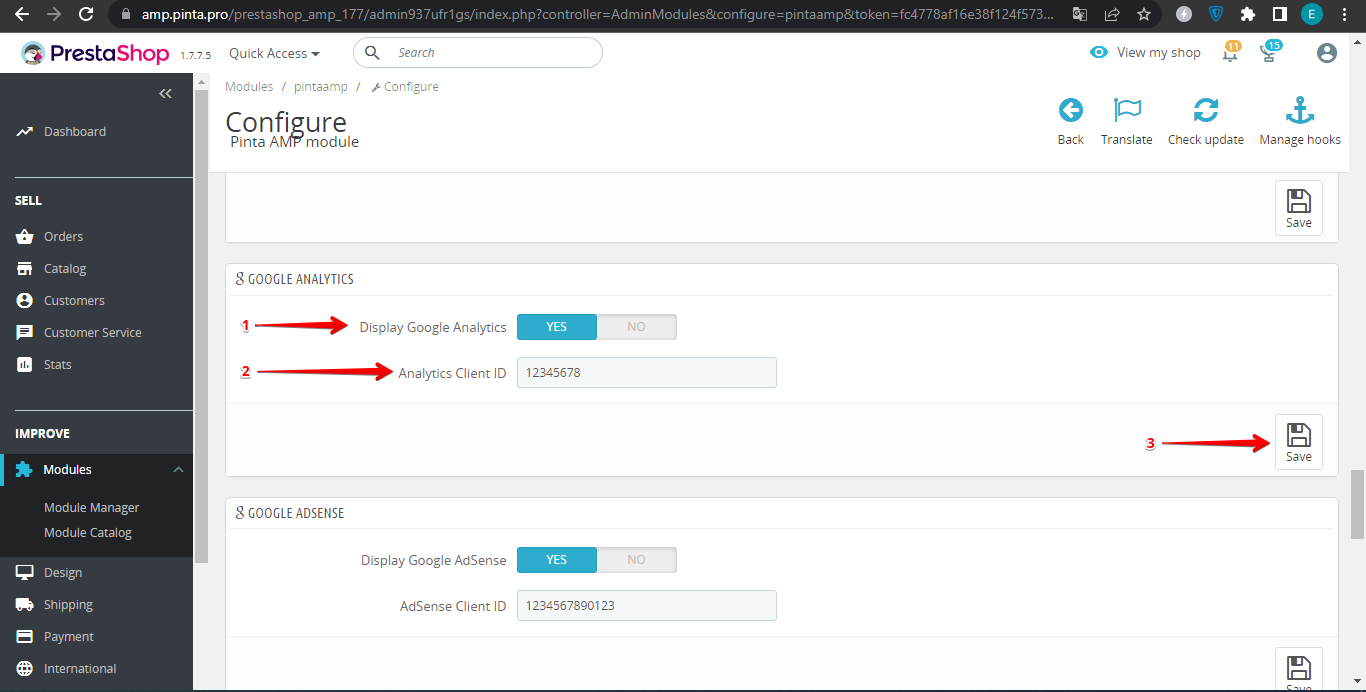
The GOOGLE ADSENSE block consists of:
The Display Google AdSense button (1) - to enable / disable the displaying of the Google AdSense block (position YES / NO).
The AdSense Client ID field (2) - to add the Google AdSense ID.
The Display Google Adsense on home page button - to enable / disable the displaying on the main page (position YES / NO). Select the YES position and choose the block location.
The Display Google Adsense on category page button - to enable / disable the displaying on the category page (position YES / NO). Select the YES position and choose the block location.
The Display Google Adsense on product page button - to enable / disable the displaying on the product page (position YES / NO). Select the YES position and choose the block location.
The Display Google Adsense on CMS page button - to enable / disable the displaying on the CMS page (position YES / NO). Select the YES position and choose the block location.
The Save button (3) - to save the selected settings.
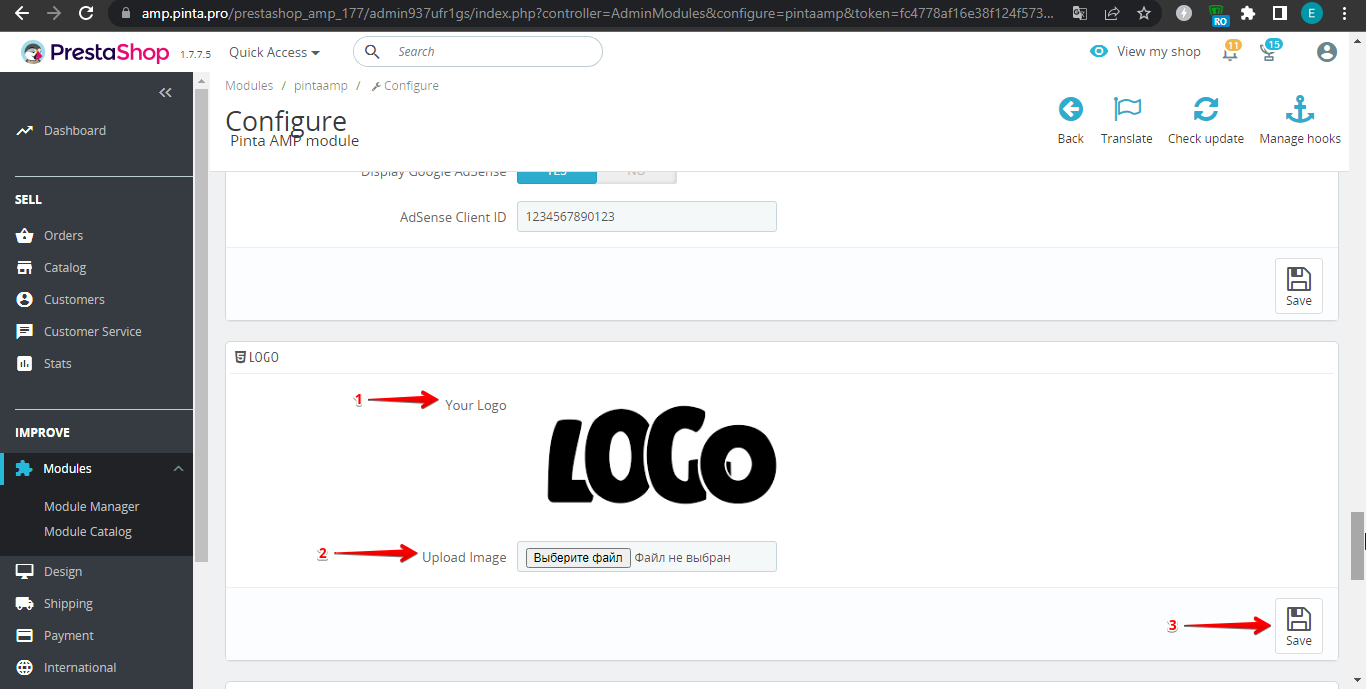
The LOGO block consists of:
The Your Logo field (1) - to view the logo image.
The Upload Image field (2) - to upload a logo image from your computer.
The Save button (3) - to save the selected settings.
The COLOR SETTINGS block allows you to change the color of various page elements. To do this, use the following buttons:
Website Bg (1) - for the background of the website.
Website Text Color (2) - for the text color of the website.
Header Bg (3) - for the background of the block at the top of the page.
Side Menu Bg (4) - for the background of the side menu.
Side Menu Categories Text Color (5) - for the text color of the side menu categories.
Side Menu Subcategories Text Color (6) - for the text color of the side menu subcategories.
Footer Bg (7) - for the background of the block at the bottom of the page.
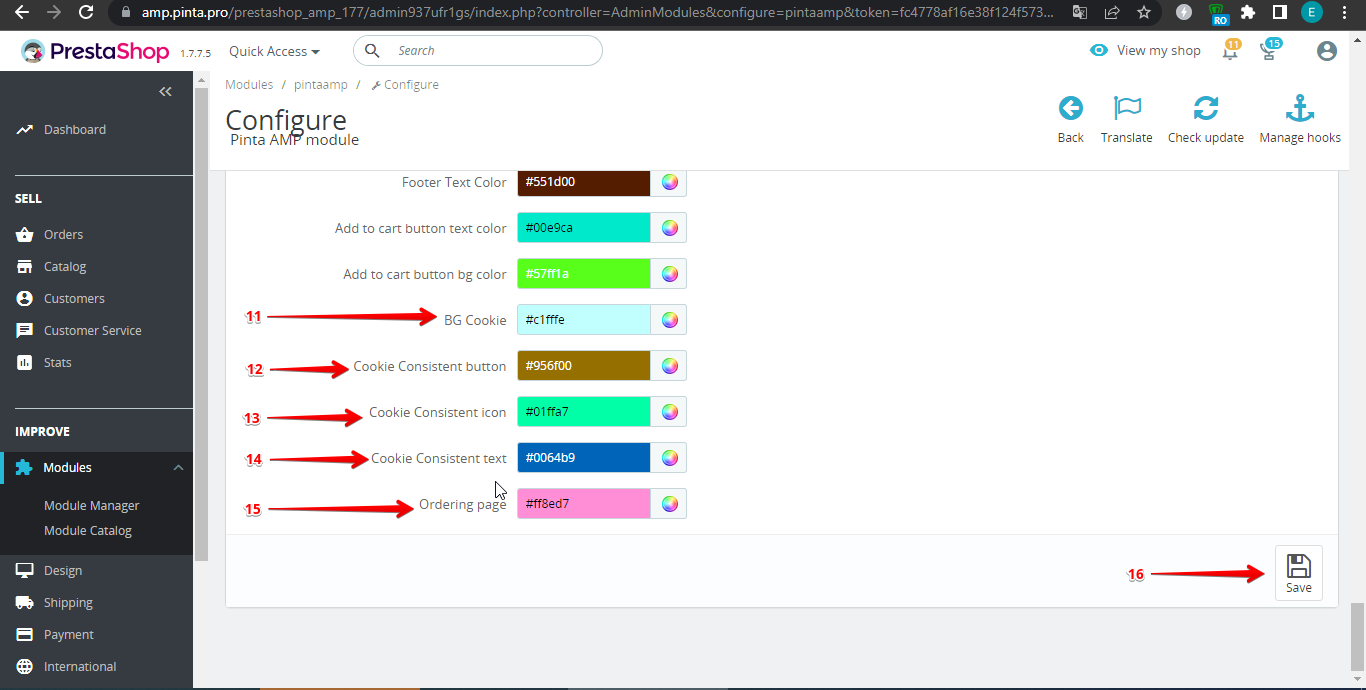
Footer Text Color (8) - for the text color of the block at the bottom of the page.
Add to cart button text color (9) - for the text color of the Add to cart button.
Add to cart button bg color (10) - for the background of the Add to cart button.

BG Cookie (11) - for the background of the "Cookie" notification.
Cookie Consistent button (12) - for the background of the "Cookie Consistent" button.
Cookie Consistent icon (13) - for the color of the "Cookie Consistent" icon.
Cookie Consistent text (14) - for the text color of the "Cookie Consistent" button.
Ordering page (15) - for the background of the ordering page.
Next, click the Save button (16).
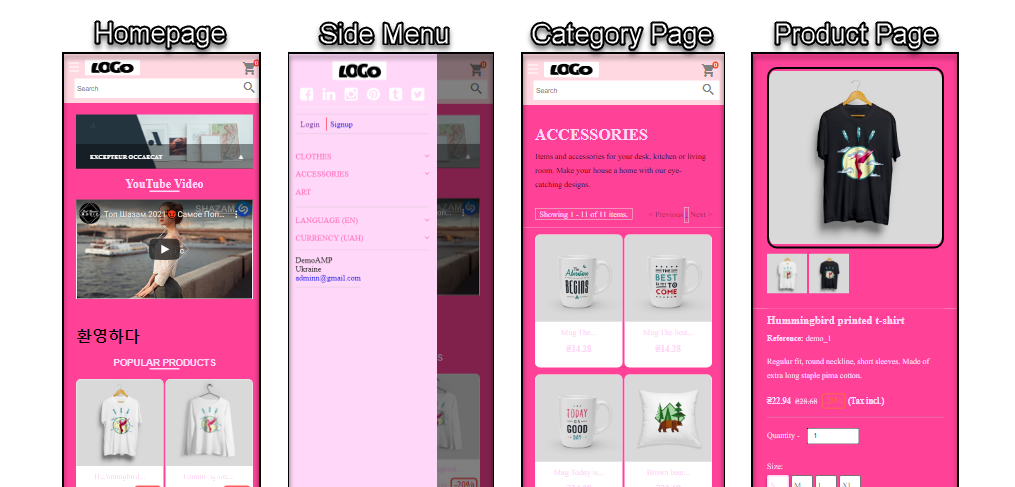
An example of displaying the amp-version of the website pages:
Use an AMP validator to check your website pages for AMP requirements. With it, you can automatically check the amp-version of all pages that you visit.
VIDEO INSTRUCTION