Installation Guide for Full SEO Marketing Pack in Opencart
INSTRUCTION FULL MARKETING PACK FOR OPENCART 3.0
Upload and install
Download archive with plugin in the Shop Pinta store and save it on your computer.
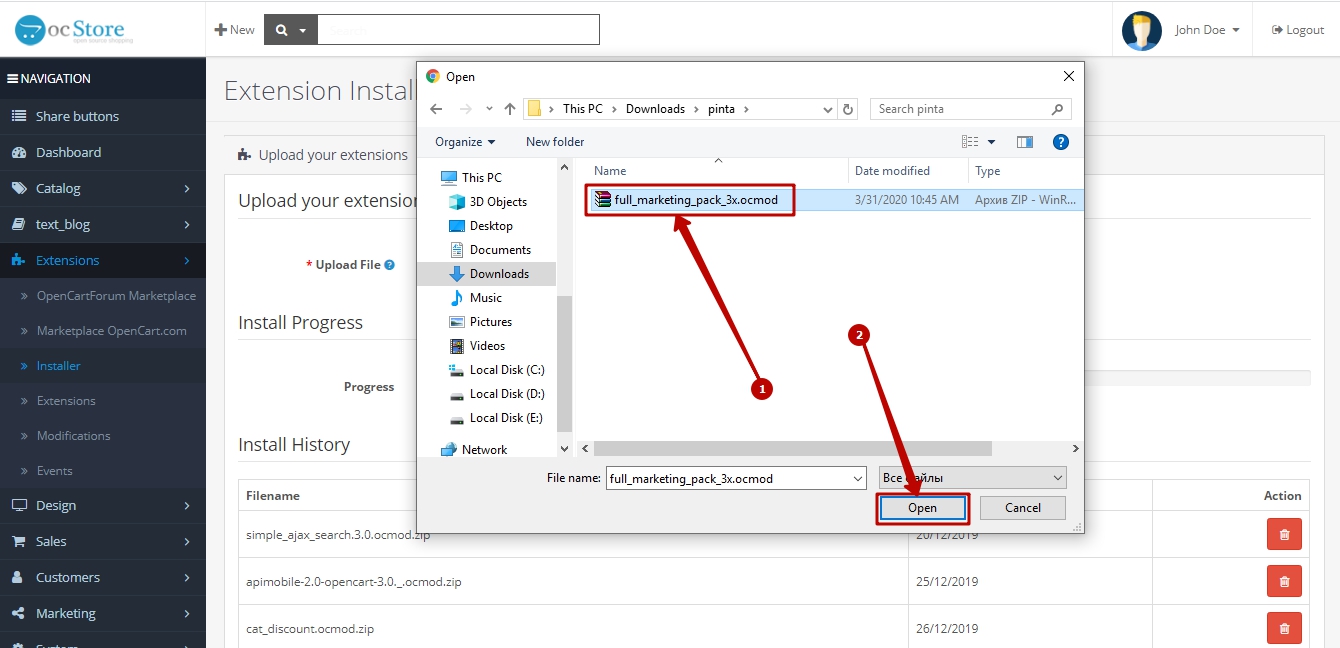
In the admin panel of your site, select Extensions (1) > Extension Installer (2).
In the Upload your extensions block click the Upload button (3).

http://joxi.net/Grqqgx8U4pE9Dr
In the opened window select the archive of the plugin (1) and click the Open (2) button.
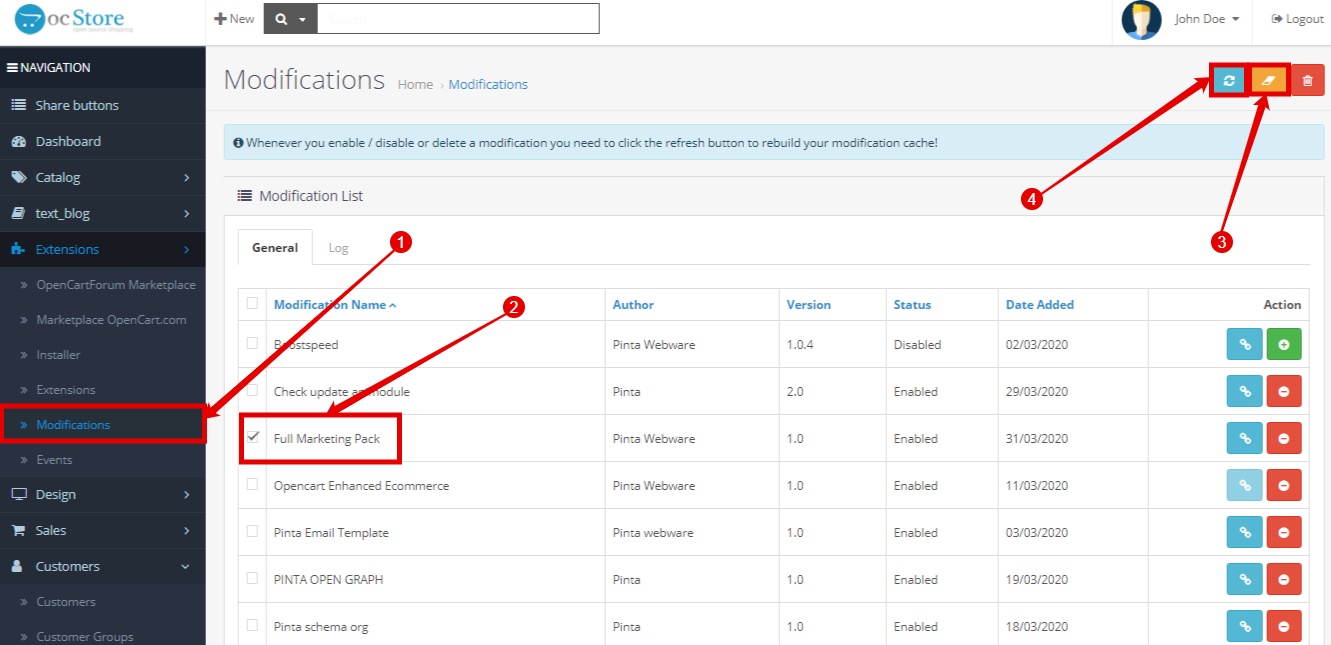
Clear the cache. Go to the Modifications subcategory (1), check the Full marketing package checkbox (2), click the Clear (3) and Refresh (4) buttons.
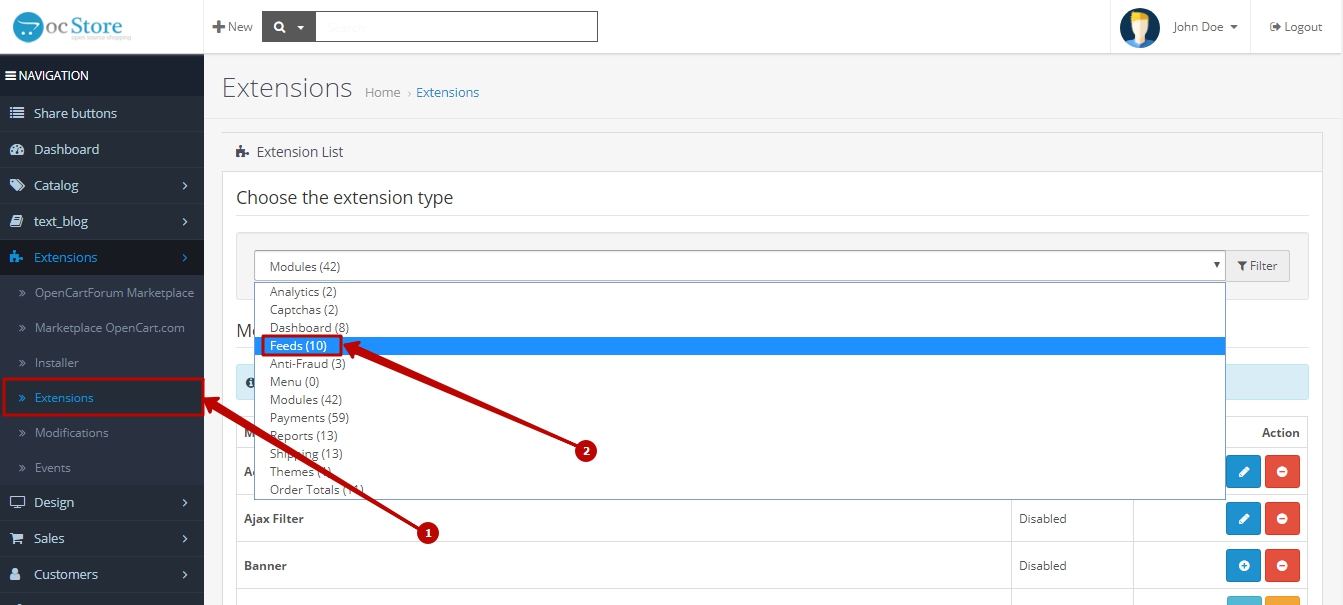
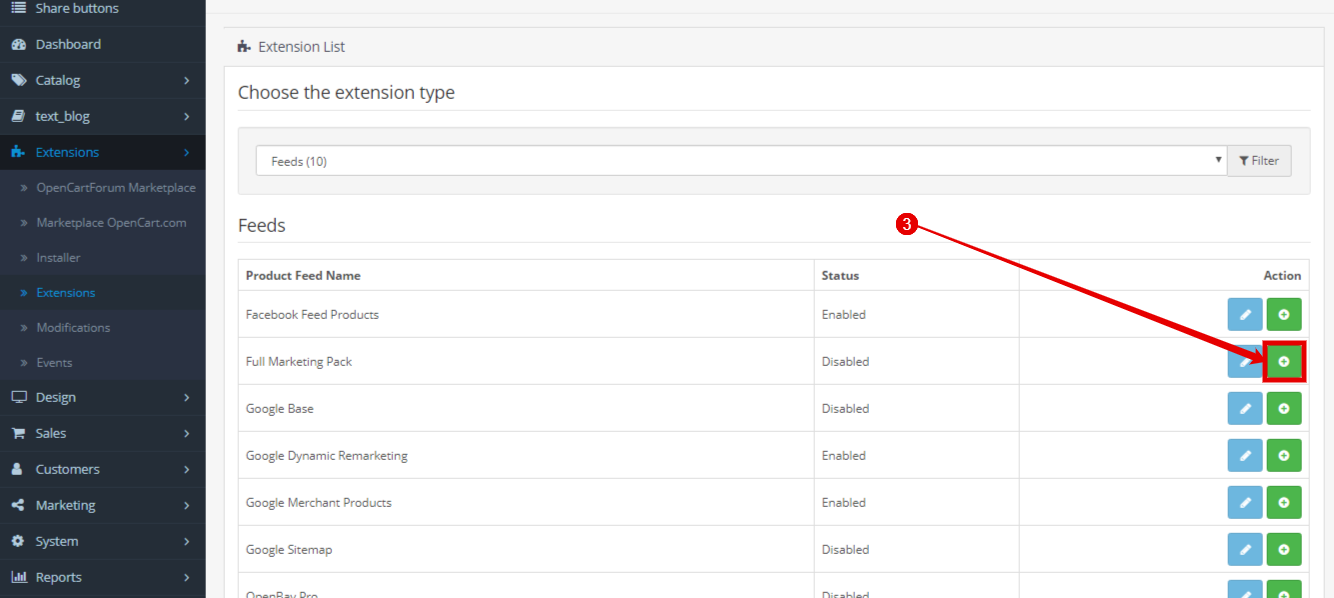
Go to the Extensions (1) subcategory in the list of Feeds (2) modules, find the Full Marketing Pack plugin and click the Install button (3).
To configure the plugin, click the Edit button.

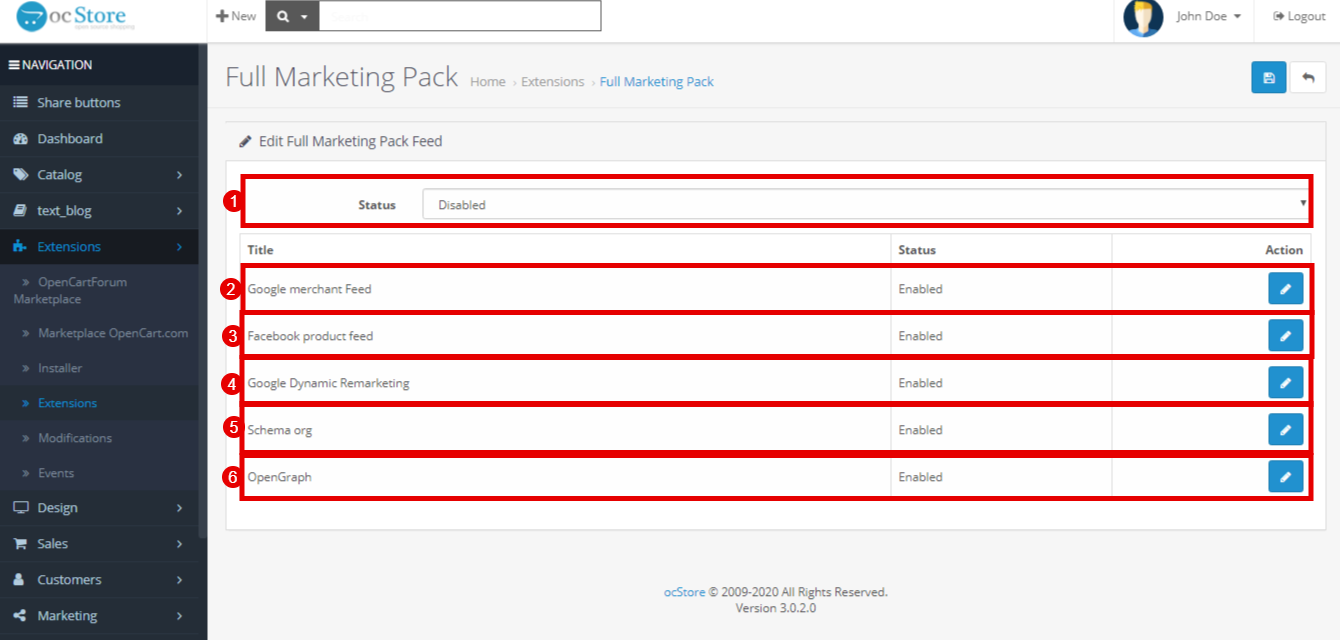
The settings page.
The page consists of the Status field (1), where the plugin (1) is turned on / off and 5 plugins:
Google merchant feed plugin (2).
Facebook product feed plugin (3).
Google Dynamic Remarketing plugin (4).
Schema org plugin (5).
OpenGraph plugin (6).
Google merchant feed plugin.
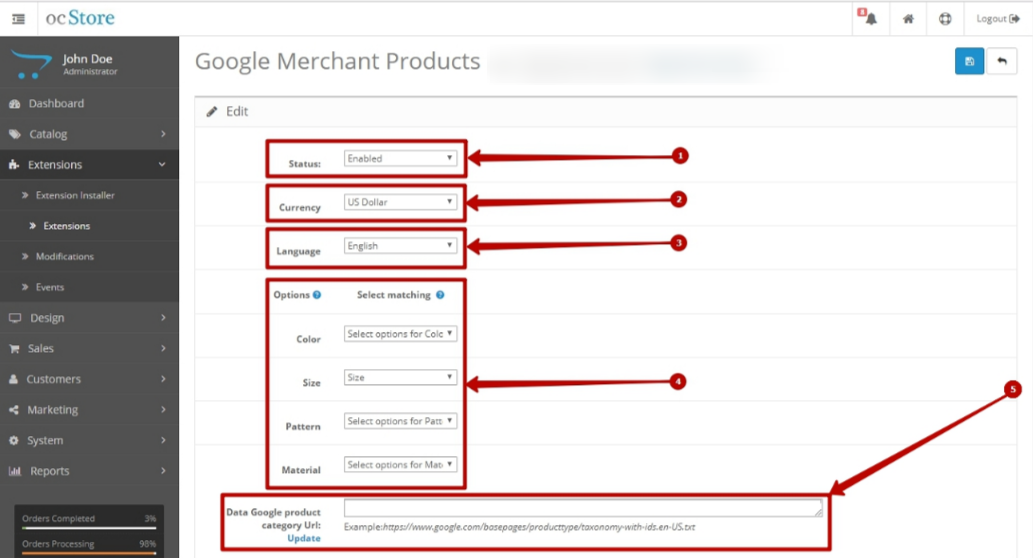
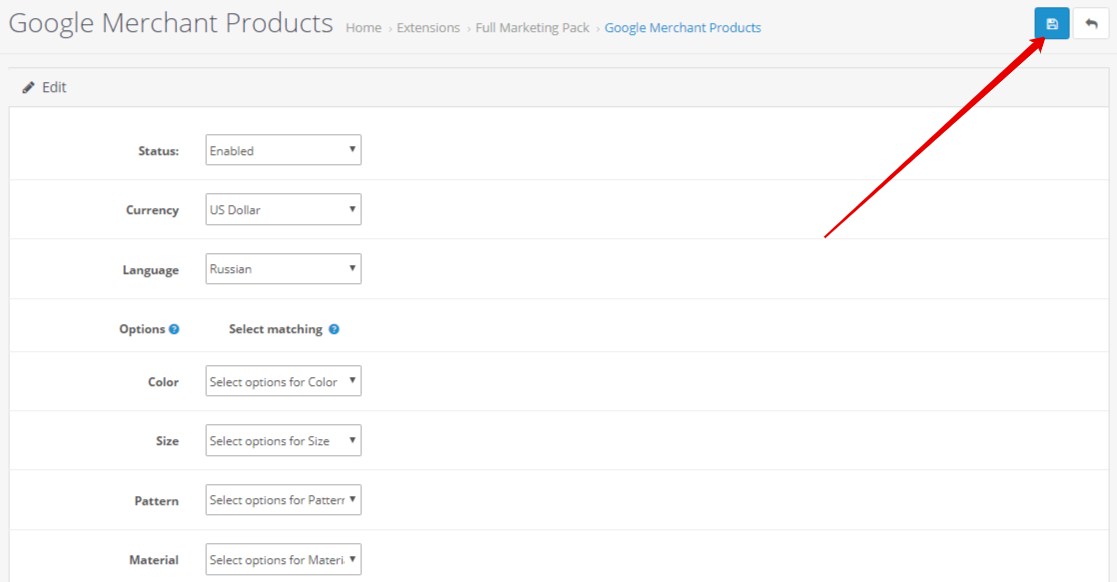
The Google merchant Feed page has fields for configuring the plugin:
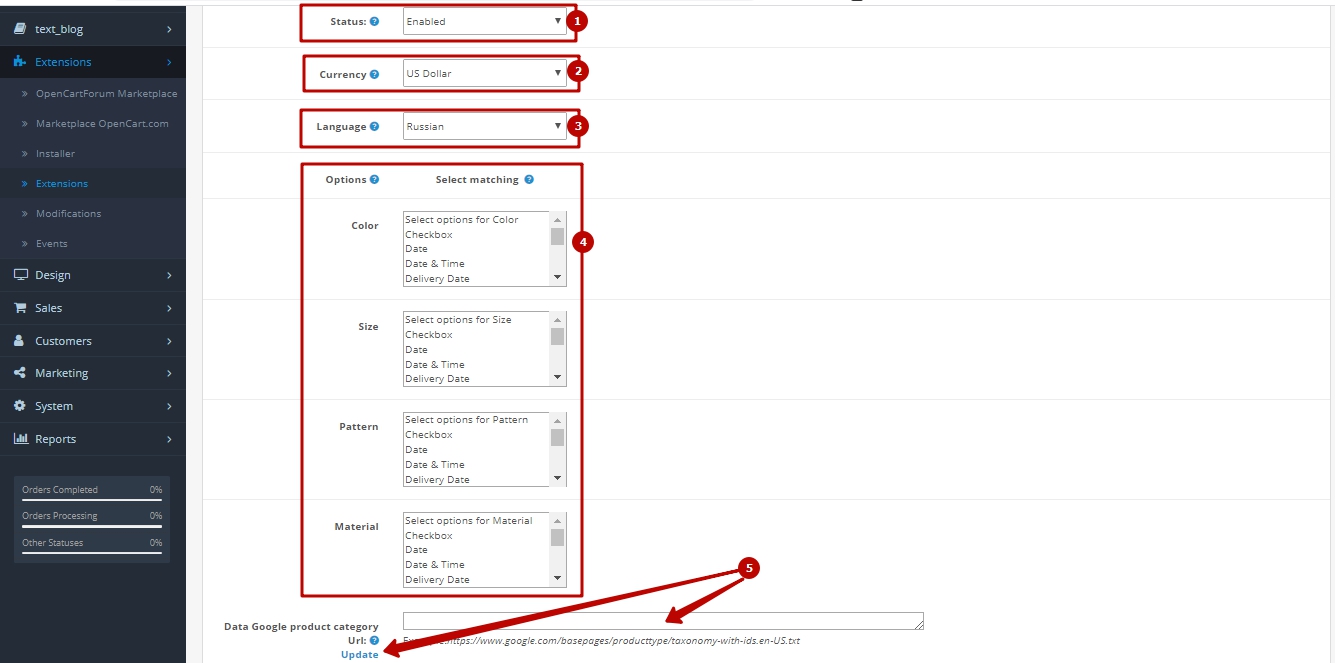
Status field (1). To activate the plugin, select Enabled.
Field Currency (2). Here you can choose a currency for your products.
Field Language (3). Allows you to select the language used in the data feed.
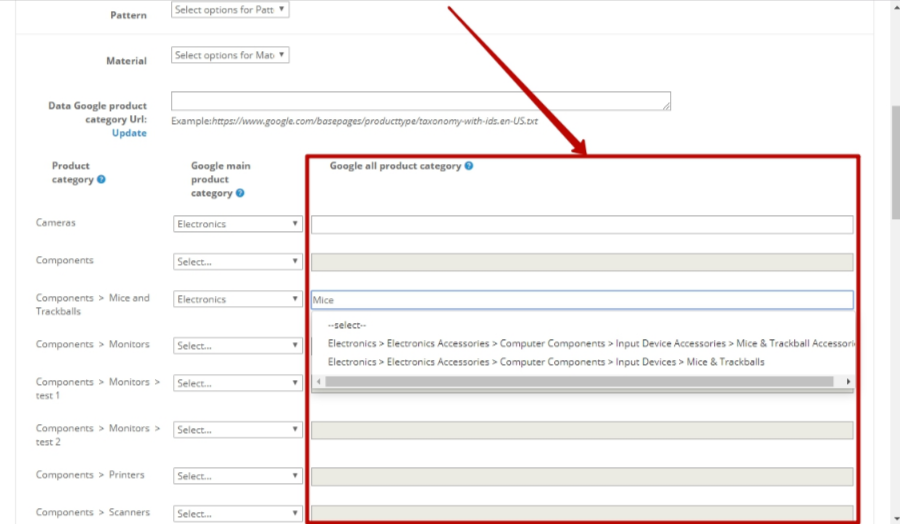
Block Options (4) includes such fields: Color, Size, Pattern, Material, where you can select the properties of your product.
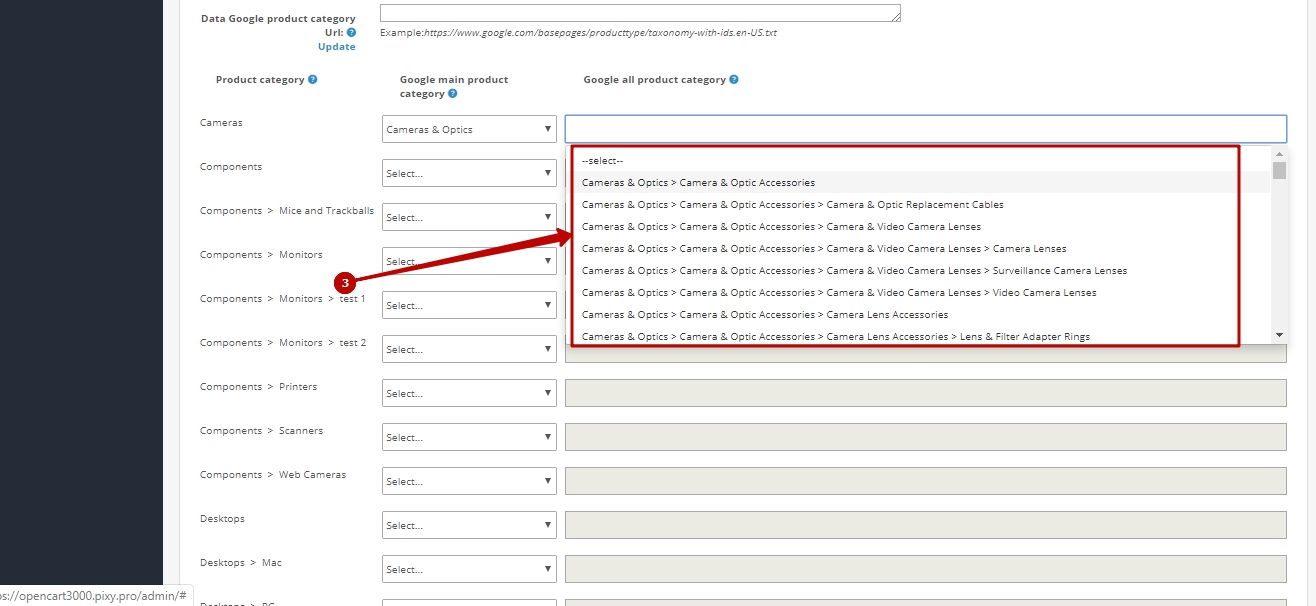
Field Data Google product category URL (5). To update the list of Google categories, enter the address where the Google categories are located and click the Update button. By default, the list of Google categories is already in the plugin.
6. In the Google main product category column select the appropriate category to your product.
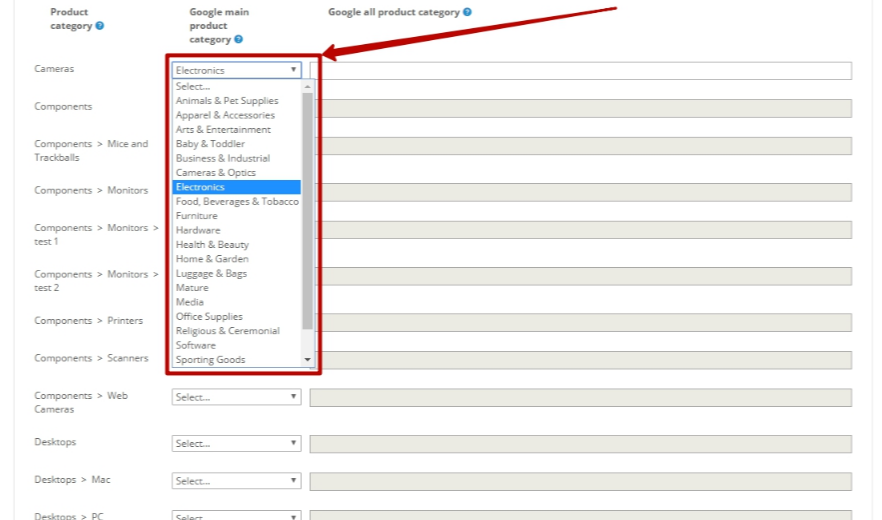
7. Additionally, you can specify the subcategories in Google all product category column, the more accurate - the better.
After filling in the fields, click the Save button.
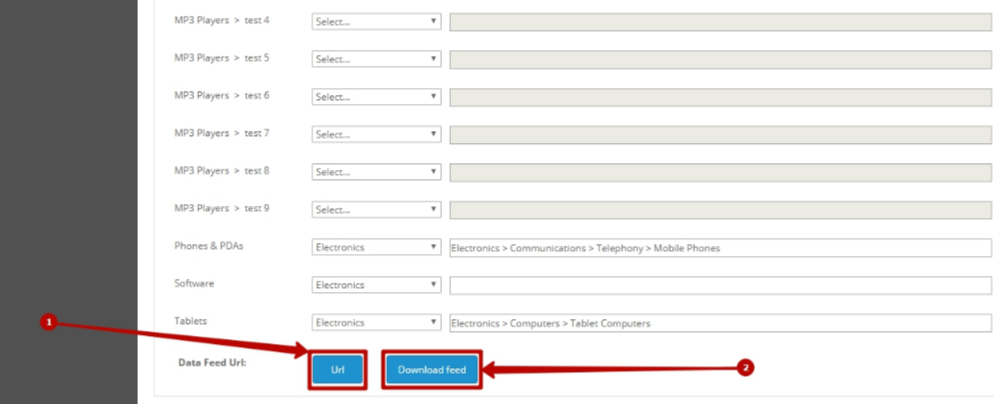
To download the data feed to your computer, click the Download (2) button.
If you want to open the feed in a new tab, click the Url button (1).
Sign up for a Google account, if you don’t have it yet and create an account in Google Merchant Center.
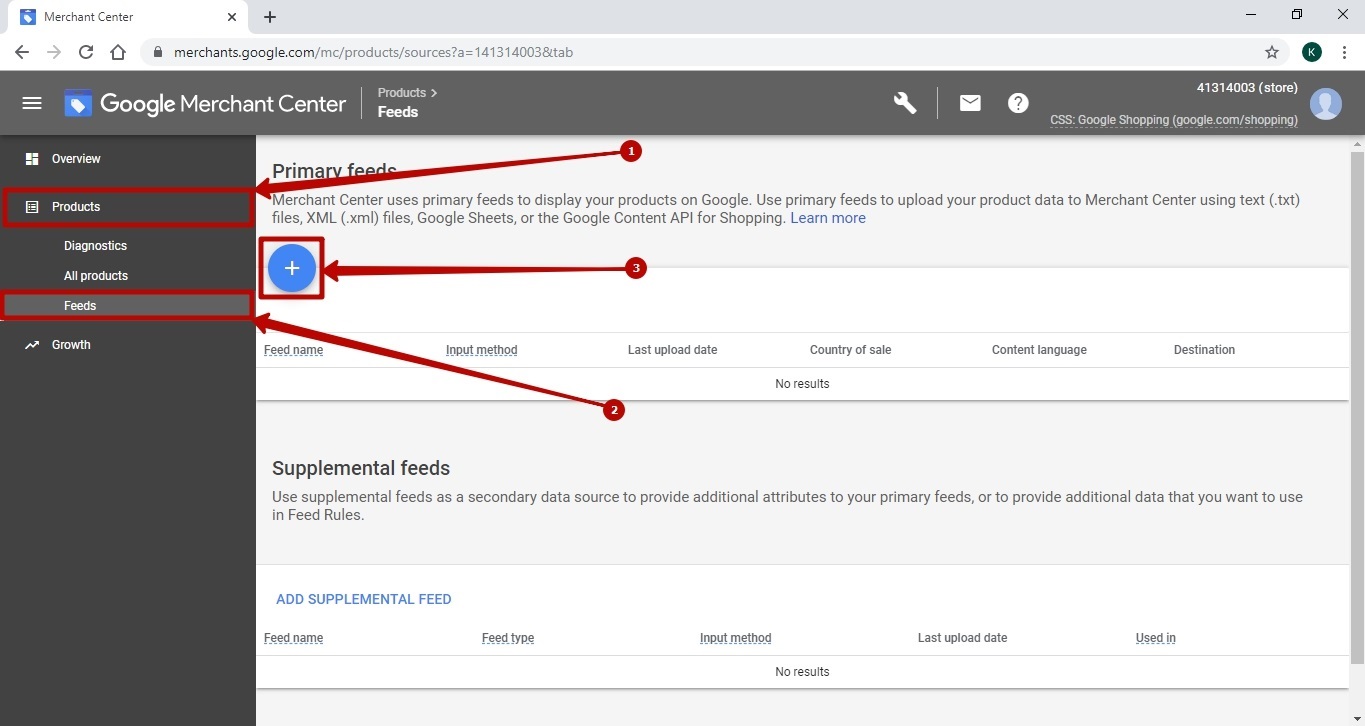
In the Google Merchant Center, select Products (1) > Feeds (2) and click the Add primary feed button (3).
http://joxi.net/eAOy1G8U90lvnm
Upload the product feed.
Copy the feed address in the browser row (1) and paste into the file upload field (2) in your Google Merchant Center account and click the Open button (3).

The products from your site are uploaded to the Google Merchant Center account.
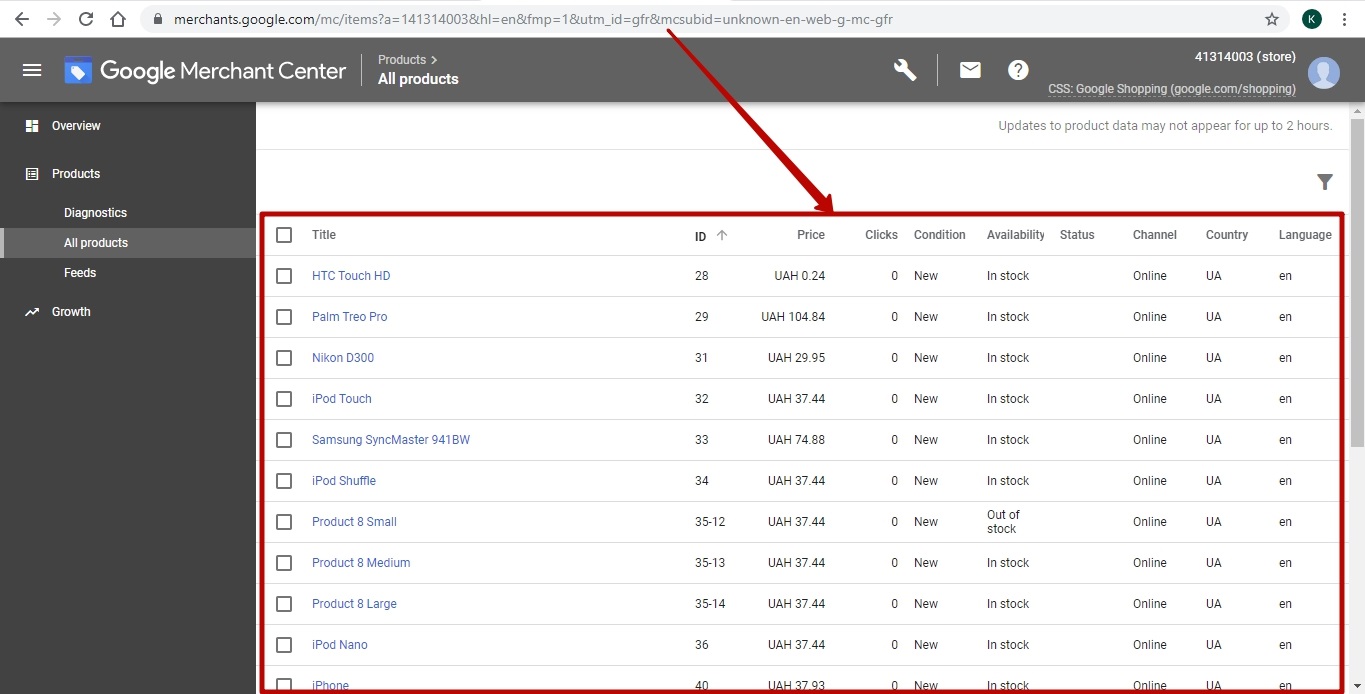
http://joxi.net/12MkjlyUlpoNKr
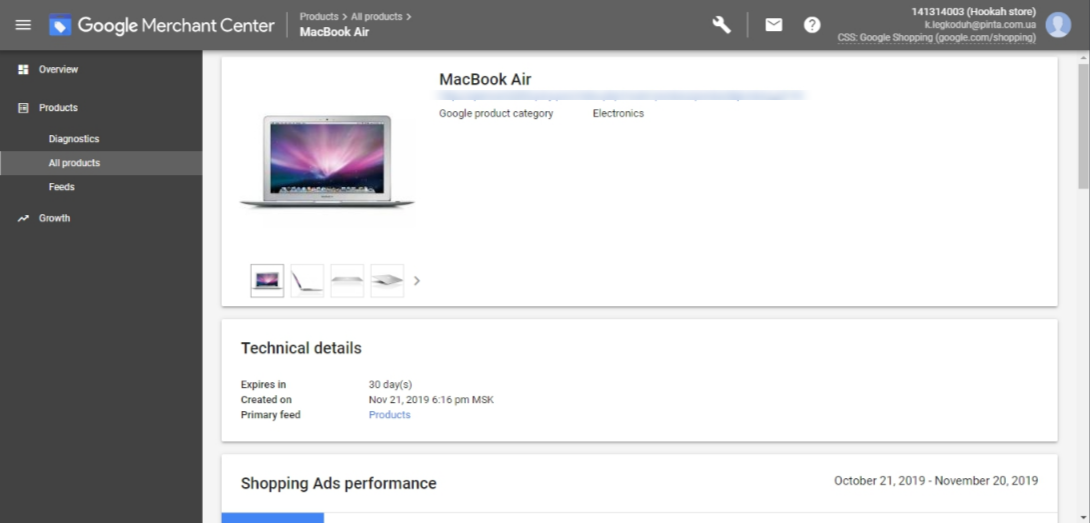
A detailed description of the products is in the product card, which can be opened by clicking on the product.
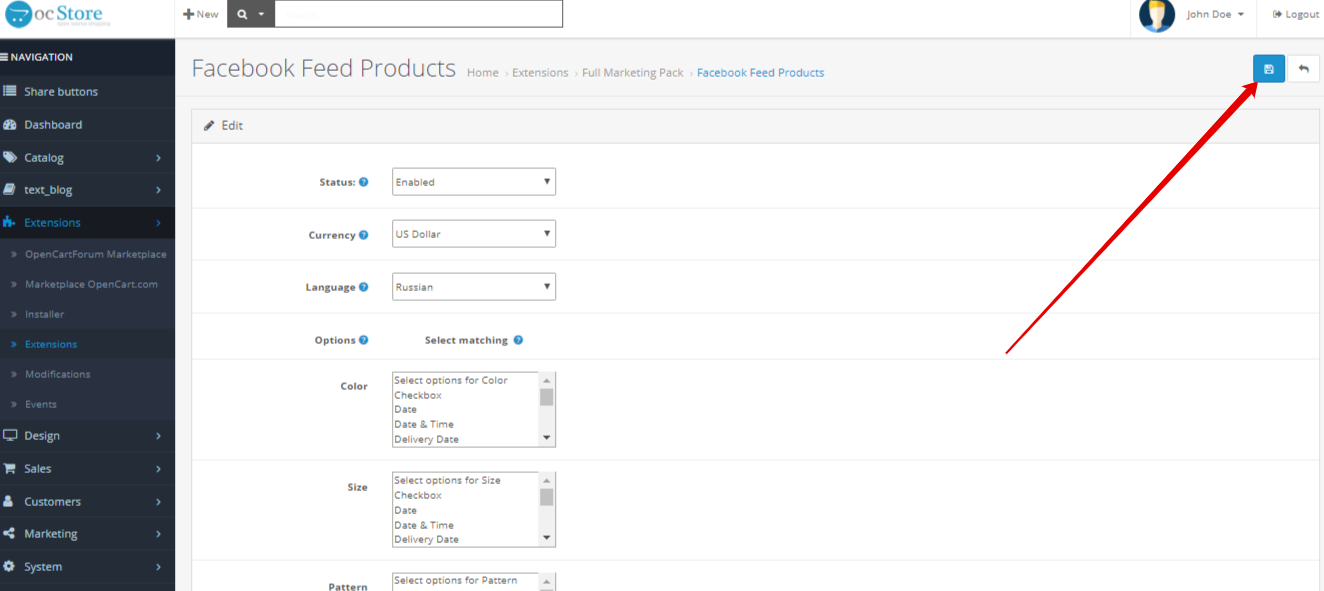
Facebook product feed plugin
On the Facebook product feed page there are fields for configuring the plugin:
Field Status (1). Activate the plug-in, by selecting the Enable option. Without this, you cannot create a data feed.
Field Currency (2). Select the currency type of your goods.
Field Language (3). Select the language to display products in the feed in accordance with the language of products on your site
Fields Color, Size, Pattern, Material (4). Choose matching options on your site with Facebook options
Field Data Google product category (5). To update the list of Google categories, enter the address where the Google categories are located and click the Update button. By default, the list of Google categories is already in the plugin.
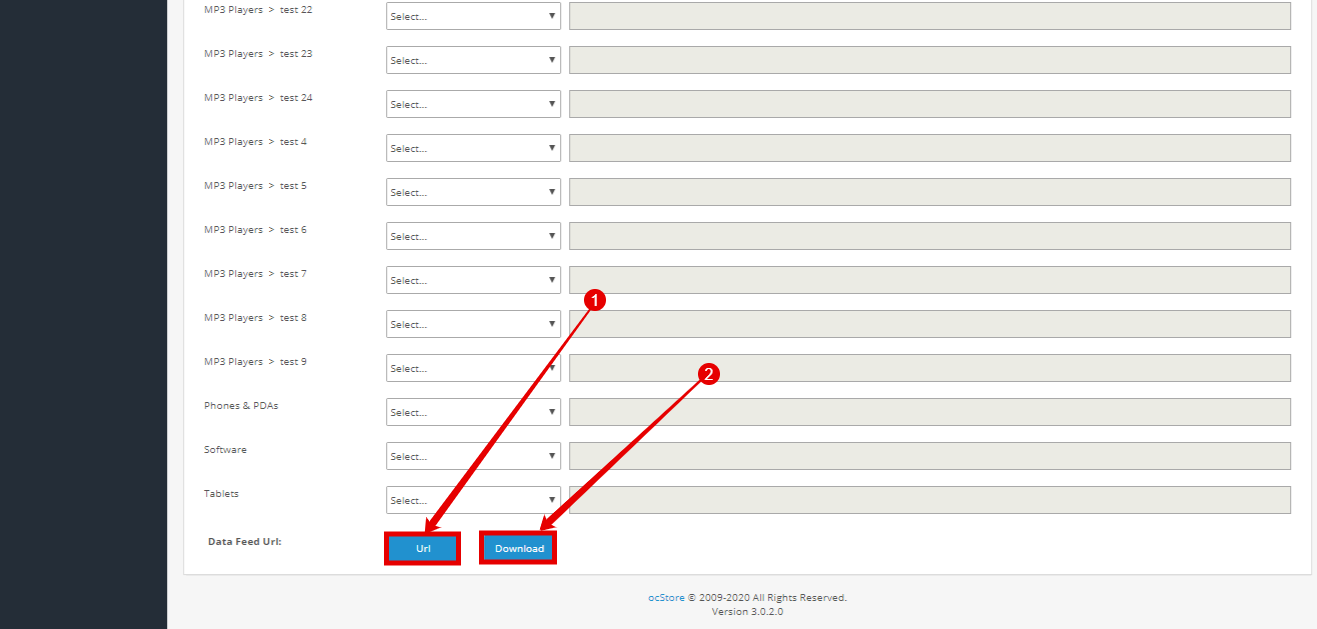
In the category table, select the match for your categories on the site in the Category column (1) of the main category in the Google main category column (2) (obligatorily).

Additionally, you can specify subcategories in the Google subcategory column, the more accurate - the better.
After filling in the previous fields, click the Save button.
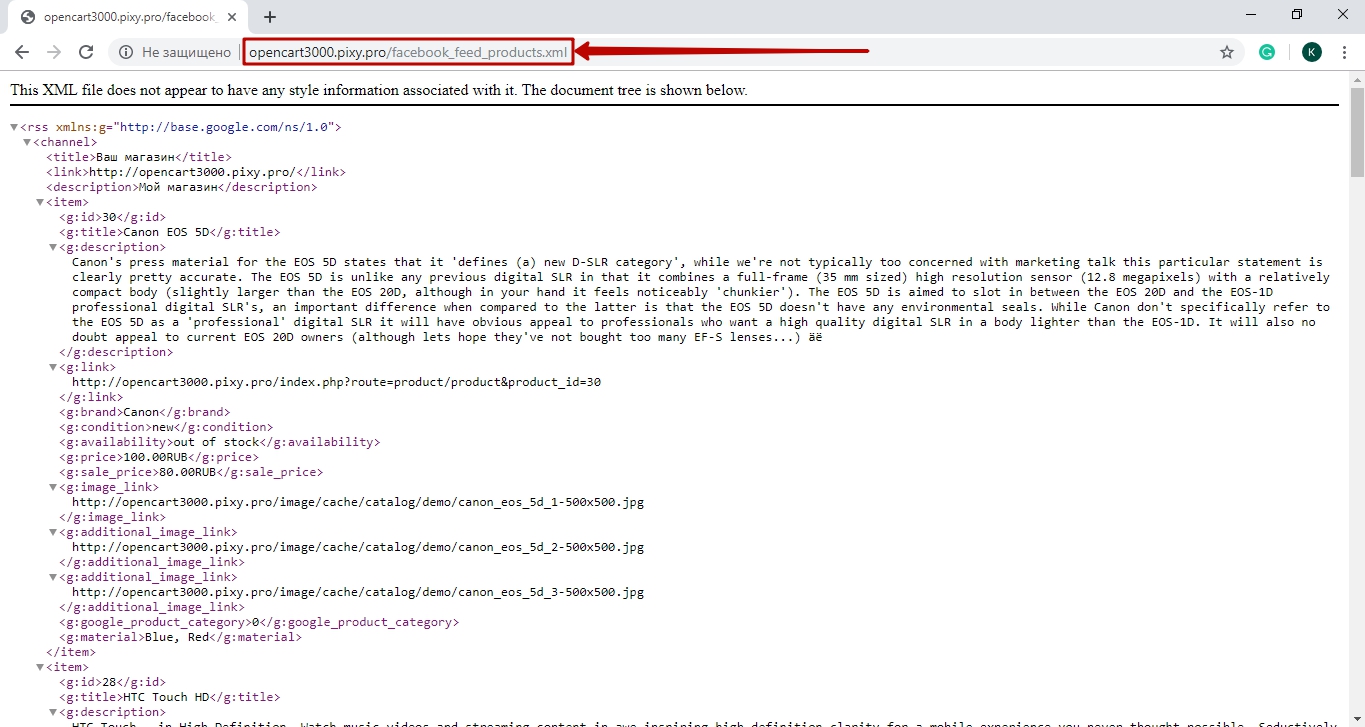
To download the feed, click the Url button (1). The data feed opens in a new window in xml format.
To save the feed to your computer, click the Download button (2).
Sign up for a Facebook account and create Catalog in your Facebook advertising account (if this hasn’t been done in advance).
Copy the feed address in the browser row and paste into the file upload field in your Facebook Сatalog.
Upload the feed to your Facebook Catalog.
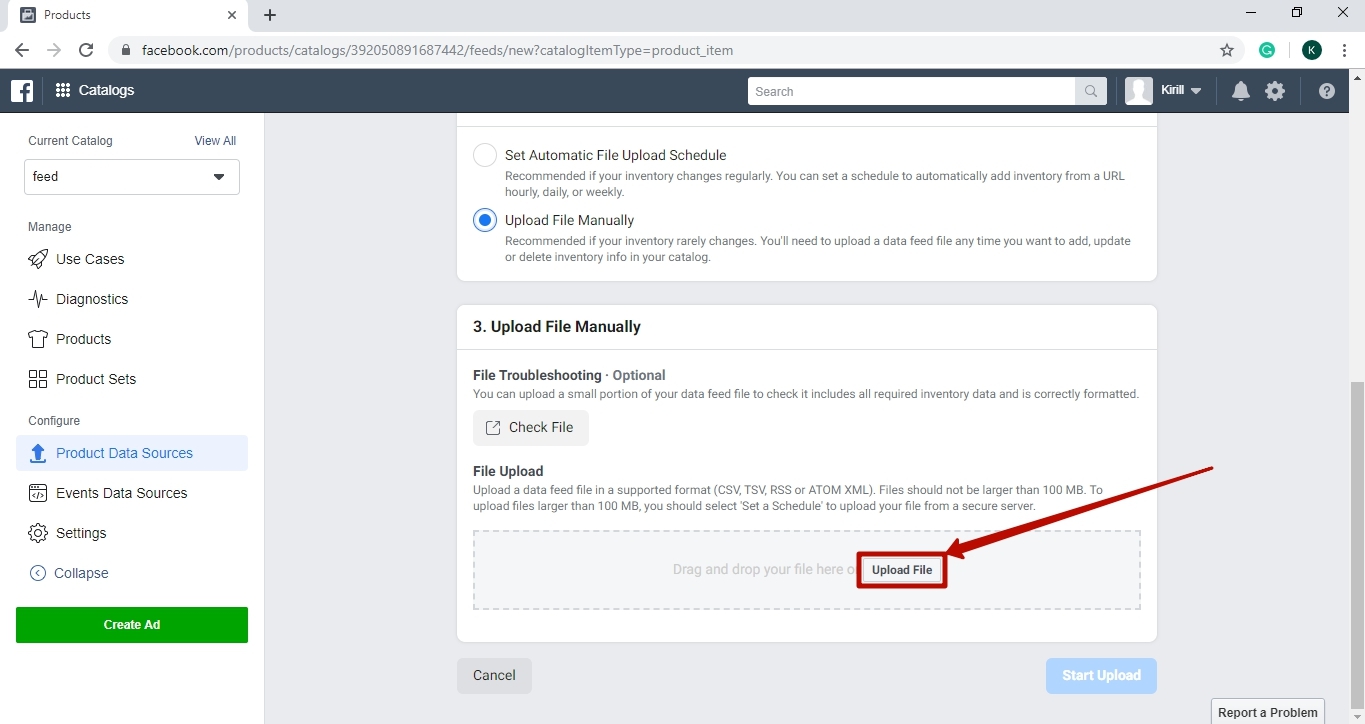
All products from your site are uploaded to the Catalog.
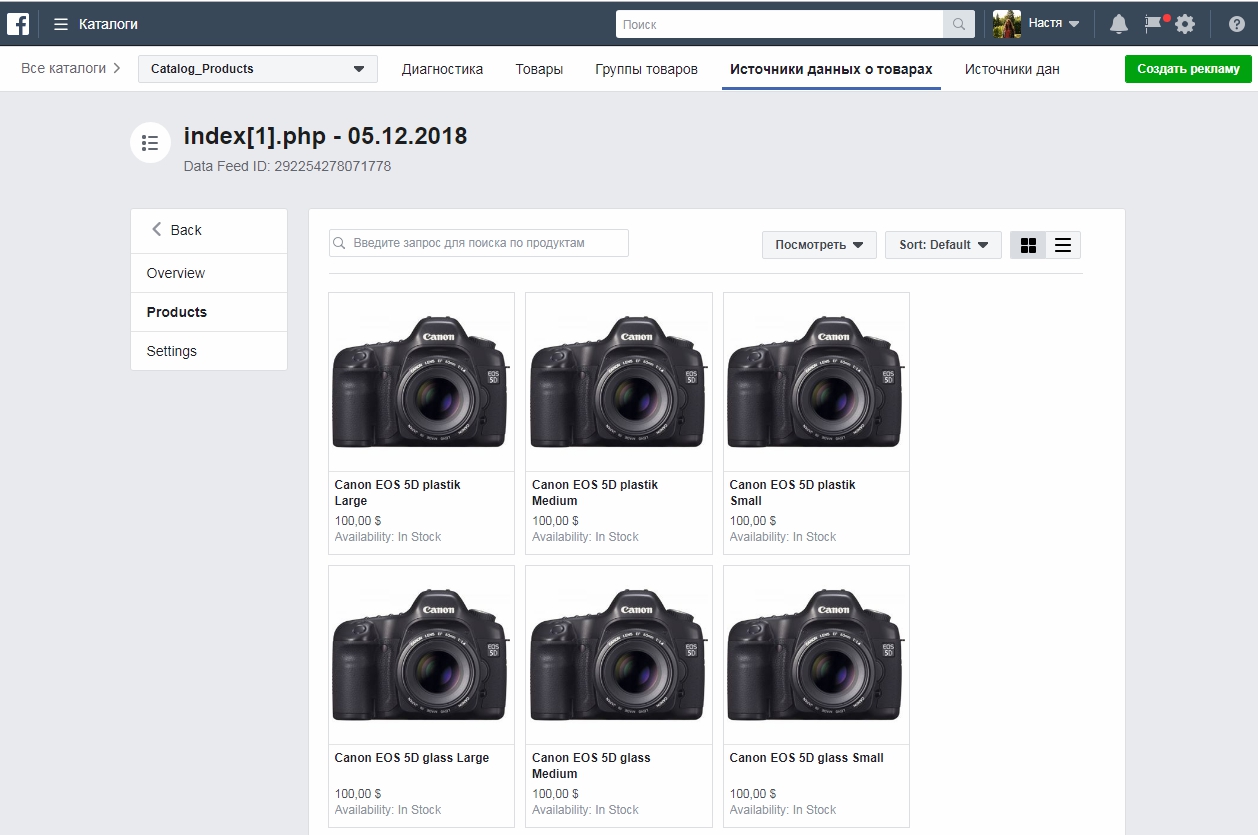
A detailed description of the product is in the Product Card, which can be opened by clicking on the product in the table.

Google Dynamic Remarketing plugin
The plugin page consists of a block changing the channel URL parameters manually (1) and the fields for setting the feed file (2).
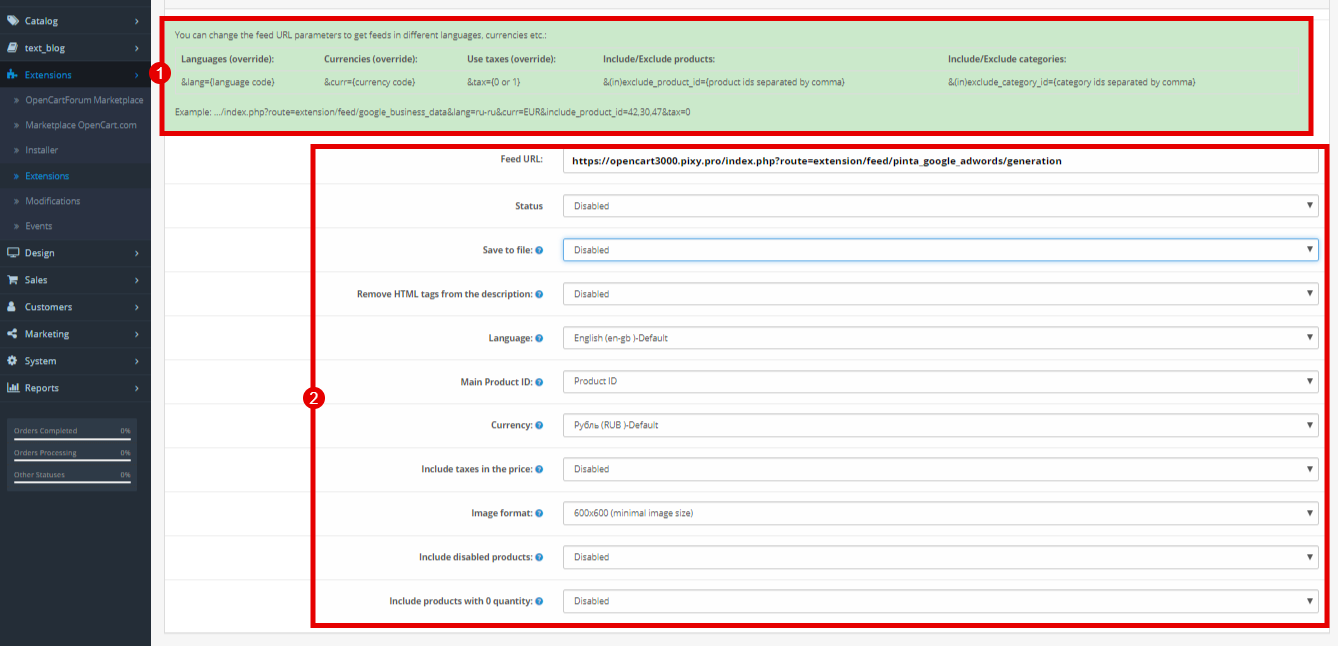
The channel URL parameter settings block manually contains instructions for creating a manual feed:
The Languages (override) block shows how to enter the language that will be used in the feed.
The Currencies (override) block shows how to enter the currency that will be displayed in the feed.
В блоке Use taxes (override) показано как включить/отключить отображение скидок в фиде.
Using the Include / Exclude products entry, you can select the products that will be displayed / not displayed in the feed.
Using the Include / Exclude categories entry, you can select the categories that will be displayed / not displayed in the feed.
The Example field shows an example of how a link to your created feed might look.
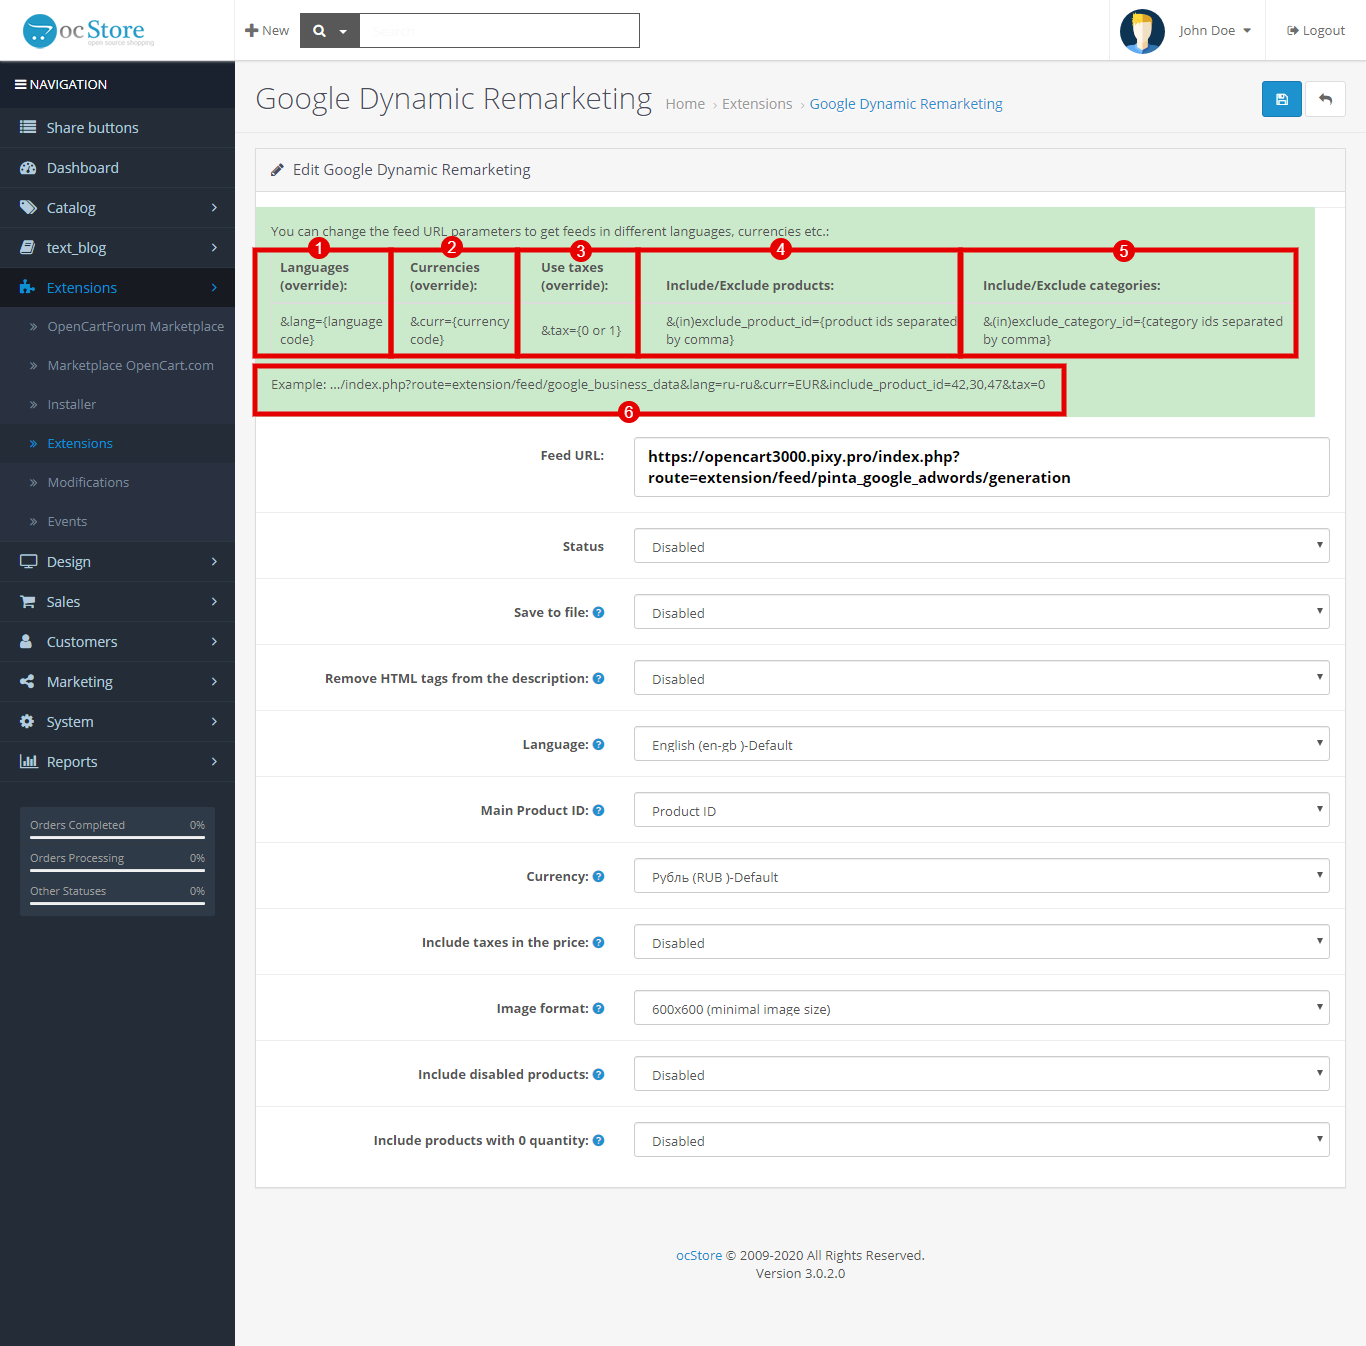
Fields for setting the feed file:
Feed URL is a link to your created feed.
Status - enable / disable feed creation.
Save to file - in this field you can enable / disable saving the feed to your computer.
Remove HTML tags from the description - this field enables / disables HTML tags in the title and description.
Language - select the language that will be used in the feed.
In the Main Product ID field, you can choose what will be displayed in the feed: product ID or product name.
Currency - select the currency that will be displayed in the feed.
In the Include taxes in the price field, you can enable / disable the display of prices taking into account the discount.
Image format - select the image size format.
In the field Include disabled products, you can choose whether products that are disabled are displayed in your feed.
In the Include products with 0 quantity field, you can choose whether or not your product will be displayed in your feed.

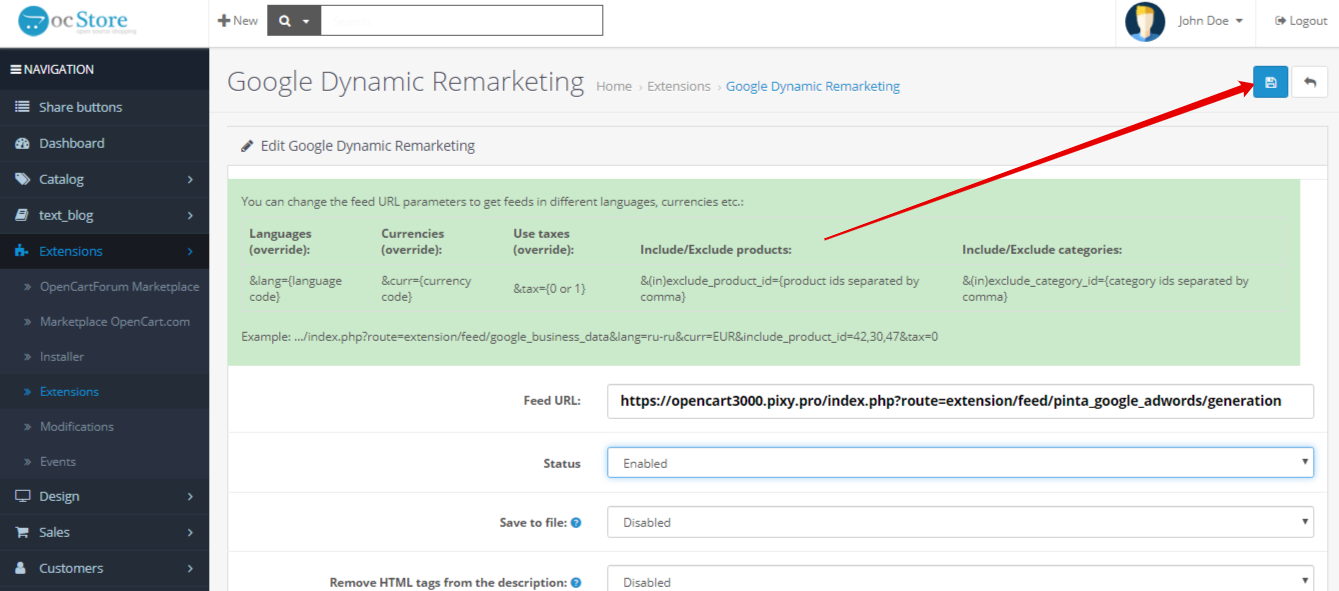
After setting up the feed, click the Save button.
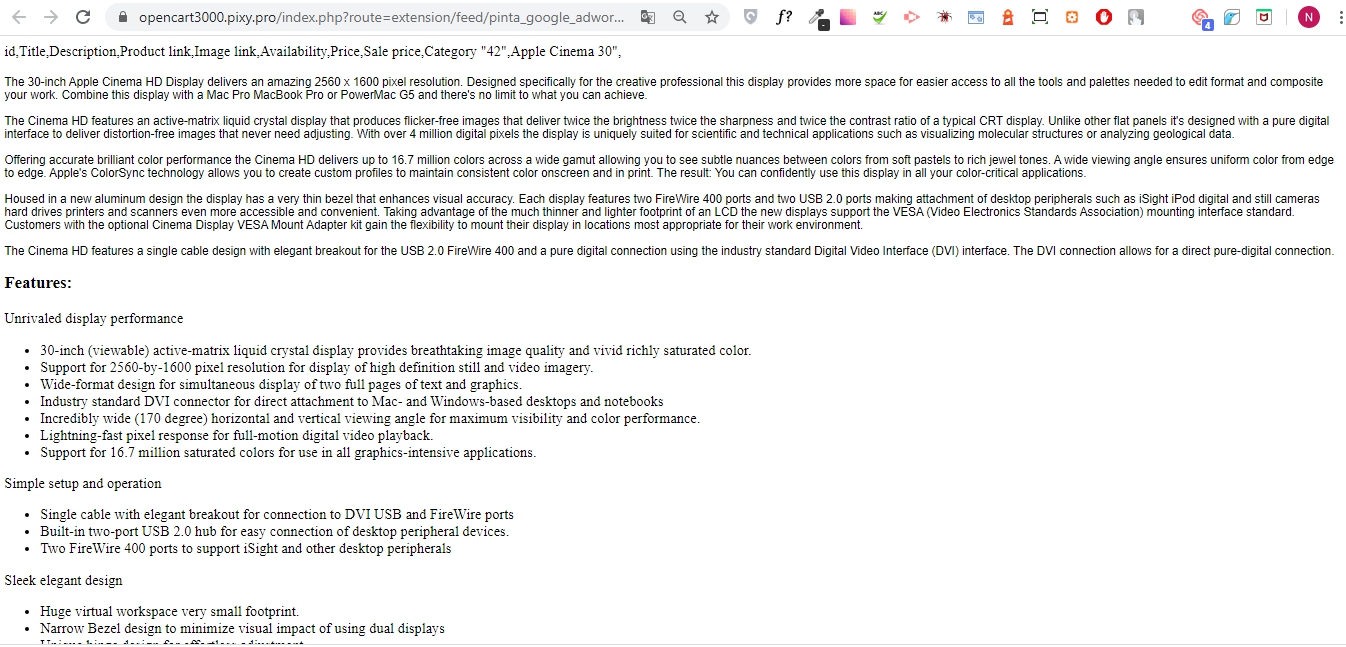
To form a feed into a file / link, click on the Feed URL field.
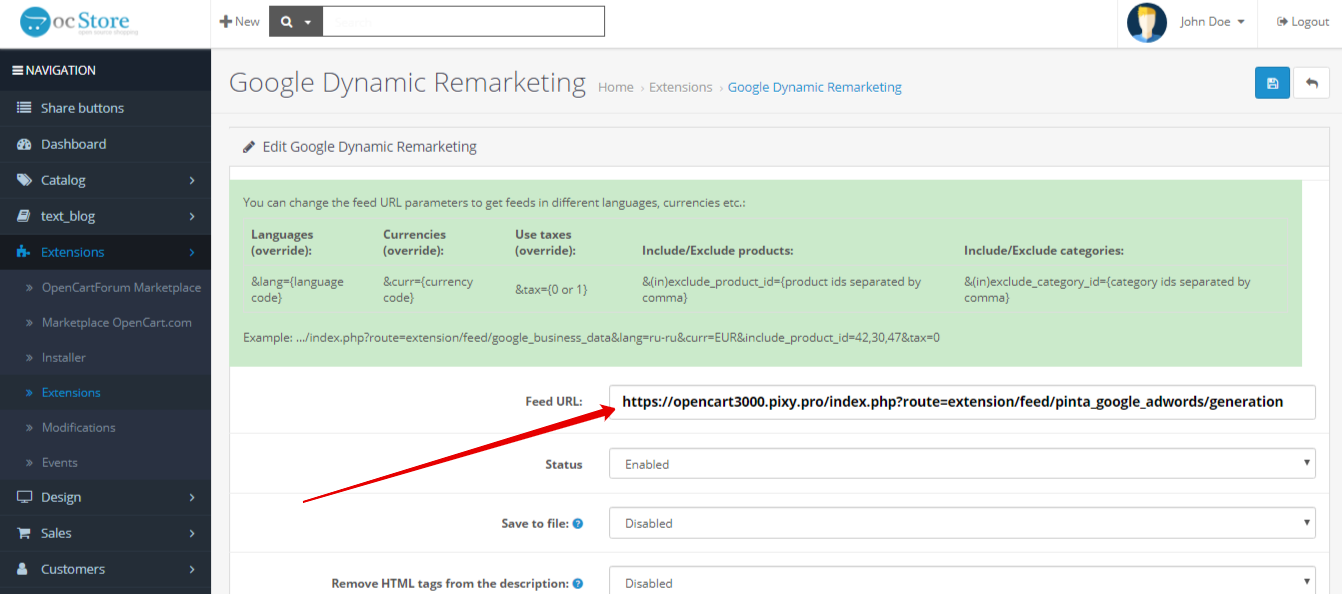
Your feed is in the form of a link / file.
Schema org plugin.
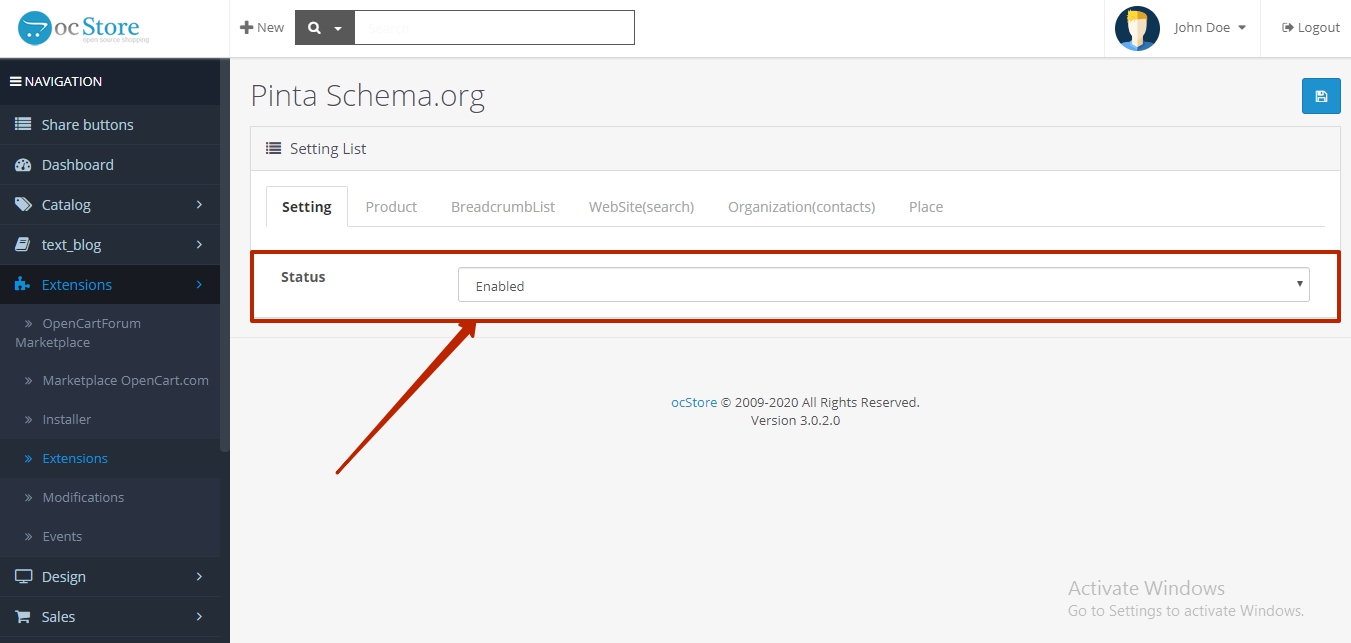
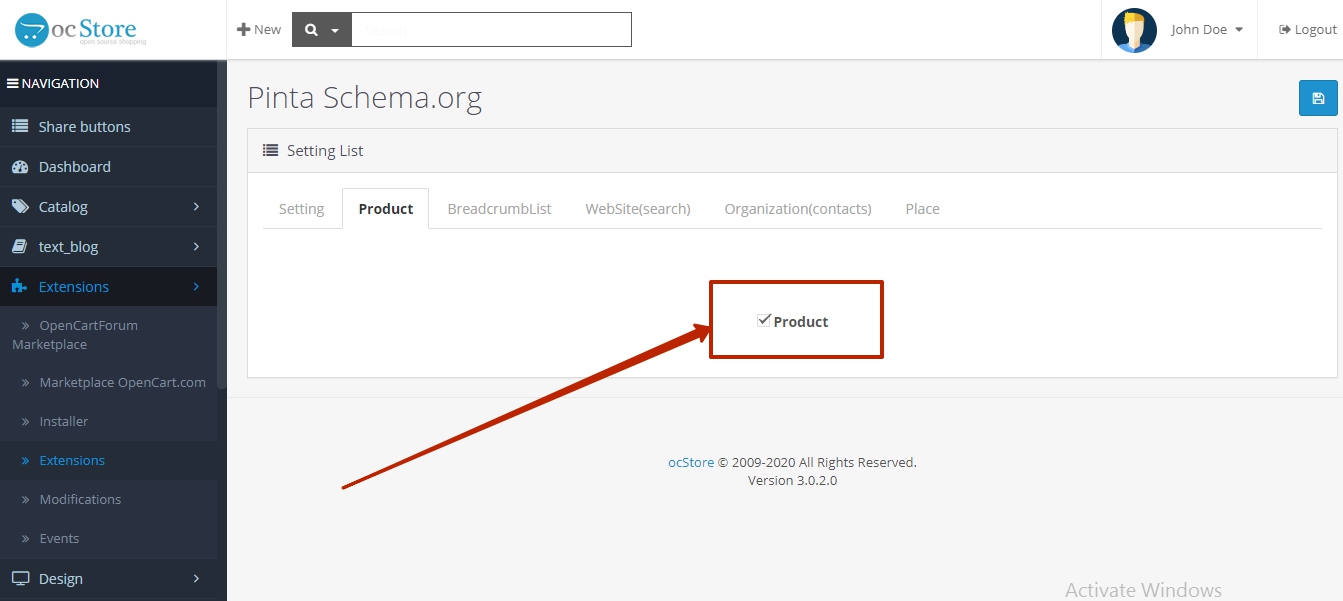
The Schema org page consists of 6 sections:
Setting. In this section you can turn the plugin on and off by checking the checkbox in the Status field.
Product. Here you can add a product.
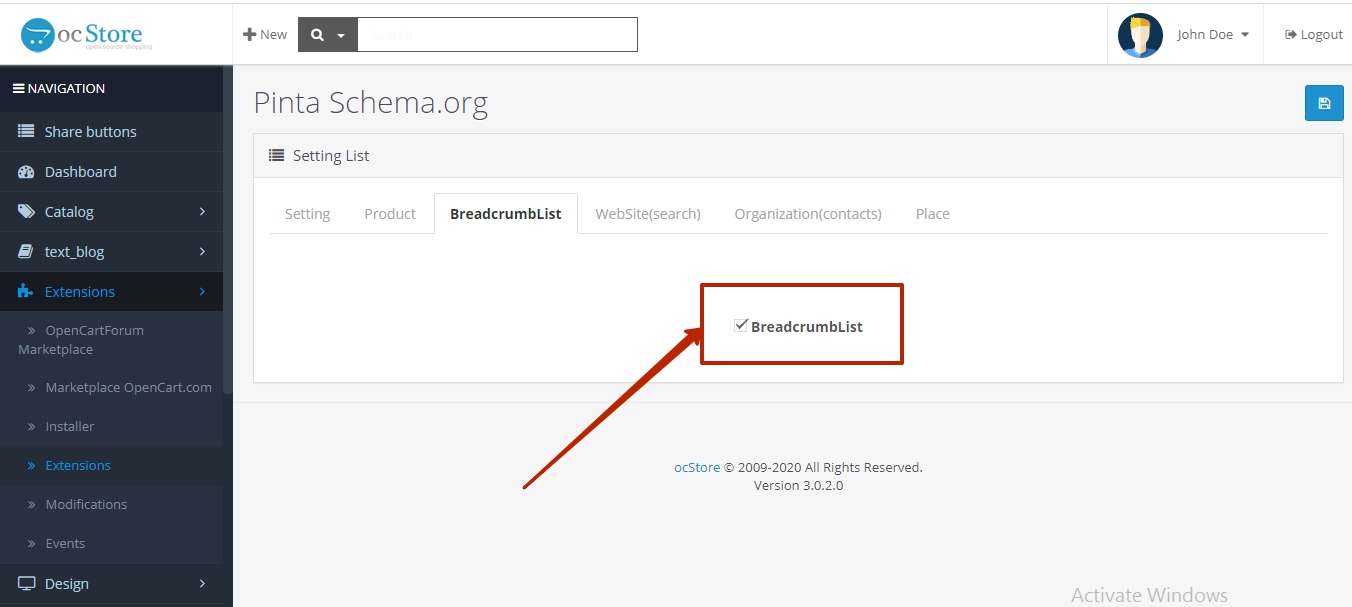
BreadcrumbList. You can add a navigation bar.
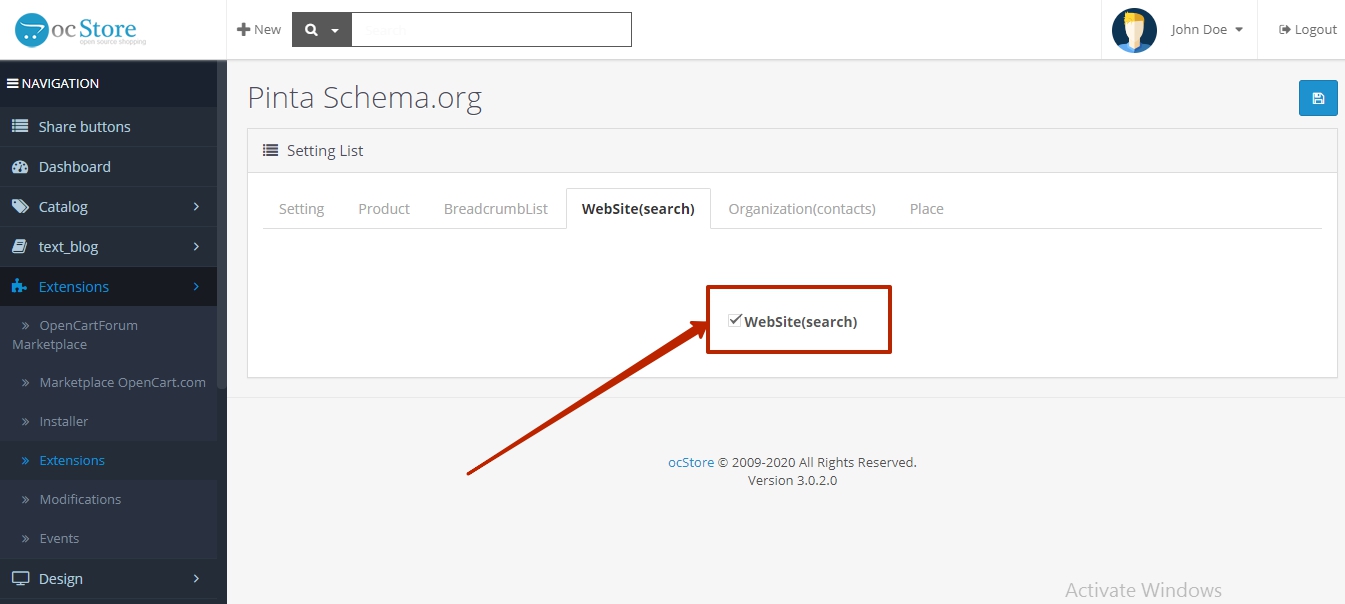
WebSite(search). This section allows you to add a search field to your site.
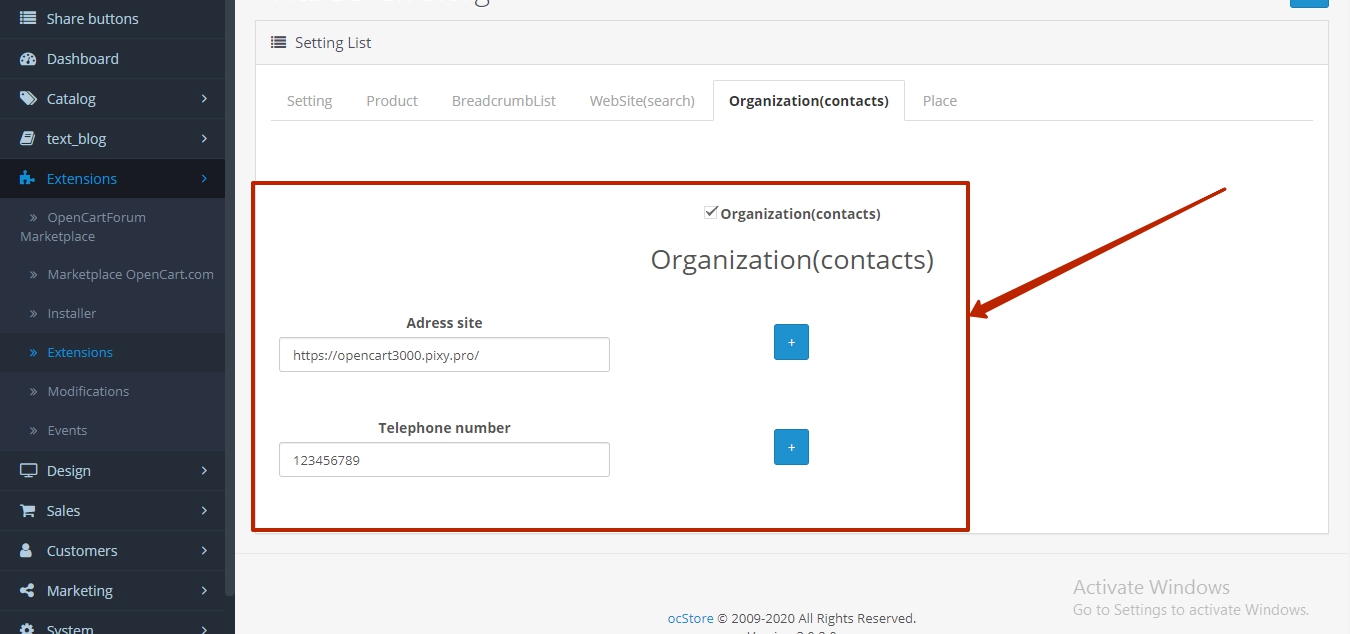
Organization(contacts). In this section you can add the address of your site and phone number to the information block of your site.
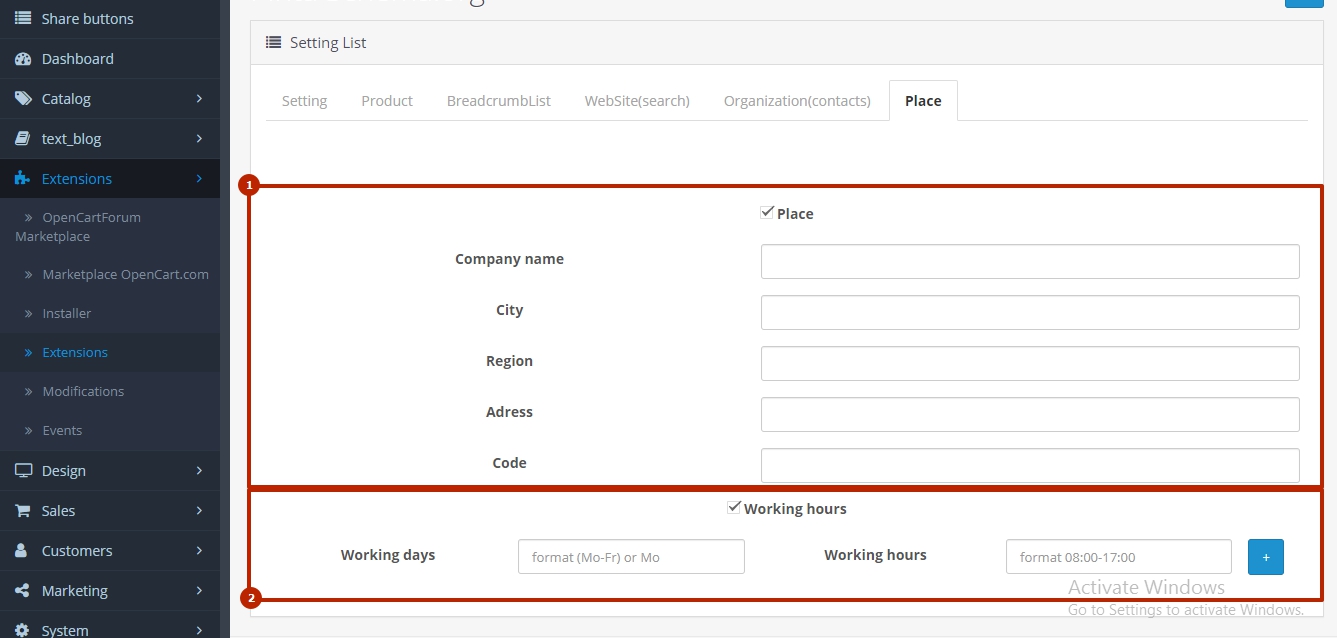
Place. Here you can add the address of your company, namely: company name, city, region, address and postal code, noting the checkbox of the Place (1) field.
You can add information about working days and hours by checking the checkbox of the Working hours (2) field.
Upon completion of the plugin configuration, click the Save button.

After installing and configuring the plugin, you can check the layout of your site using a simple Google tool - Google Rich Snippets Validator.
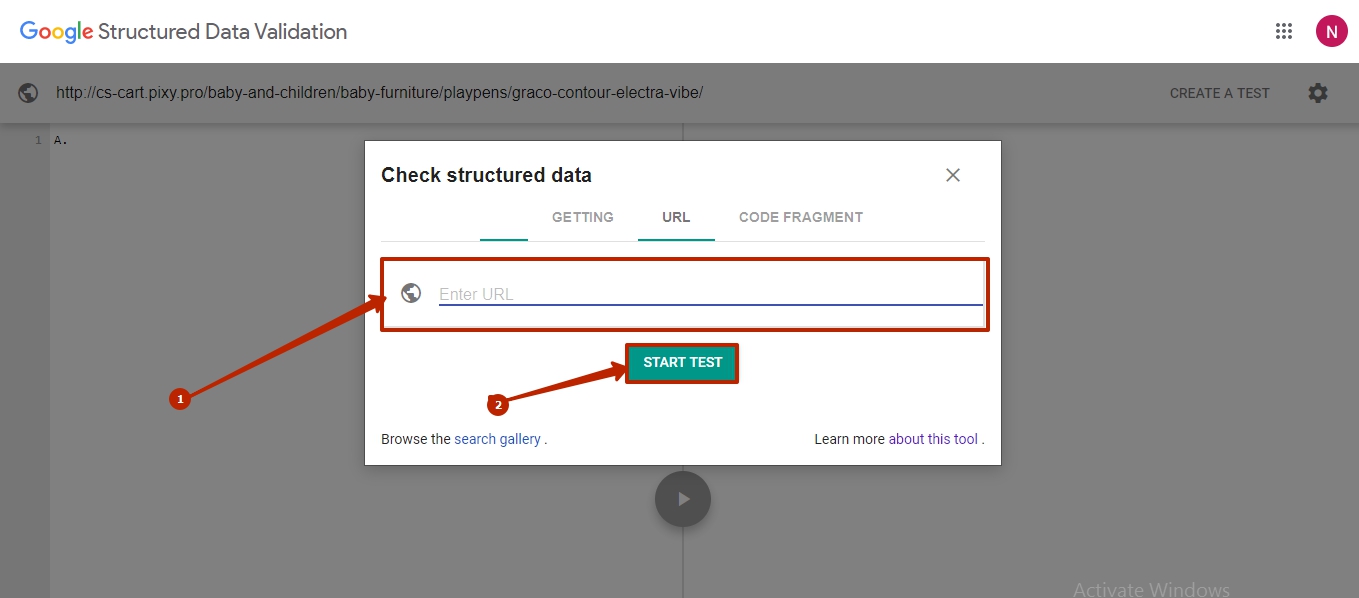
Go to the Google Rich Snippets Validator website.
Paste the link to your site in the field (1) and click the START TEST button (2).
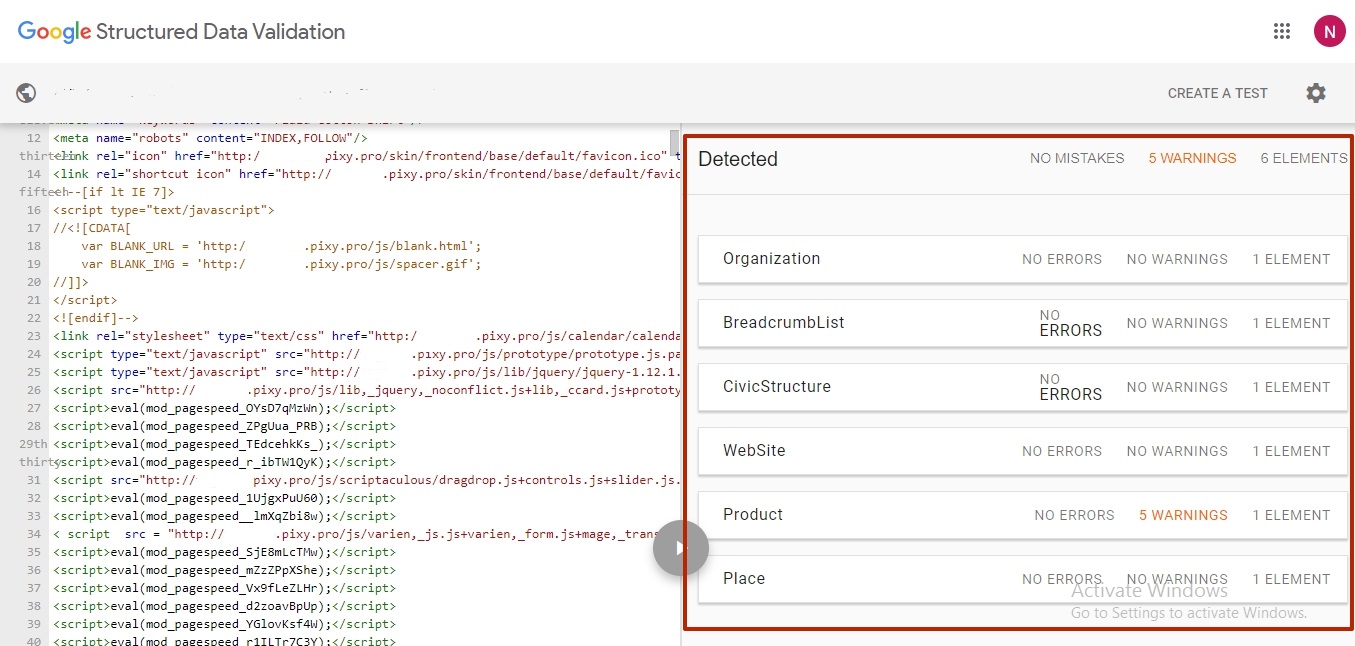
As a result of the test, you will see the structured data of your site.
OpenGraph plugin.
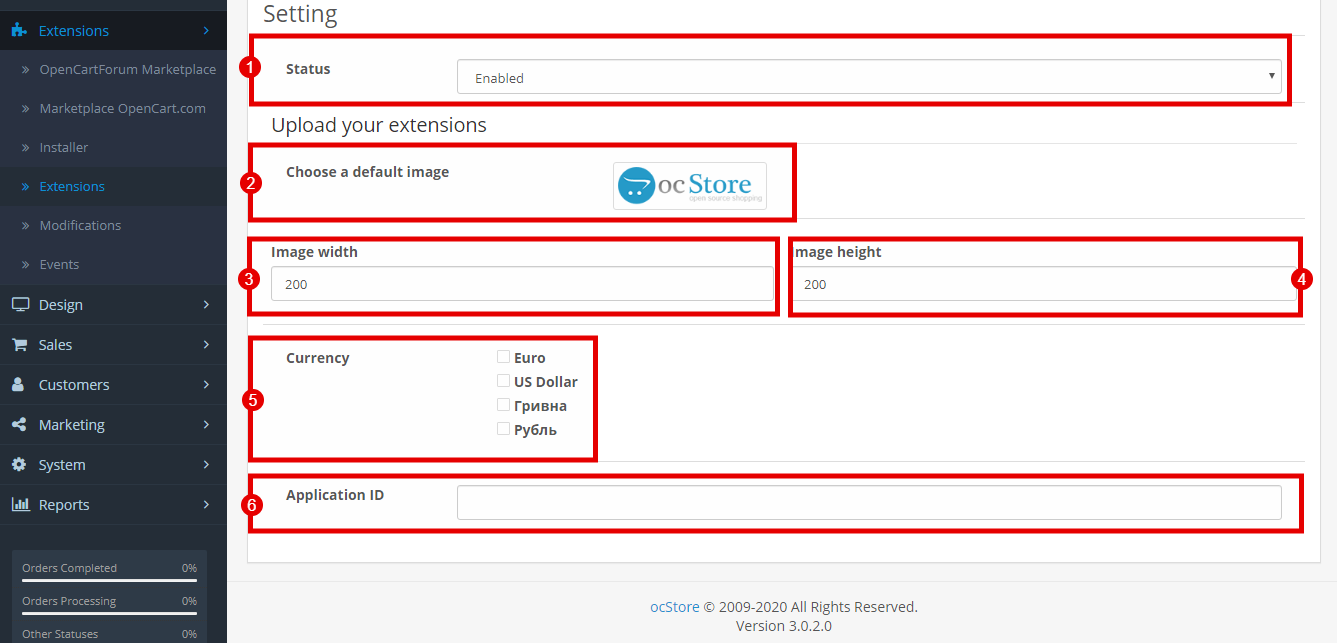
The plugin page consists of:
Status - enable (YES) / disable the plugin (NOT).
Choose a default image - a block for downloading images from your computer.
Image width - the width of the image that will be displayed in your link.
Image height - the height of the image that will be displayed in your link.
Currency - select a currency.
Application id - application id number.
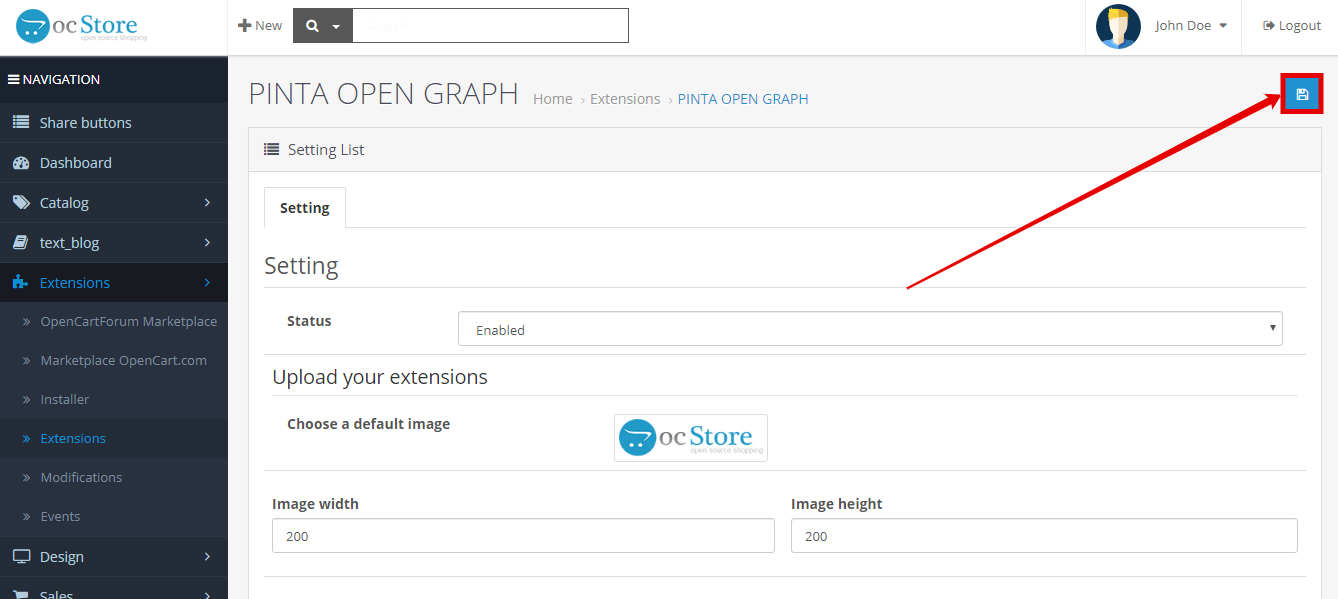
After configuring the plugin, click the Save button.
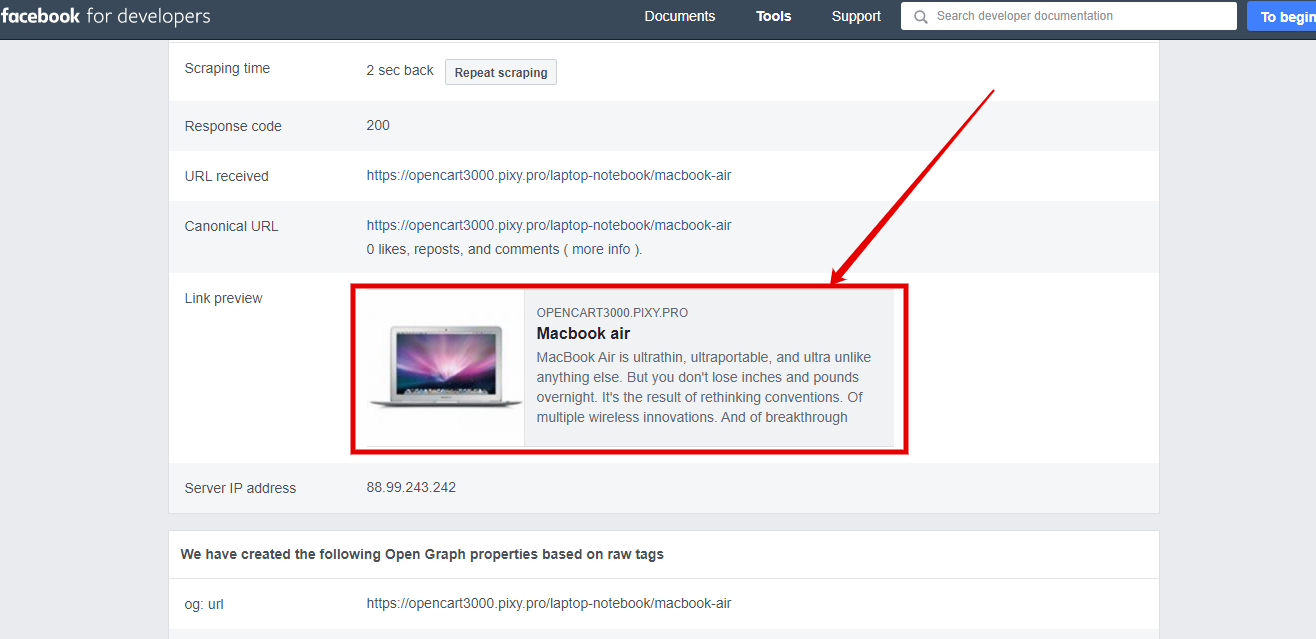
To see what your Facebook page will look like, open the Repost Debugger tab in Facebook for developers.
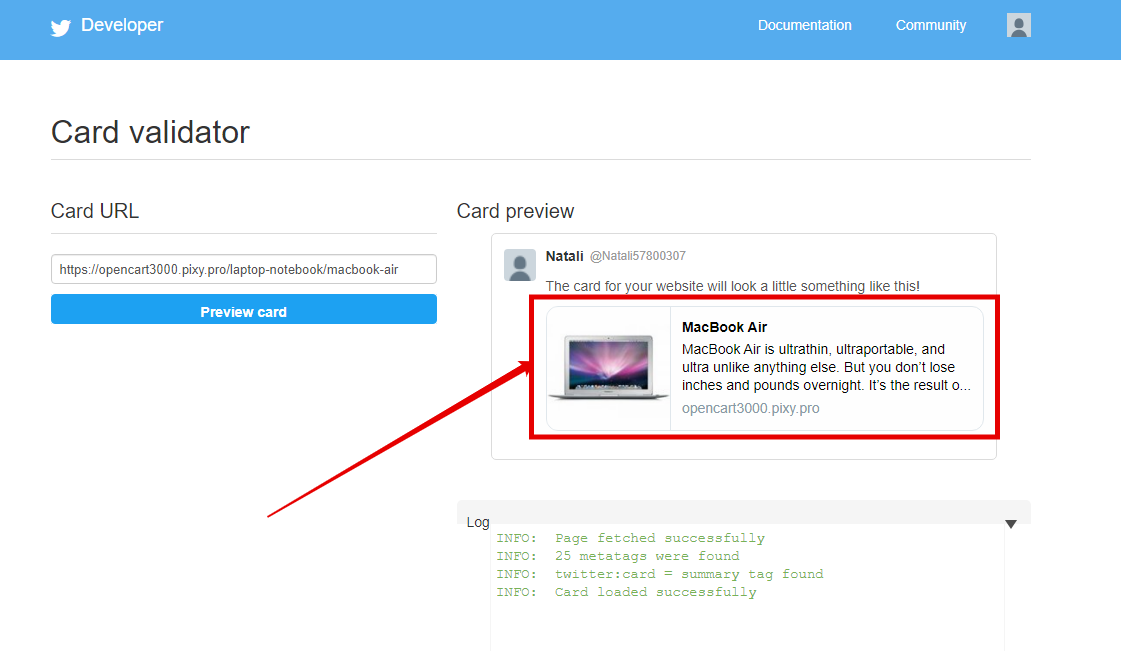
To see what your Twitter link will look like, open the Card validator tab on Twitter developer.